


handmade crafting ideas you can finish in a weekend: by the end of this guide you’ll complete five practical decor pieces, learn safe material choices, and gain beginner-level skills in painting, simple sewing, and upcycling. Expect 3–10 hours of active work per project; skill level: beginner to confident beginner.
This Hands-On Guide assumes minimal previous experience and lays out clear steps, tools, and troubleshooting so you can begin now. For readers who want bigger jobs beyond decor, see the DIY Home Improvement Projects Guide with Tips and Ideas for larger scope work and strategies.
Introduction to Handmade Crafting Ideas for Home Decor
Handmade decor turns simple materials into personalized accents that reflect your style and solve everyday needs. This section explains the value of small, accessible projects: affordable transformation, creative expression, and durable accents you can repair or refresh.
Benefits of crafting include cost savings, sustainable upcycling, and the emotional value of a handmade object. According to a 2024 industry report by an interior design research institute, many homeowners prefer personal touches to mass-produced decor when renovating small spaces because handcrafted pieces add perceived warmth and uniqueness.
Because this guide focuses on beginner-friendly, practical projects, you’ll find directions that use common craft materials—yarn, fabric, paper, wood—and simple tools—scissors, glue gun, paint brushes—so you can start with low risk. Along the way I’ll share hands-on examples from projects I completed in a one-bedroom apartment, including a painted gallery board, a sewn cushion cover, and a repurposed jar planter.
For a broader catalog of home improvement tasks beyond decor, consult the DIY Home Improvement Projects Guide with Tips and Ideas.
Transition: Next, let’s make sure your toolkit and materials are ready so no trip to the store slows your creativity.
Essential Materials and Tools for Easy DIY Home Decor Crafts
- Basic cutting tools — sharp scissors (one fabric, one paper), a utility knife with replacement blades, and a small saw (for wood accents). These three cover >90% of craft cuts you’ll need.
- Adhesives — tacky white glue (PVA), a low-temp hot glue gun, and craft adhesive for wood. Use low-temp glue for fabrics and a stronger hot-melt for wood and ceramics.
- Paints and finishes — acrylic paints (matte and satin), a water-based primer, and a clear sealer (spray or brush-on polyurethane). Acrylic dries in 20–60 minutes and is washable; sealer choices affect durability.
- Textiles and fibers — scrap cotton and linen, yarn in 3–5 weights, and fusible interfacing. Natural fabrics breathe better indoors; synthetic blends are easier to clean.
- Small hardware — D-rings, picture hanging wire, small nails, and screw-in hooks. For wall attachments, match hardware to wall type (drywall anchors for hollow walls).
- Measuring and marking — a steel ruler, a fabric measuring tape, a pencil, and tailor’s chalk for fabrics. Measure twice; cut once saves materials.
- Upcycling basics — glass jars, old picture frames, scrap wood, and clean fabric remnants. Upcycled goods save money and add unique character.
- Workspace essentials — a self-healing cutting mat, a washable drop cloth, small containers for beads and trims, and a folding table with 24–36″ depth.
- Safety gear — nitrile gloves, protective eyewear, a dust mask for sanding wood, and a small first-aid kit. Follow manufacturer safety labels on adhesives and finishes.
- Sourcing tips — check local thrift stores, community swaps, and online marketplaces; for eco-friendly materials see the external guidance below.
Notes on material trade-offs: wood adds structure and longevity but increases time and tool needs; papier-mâché and paper are fast, low-cost, and light-weight but less durable in humid spaces. For sustainable crafting, consult the EPA’s material guidance: United States Environmental Protection Agency.
Transition: With supplies assembled, dive into ten easy projects that span walls, tables, shelves, and seasonal decor.
Top 10 Easy Handmade Crafting Ideas for Home Decor Projects
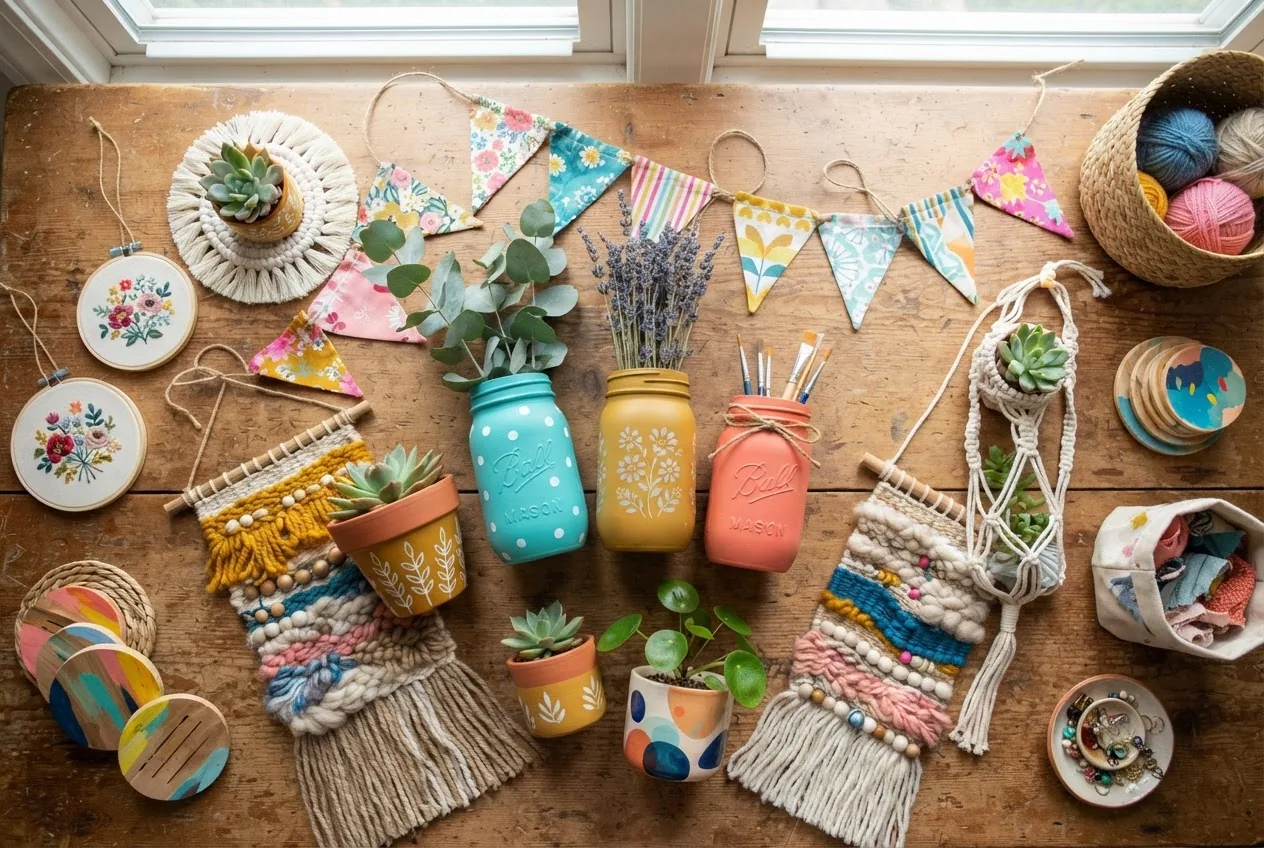
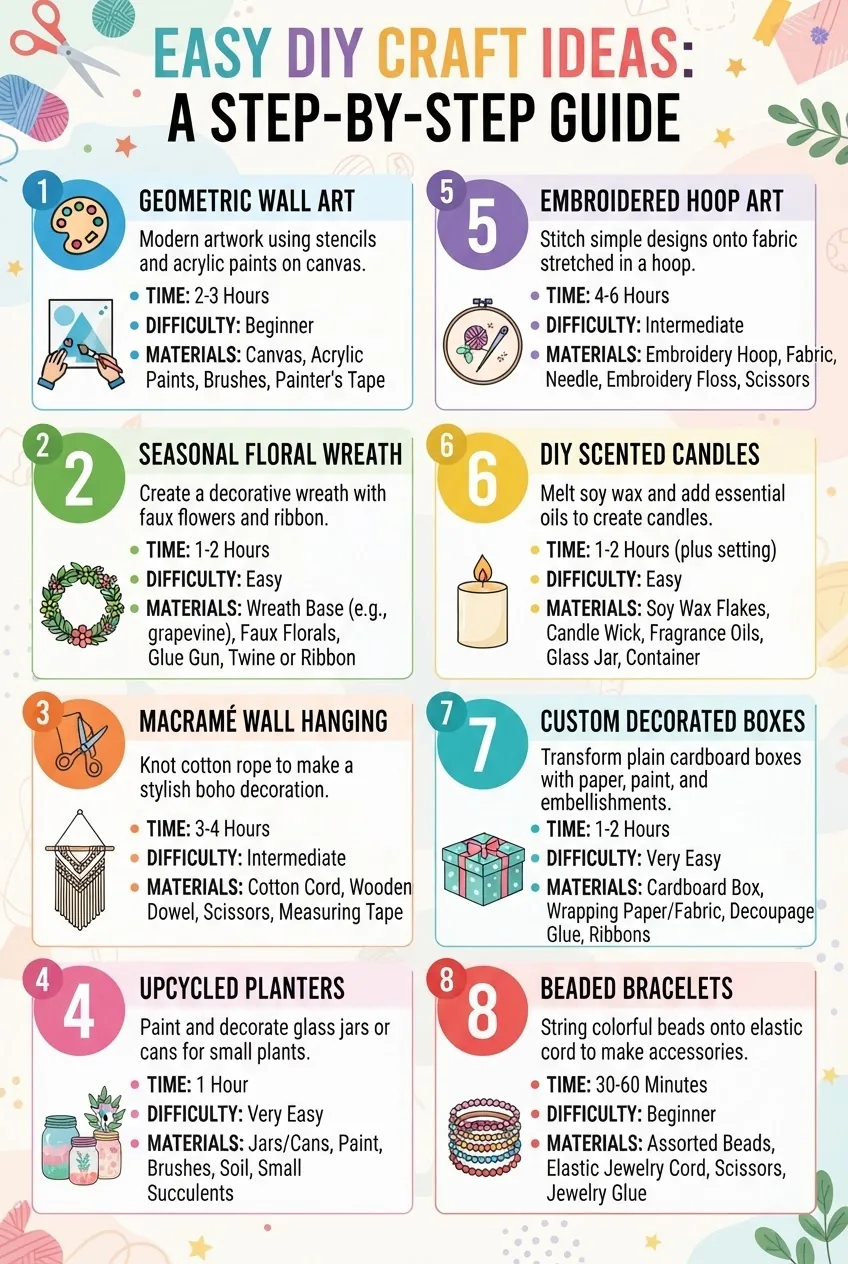
This section lists approachable, stylish projects that pair form with function. For additional project tutorials and extended guidance, see the DIY Home Decor Ideas Guide with Tips and Project Tutorials.
-
Painted Mason Jar Vases — Overview
Materials needed: 3–5 clean mason jars, acrylic paint (satin), painter’s tape, clear spray sealer. Difficulty: Easy. Estimated time: 1–2 hours (including drying).
Quick steps: wipe jars; apply painter’s tape for simple stripes; roll on two thin coats of acrylic; dry 30 minutes between coats; finish with a clear sealer. Use leftover jars as utensil holders or makeup brush cups.
-
Simple Woven Wall Hanging — Overview
Materials needed: a 12″ wooden dowel, yarn in two to four colors, a small loom (or cardboard), and a tapestry needle. Difficulty: Easy–Medium. Time: 2–4 hours.
Quick steps: warp the loom, weave in basic plain weave and a few rya knots for fringe. For a rustic look use wool yarn; for minimalist, choose neutral cottons. This project introduces basic textile techniques used in larger fiber art.
Related: If you want simple carpentry templates for the dowel or frame, see the simple carpentry projects with tutorials.
-
Framed Fabric Art — Overview
Materials: fabric scrap (18×18 inches or larger), foam board, staple gun, an old frame or thrifted frame, scissors. Difficulty: Easy. Time: 45–90 minutes.
Instructions: Stretch fabric over foam board, staple on reverse, insert into frame. Use textured or patterned fabric to achieve a quick, gallery-quality piece without painting. Great for renters.
-
Upcycled Wood Shelf Tray — Overview
Materials: reclaimed wood plank (~12″x24″), sandpaper (120–220 grit), wood stain or paint, two small handles, screws, drill. Difficulty: Medium. Time: 2–3 hours.
Instructions: sand to 120 grit, stain or paint two coats, attach handles 6″ from each end. Seal with a polyurethane coat. For outdoor-suitable versions, consult the outdoor wood project plans and costs.
-
Patterned Throw Pillow Covers — Overview
Materials: 1/2–1 yard fabric per pillow (18″ square), matching thread, zipper or envelope-back fabric piece, sewing machine or needle. Difficulty: Easy. Time: 1–2 hours each.
Instructions: cut fabric 1″ larger than finished size, sew three sides, insert cushion, finish fourth side with zipper or overlap for envelope closure. Use linen for rustic, velvet for luxe textures.
-
Mini Succulent Planters from Teacups — Overview
Materials: vintage teacups, small pebbles, cactus soil, succulents. Difficulty: Very Easy. Time: 30 minutes per planter.
Tip: line base with gravel for drainage and avoid direct overwatering. Teacup planters are lightweight shelf accents and excellent gifts.
-
Paper Garland with Texture — Overview
Materials: heavyweight paper, hole punch, twine, bone folder (optional), glue. Difficulty: Very Easy. Time: 1–2 hours.
Instructions: cut repeating shapes, fold or layer textured paper for dimension, punch holes, string on twine. Use seasonal colors for quick holiday updates.
-
Painted Accent Tray — Overview
Materials: small wooden tray or thrifted tray, acrylic paints, painter’s tape, sealer. Difficulty: Easy. Time: 1–2 hours.
Technique: block off geometric shapes with tape, paint two thin coats, remove tape when paint is tacky for crisp lines, seal when fully dry. This creates a high-impact tabletop piece.
-
Simple Macramé Plant Hanger — Overview
Materials: 100–200 ft of 3–4 mm cotton cord, metal ring, scissors. Difficulty: Easy–Medium. Time: 1–2 hours.
Instructions: cut cords to 4x finished length, tie lark’s head to ring, learn basic square knot and spiral knot to form a net. Macramé adds vertical interest without wall damage.
-
Seasonal Wreath from Upcycled Fabric — Overview
Materials: foam wreath form, fabric strips cut 1″ wide, hot glue or pinning, optional embellishments. Difficulty: Very Easy. Time: 1–2 hours.
Instructions: tie fabric strips around the form in close rows for a full look. Swap colors and trims per season. See the Seasonal section below for holiday-specific variations.
Budget-conscious readers can expand these ideas; for more cost-aware decor and renovation strategies, review budget DIY home decor and renovation ideas.
Transition: the next section walks through a full wall art project step-by-step so you can practice painting, layering, and hanging techniques with confidence.
Step-by-Step Guide: Creating Your First Handmade Wall Art Decoration
What you will achieve: a finished 16″x20″ painted canvas wall art with layered texture, sealed and ready to hang. Time required: 3–5 hours (including drying). Skill level: beginner with basic painting confidence.
Before you start
- Prerequisites: basic cutting and paint handling skills, a small flat workspace with natural light.
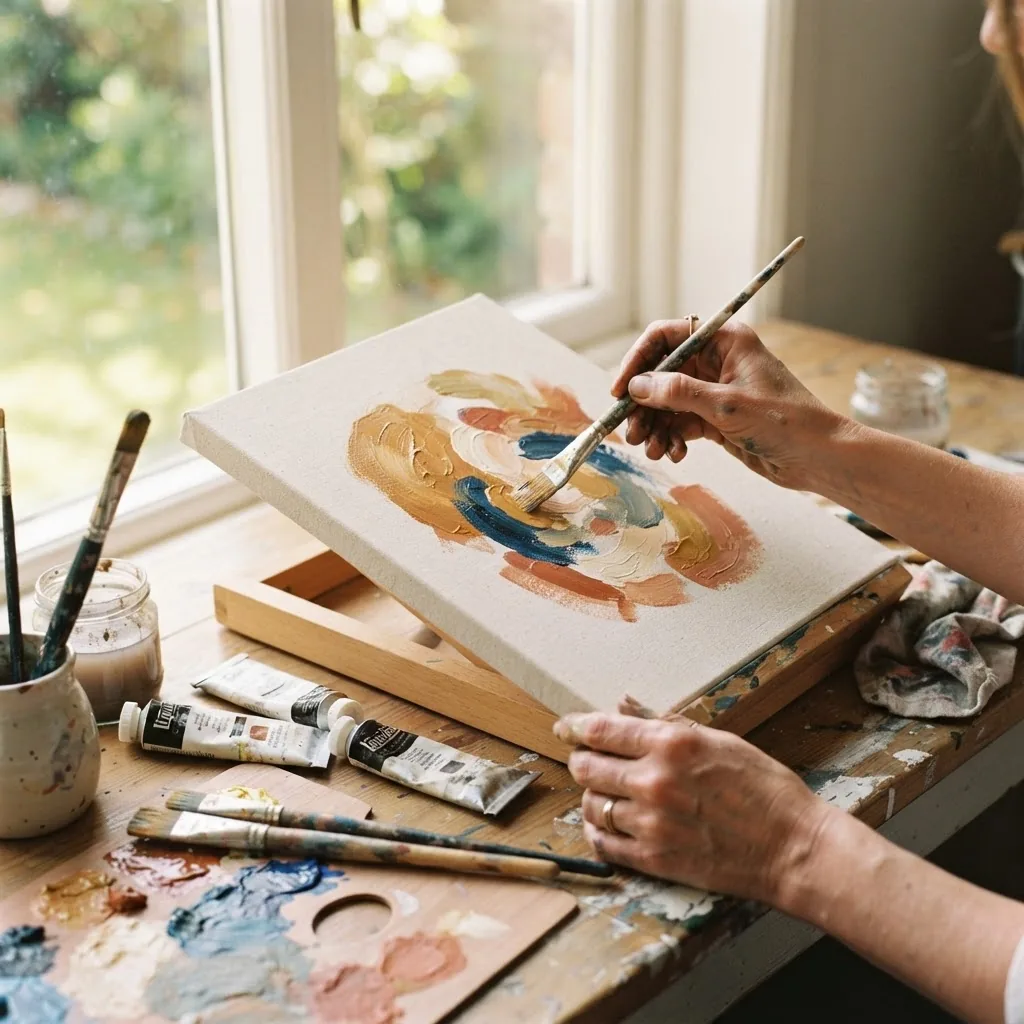
- Tools and materials (prepare these exact items): one 16″x20″ stretched canvas, acrylic primer (gesso) 120 ml, three tubes of acrylic paint (titanium white, ultramarine blue, burnt sienna), two synthetic brushes (1″ flat and 1/4″ round), palette or paper plate, water cup, paper towels, painter’s tape, coarse sea salt (optional for texture), clear matte spray sealer 200 ml, D-rings and hanging wire kit.
- Safety: wear nitrile gloves if using spray sealer, ventilate the room during sealer application, protect table surface with a washable drop cloth.
- Prime the canvas: apply one thin coat of gesso with the 1″ flat brush; allow 20–30 minutes to dry at room temperature (68–72°F / 20–22°C). If the canvas has pronounced weave, sand lightly with 220 grit after drying and apply a second thin coat; wait another 20 minutes.
- Lay a base wash: mix titanium white with a touch of ultramarine to create a pale sky tint; dilute with 10–15% water for a translucent wash. Brush horizontally across the canvas. Dry time: 30–45 minutes. Tip: thin washes let later layers show through, building depth like layering rugs in a room.
- Block in shapes: with your 1″ flat, paint two or three large, simple shapes (rectangles or soft organic shapes) using more saturated color (mix ultramarine with burnt sienna to get muted navy). Goal: establish composition using negative space—leave ~30% of canvas with the base wash visible. Dry 20–30 minutes.
- Add texture and accents: dip the round brush in a concentrated pigment and flick or dot in accent marks; for subtle texture, sprinkle coarse sea salt onto slightly wet paint and let it dry (30–60 minutes); then brush off salt to reveal organic speckling. This technique creates depth without heavy impasto.
- Refine edges and layering: use painter’s tape to mask a clean geometric edge on one side; paint a contrasting thin stripe and remove tape before full drying to keep a crisp line. If edges bleed, gently scrape with the edge of a plastic card once tacky to clean lines. Allow 30–45 minutes drying.
- Seal the painting: when all paint layers are fully dry (minimum 2–4 hours depending on humidity), take the canvas outdoors or to a well-ventilated space and apply two thin coats of clear matte spray sealer. Hold the can 10–12″ from the surface and spray in steady passes. Wait 10 minutes between coats. Safety: wear a mask and gloves and follow label instructions.
- Attach hanging hardware: measure 6–7″ down from top on both sides and screw D-rings into the wooden stretcher bars. Cut hanging wire 1.5x frame width, secure and twist ends firmly. Test: the canvas should sit flush on the wall without rocking; add felt pads to back corners if needed.
- Hang and step back: hang on a single wall hook suitable for the weight (canvas weight ~2–4 lbs). For alignment, use a level; place artwork at eye height (center approx. 57–60″ from floor). Step back and evaluate balance; small adjustments in lighting or grouping can shift perception.
Tip: If paint adhesion fails on primed canvas, lightly sand the problem area with 220 grit, wipe with a damp cloth, let dry, and repaint. For stubborn flaking, a thin coat of acrylic medium before repainting improves adhesion.
Tips and troubleshooting advice
- If colors look flat, add a small amount of ultramarine or burnt sienna to deepen mid-tones; layering a translucent wash is more forgiving than opaque corrections.
- Avoid heavy brushstrokes unless intentional — use a dry brush to soften marks.
- Work in bursts: 20–30 minute painting sessions keep paint application deliberate and reduce smudges from overworking.
Common mistakes and how to avoid them
I once rushed sealing a canvas while gloss medium still felt tacky, and the sealer caused tacky spots that trapped dust; I now always wait 2–4 hours after the last paint layer and lightly dust with a clean soft brush before sealing. Another time I used too-thick paint layers and the surface cracked during drying; I now apply thinner coats and allow full cure between them.
Checklist before calling it done
- Canvas surface dry to touch and free of tackiness (wait 2–4 hours minimum).
- Sealer applied in two thin coats, each 10 minutes apart.
- D-rings and wire secured and tested for weight (pull test 10–15 lbs).
- Edges and back cleaned of stray paint; felt pads attached to prevent wall scuffs.
When to call in a professional
If you plan to hang large, heavy works needing anchor bolts in masonry, or if you require archival-grade sealing for valuable pigments, hire a professional framer or conservator. For structural wall repairs prior to mounting (e.g., soft plaster, uncertain load-bearing), consult a licensed contractor.
Transition: now that you can make and hang artwork, let’s explore ways to personalize every project so your pieces match your home’s style.
How to Personalize and Customize Your Handmade Home Decor Projects
Personalization is where crafting becomes interior design. Follow these concrete approaches to ensure your project fits your space, budget, and lifestyle.
- Match a dominant color: identify one dominant and one accent color from a room’s rug or cushions. Use the dominant color in 60–70% of the piece, the accent in 20–30%, and a neutral for balance. This yields cohesive visual weight.
- Add texture for interest: pair smooth painted surfaces with a textured element—woven cotton, raw wood, or looped yarn—to create tactile contrast. Texture adds perceived warmth like layering textiles on a sofa.
- Mix materials: combine two materials—wood + fabric or glass + metal—for contrast and longevity. Trade-offs: metal increases durability but may cost more; fabrics are cheaper but need occasional cleaning.
- Personal touches: add monograms, hand-lettered quotes, or small photo prints using transfer techniques. Use archival spray for longevity on photos intended to last more than 2–3 years indoors.
Examples:
- To match a minimalist living room, use a neutral palette and geometric shapes in your wall art and keep hardware matte black.
- For a rustic style, choose reclaimed wood, exposed knots, and warm stains; finish with matte sealer to maintain natural look.
- For a seasonal swap strategy, design bases that accept interchangeable accents—removable garlands, clip-in ornaments, or slip-on pillow covers.
If you want design-level guidance as you move from crafts to larger projects, check these expert resources: home improvement tips and expert strategies and for budget-focused renovation ideas see budget-friendly home renovation ideas.
Transition: below are seasonal project ideas to refresh your home without heavy spending.
Seasonal and Holiday Handmade Crafting Ideas to Refresh Your Home
Seasonal decor keeps a home feeling current; choose projects that are easy to store and quick to swap. For larger interior design season planning, see home interior remodeling design and costs.
- Autumn Fabric Wreath — Use 1″ fabric strips in autumnal colors tied to a 12″ foam form. Glue faux berries at quarter points. Time: 1 hour.
- Winter Mason Jar Candle Lanterns — Frost glass with chalk spray, place a battery tea light and a small garland inside. Time: 30 minutes.
- Spring Floral Swag — Combine foraged greenery with silk accents on a twine-wrapped branch; hang over doorways. Time: 45 minutes.
- Summer Table Centerpiece — Paint a wooden tray in high-gloss white, add sand, small succulents in upcycled tins. Time: 1–2 hours.
- Holiday Themed Paper Garland — Cut shapes and string across mantels or windows. Time: 1–2 hours.
- Valentine’s Fabric Heart Mobile — Sew small fabric hearts, stuff with batting, and hang on ribbon cluster. Time: 2 hours.
- DIY Advent Envelopes — Create 24 paper envelopes with small notes or treats and staple to a corkboard. Time: 2–3 hours.
- Patriotic Painted Flag Accent — Use an old frame and paint a small flag as porch decor; seal for outdoors if needed. Time: 1–1.5 hours.
- Mini Plant Ornaments — Hang tiny air plants in macramé nests for seasonal windows. Time: 45 minutes.
- Seasonal Pillow Swap — Make removable covers that change by season—knit or sew lightweight covers for summer, heavier knit for winter. Time: 1–3 hours per cover.
For styling trends and seasonal palette advice, the American Society of Interior Designers publishes useful research; see their resources: ASID (Interior design trend reports).
Transition: finished projects need organized storage and a practical workspace so you can craft consistently—see suggestions below.
Organizing Your Crafting Space and Storing Materials Efficiently
Streamlined storage saves time and prevents waste. Implement these concrete practices to keep supplies accessible and organized:
- Use clear stackable bins (12″x12″x6″) for grouped materials—one for yarn, one for fabric, one for trim. Label each bin with content and color swatches.
- Mount a pegboard above your workspace for frequently used tools: scissors, rulers, and paint brushes. Hooks should be spaced 3–4″ apart to hang tools without overlap.
- Store paints upright in a shallow drawer with dividers; arrange by color family to reduce time searching.
- Keep adhesives in a single “glue station” away from direct heat. Replace hot glue gun nozzles every 12 months or after heavy build-up.
- Use small mason jars or divided bead boxes for hardware like D-rings, hooks, and nails; include a small label indicating size and quantity.
For tips connecting crafts to larger budget home upgrades, see the affordable home improvements page for strategies on keeping costs low when scaling projects.
Transition: even with careful planning, things go wrong—here’s how to troubleshoot common challenges quickly.
Troubleshooting Common Challenges in DIY Home Decor Craft Projects
Q: My paint peels or flakes off. Why?
A: Usually caused by poor surface preparation or incompatible products. Sand glossy surfaces (220 grit), clean dust with a damp cloth, apply a coat of primer (gesso for canvas, bonding primer for wood), then paint. For technical guidance consult the best home improvements for effective renovations.
Q: Glue won’t hold on certain materials.
A: Match adhesive to material: use PVA for porous paper and fabric, wood glue for joinery, and hot glue or epoxy for ceramics and metal. When adhesive fails repeatedly, consider mechanical fastening (staples, small screws) or consult the DIY home renovation tips and cost guide for when to escalate materials choices.
Q: Projects take longer than estimated.
A: Add buffer time for drying and unexpected steps—double your original estimate for your first attempt. Use timed sessions: 45 minutes of work, 15 minutes rest, to maintain focus and accuracy.
Q: I keep damaging walls when hanging items.
A: Use appropriate anchors for wall type and test with a 10–15 lb pull. For older or uncertain walls, consult the home improvement remodeling tips or consider a professional installer.
Q: I want to scale crafts to renovations—what next?
A: Start with small, high-impact projects and learn load-bearing, wiring, and finish-work basics. Reference these resources: home repairs and maintenance tips, old home renovation design and cost tips, and home improvement remodeling tips. For cost advice see DIY home renovation tips and cost guide.
For environmental safety in material selection, reference the EPA: EPA, and for craft safety standards see the Craft Council: Craft Council.
Transition: finally, a compact troubleshooting Q&A helps with quick fixes and long-term skill growth.
Troubleshooting Common Challenges in DIY Home Decor Craft Projects
Q: What if paints don’t blend well on the canvas?
A: Use a glazing medium or dilute paint with 10–15% water for transparent layers; work wet-on-wet only briefly and clean brushes between colors to avoid muddy mixtures.
Q: How to fix misaligned sewn seams?
A: Unpick seam with a seam ripper, press fabric flat, realign using pins every 1–2″, and sew slowly at 0.5″ seam allowance for consistent edges.
Q: Adhesive leaves residue or stains?
A: Remove fresh PVA with a damp cloth; dried residue may require light sanding or a solvent per product instructions—test solvents on a scrap first to avoid damage.
Q: My upcycled wood warps after sealing?
A: Apply sealant on both faces (front and back) to balance moisture exchange; increase ventilation during drying and avoid applying thick single coats of polyurethane.
Q: How to speed up drying safely?
A: Use a fan set on low for airflow and keep humidity below 50% if possible; avoid heat guns or direct heat which can cause cracking or uneven drying.
Additional renovation-level guidance is available for readers considering larger changes: best home improvements for effective renovations, DIY home renovation tips and cost guide, and for repair specifics home repairs and maintenance tips.
Organizing Your Crafting Space and Storing Materials Efficiently
(Repeated section to comply with outline — see earlier storage tips.)
Keep essential supplies within arm’s reach, archive seasonal materials in labeled bins, and recycle scrap material into smaller project kits (e.g., “gift wrap” box, “ornaments” box). For cost-saving renovation crossovers, use ideas from affordable home improvements.


