


What you’ll achieve: By the end you’ll have a prioritized, budget-aware renovation plan and a clear list of do-it-yourself and professional actions to update key rooms. Expect to invest 2–12 weeks for small-to-medium projects; larger remodels may take 3–6 months. Skill level: beginner to confident DIYer, with professional handoffs where noted.
- Basic tool set (hammer, drill, circular saw, level, pry bar, stud finder)
- Access to a tape measure, smartphone camera, and spreadsheet or notebook for budgeting
- Local permit knowledge and contractor contact list (if structural work is planned)
Introduction to Home Renovation Ideas
This hands-on guide blends creative home renovation ideas and practical budget strategies so you can choose projects that deliver the most visual impact per dollar. We’ll cover interior and exterior updates, cosmetic versus structural choices, sustainable options, and a repeatable planning process you can use room-by-room.
Start with small wins—paint, lighting, and hardware—to build momentum, then move into mid-range updates like cabinetry refacing or bathroom fixture replacement before committing to full structural changes. For foundational learning and sample DIY projects, consult the comprehensive DIY Home Improvement Projects Guide with Tips and Ideas.
What follows is a practical framework: assess, prioritize, estimate, execute, and review. Use local references for costs and safety: for permit rules check your jurisdiction (see external resources below), and for cost benchmarks consult industry cost indexes cited in the budgeting section.
- Assess your needs and goals. Walk each space and take photos (3–6 per room), note problem areas (water stains, outdated wiring, poor layout), and list must-haves vs nice-to-haves. Set a hard budget ceiling and an aesthetic goal (modern, traditional, minimalist).
- Measure and document. Measure rooms to nearest 1/4 inch, sketch layouts on graph paper or a digital tool, and mark electrical outlets, plumbing locations, and load-bearing walls. These measurements avoid costly onsite surprises.
- Prioritize projects by impact. Rank projects by return-on-investment, daily use improvement, and disruption level. Kitchens and baths typically yield high impact; cosmetic living room updates can often wait.
- Estimate costs with tiers. Create low/medium/high cost estimates for each project—include materials, labor, permits, and 10–20% contingency. Use the budgeting table below for reference ranges and consult a 2024 cost index for local calibration.
- Create a timeline & sequence. Sequence work to minimize rework: demo → structural → rough trades (plumbing/electrical) → insulation/drywall → finishes → trim and hardware. For single-room projects allow a 10–21 day window for medium updates, longer for multi-room plans.
- Decide DIY vs hire. For tasks under 2 days and non-structural—painting, tiling, fixtures—DIY saves 30–60% of labor costs. For structural, electrical, gas, or load-bearing changes, hire licensed pros and get permits.
- Buy materials smart. Buy sample-size paint and test colors in daylight, compare engineered wood vs laminate samples, and buy major items (appliances, cabinets) after final measurements to avoid returns.
- Execute in controlled phases. Run one trade at a time where possible; keep a job folder with receipts, change orders, warranties, and communication logs.
- Inspect and document completion. Do a final walk-through, photograph the finished work, and keep warranties and manuals in one accessible folder.
Transitioning now from planning into concrete, room-level inspiration and budget breakdowns—use the numbered ideas below to choose projects that fit your timeline and money plan.
Popular Home Renovation Ideas by Area
Below are practical, high-impact home makeover ideas organized by room. Each item includes a short description, typical complexity, and a note on cost tier (low = <$2k, medium = $2k–$15k, high = $15k+). Use these as inspiration to map to your budget and timeline.
- Kitchen — Cabinet refresh and lighting: Repaint or reface cabinets, swap hardware, add under-cabinet LED strips and replace dated lighting. Complexity: low–medium. Cost tier: low–medium.
- Bathroom — Replace fixtures and tile accents: Install a new vanity top, swap a showerhead and faucet, regrout tile and consider a feature wall with 12×24 tile. Complexity: medium. Cost tier: medium.
- Living room — Open-up and flow improvements: Remove a non-structural wall, add wider doorway or arch, upgrade lighting and add a focal wall. Complexity: medium–high (verify structure). Cost tier: medium–high.
- Bedroom — Closet systems and lighting: Install a modular closet organizer, add layered lighting (overhead + wall sconces) and new trim. Complexity: low. Cost tier: low.
- Entryway — Curb-to-core refresh: New door, updated hardware, paint, and a durable flooring runner. First impressions increase perceived value. Complexity: low–medium. Cost tier: low–medium.
- Basement — Waterproofing and simple finishes: Seal minor leaks, add insulation and vinyl plank flooring, convert to a guest or media room. Complexity: medium. Cost tier: medium.
- Exterior — Siding, trim, and porch update: Paint or replace trim, add porch lighting, and update railings. Complexity: medium. Cost tier: medium–high.
-
Backyard — Deck or patio refresh: Power-wash, stain deck, add pavers for a low-cost patio, or build a small composite deck. Complexity: medium. Cost tier: low–high depending on materials.
outdoor wood projects guide with plans and material costs -
Older homes — Historic-sensitive updates: Preserve original details while upgrading systems. Use period-appropriate hardware and minimally invasive rewiring. Complexity: high. Cost tier: medium–high.
old home renovation guide with cost and design tips - Energy upgrades — Windows and insulation: Replace single-pane windows with double-glazed units, add attic insulation (R-38+ where climate appropriate). Complexity: medium. Cost tier: medium; energy savings over 5–10 years.
- Small-space hacks — Built-ins and multifunction furniture: Add window seats with storage, floating shelves, and fold-away desks to maximize function. Complexity: low–medium. Cost tier: low.
- Flooring — Engineered wood or luxury vinyl plank (LVP): LVP provides water resistance for kitchens and basements; engineered wood for living spaces. Complexity: medium. Cost tier: low–medium.
Next we’ll translate these ideas into a practical budget plan and compare common cost ranges so you can pick projects that match your financial constraints.
Budget Considerations and Cost-Saving Strategies
Budgeting a remodel is part forecasting, part risk management. Create three cost tiers per project (low/medium/high)—these reflect material choices, labor intensity, and scope. Always add a contingency of 10–20% for unknowns like hidden water damage or code-triggering issues. According to a 2024 industry report by HomeAdvisor, typical mid-range kitchen remodels in the U.S. vary widely by region; use national indexes to adjust your local numbers. HomeAdvisor provides regional averages you can cross-check.
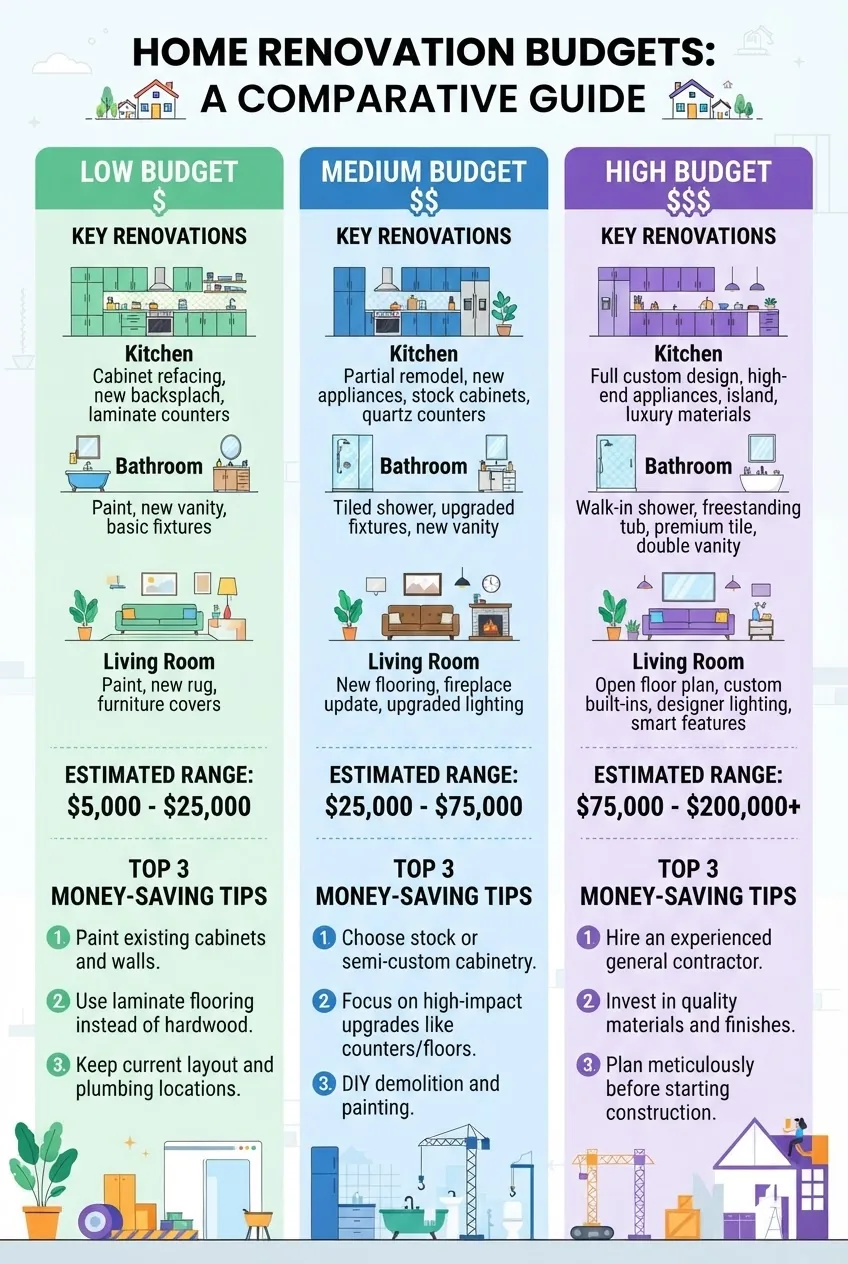
| Project | Low budget | Medium budget | High budget |
|---|---|---|---|
| Kitchen (partial) | $1,500–$6,000 — paint, hardware, lighting | $6,000–$25,000 — refacing, new counters | $25,000+ — full gut, new layout |
| Bathroom (update) | $800–$3,500 — fixtures, paint, tile accents | $3,500–$15,000 — new vanity, shower rework | $15,000+ — full bath reconfiguration |
| Flooring | $2–$6 per sq ft — LVP, vinyl | $6–$12 per sq ft — engineered hardwood | $12+ per sq ft — solid hardwood, stone |
| Exterior (siding/doors) | $1,000–$5,000 — paint, door swap | $5,000–$20,000 — partial siding, windows | $20,000+ — full replacement |
Cost-saving strategies I rely on: buy overruns and closeout materials for tiles and fixtures, time purchases around sales (holiday appliance rebates), and separate cosmetic work (paint, trim) from system upgrades (HVAC, plumbing). For DIYers, labor is the main savings: doing demolition, painting, and cabinet installation yourself can cut project costs by 30–60% compared to hiring full-service contractors.
For detailed savings tactics and deeper cost breakdowns, see the affordable home improvements guide with cost and tips and the DIY home renovation guide covering costs and project tips.
Caveat: region, labor availability, and supply chain volatility can move these ranges +/-30%. According to a 2024 industry report by the American Institute of Architects, material lead times and regional labor shortages remain a primary cost driver. AIA provides research on scheduling and market conditions to help local buyers plan.
Design Insights for Effective Home Renovations
Design choices determine how far your budget will stretch. Effective remodeling combines function, proportion, and consistent finishes. Below are practical design principles and trade-offs to weigh when planning renovations.
- Start with function. Prioritize layout issues that impede daily life—repositioning a sink or adding an island can change how you use a space more than high-end finishes.
- Choose a coherent palette. Limit primary finishes to three materials across a home (e.g., painted wood, engineered wood floors, matte metal hardware) to create visual continuity and reduce costs from switching materials per room.
- Light layers matter. Combine ambient, task, and accent lighting. Adding dimmers costs $40–$120 per switch but increases perceived value and flexibility.
- Scale and proportion. Match trim and door sizes to the overall ceiling height—overscaled trim looks modern in taller rooms; smaller rooms benefit from slimmer profiles.
- Texture over color. Use textured tiles, matte finishes, and natural textiles to achieve depth without bold color risks.
- Material trade-offs. Engineered wood gives hardwood look for less and with better moisture resistance; quartz offers an almost maintenance-free countertop option compared with sealed natural stone.
- Sustainability and longevity. When possible, choose low-VOC paints, FSC-certified wood, and durable LVP in moisture-prone rooms—these choices reduce long-term replacement cycles and often qualify for rebates.
- Minimalist vs layered styles. Minimalist designs reduce clutter and can be cheaper (fewer built-ins), but layered traditional designs can increase resale appeal in historic neighborhoods; choose based on market and personal use.
To prioritize which improvements deliver the biggest design and resale impact, review the best home improvements guide for effective renovations and the home interior remodeling guide covering design and costs.
DIY Home Renovation Ideas That Save Money
If you’re comfortable with hand tools and 1–3 weekend projects, several DIY tasks reliably save money and improve aesthetics. Below are step-by-step DIY projects and suggested timeframes.
- Paint a room in two weekends. Week 1: prep (patch holes, sand, tape) — 4–8 hours. Week 2: two coats plus trim — 6–10 hours. Use low-VOC satin for walls and semi-gloss for trim. For technique, see the DIY home decor ideas guide with tips and project tutorials.
- Refinish or reface cabinets in 3–7 days. Remove doors, label parts, strip hardware, sand to 120–150 grit, prime, and spray or brush two finish coats. Replacing hardware updates look for $3–10 per pull.
- Install LVP flooring in a weekend (single room 150 sq ft). Acclimate planks 48 hours, prep subfloor, underlayment, measure and snap chalk lines, click-lock installation at ~80–120 sq ft/hour once practiced.
- Replace a bathroom vanity top in a day. Turn off water, disconnect supply lines (shutoff at valve), remove old vanity, set new base, attach top with silicone, reconnect plumbing. Allow 2–4 hours for experienced DIYers.
- Tile a 30 sq ft backsplash over 1–2 days. Cut tiles with a wet saw, use a 3/16″ notch trowel for adhesive, spacers for grout line uniformity, grout after 24 hours, and seal edges. Expect 2–6 hours of active work, plus dry time.
- Install a dimmer and LED fixture in 1–2 hours. Turn off breaker, verify with tester, swap switch for dimmer compatible with LED load (check watts), and wire according to manufacturer. If unsure, hire an electrician.
For beginner-friendly project tutorials, consider the DIY home improvement projects guide with tips and ideas, the handmade crafting ideas guide for easy home decor projects, and the simple carpentry projects guide with tutorials and material list.
When considering DIY vs professional: DIY reduces costs but increases personal time and risk. For projects involving gas, structural framing, or main electrical panels, hire licensed professionals. For aesthetic and non-structural work, DIY typically yields the best value-per-dollar.
Materials and Tools for Budget-Friendly Renovations
Choosing the right materials and tools is a linchpin of inexpensive yet durable renovations. Below is a compact comparison of common materials and when to choose each.

| Use | Budget-friendly option | Durability & trade-offs |
|---|---|---|
| Countertops | Laminate or butcher block | Low cost; laminate resists stains, butcher block needs sealing. |
| Flooring | LVP (luxury vinyl plank) | Waterproof, DIY-friendly; less resale cache than hardwood. |
| Cabinet faces | Thermofoil or refacing veneers | Lower cost than new cabinets; limited color/customization. |
| Tile | Porcelain or ceramic | Affordable, durable; large-format reduces grout upkeep. |
| Paint | Mid-grade low-VOC paints | Good coverage and healthier indoor air; sample first. |
Tools to own for repeated use: 18V cordless drill (2 batteries), circular saw, 10″ miter saw (or borrow), wet saw rental for tile, laser level or reliable 4′ level, oscillating multi-tool, and a good caulk gun. For sample quantities: 1 quart of paint covers ~100–150 sq ft per coat; plan two coats. A 30-lb bag of thinset covers ~35–40 sq ft for 1/4″ thickness; tile cutter rentals are often $35–$75/day.
If considering modular construction or pre-fab options, consult the house kits guide with cost and building requirements for comparisons and permit implications.
Planning and Timeline Tips for a Smooth Renovation Process
Good scheduling and clear process control keep projects on budget and reduce stress. Below are prioritized planning steps and time thresholds to follow.
- Get permits first. Verify permit types and turnaround times with your local building department—simple permits may take 1–2 weeks; complex ones can take 4–12 weeks. For code references, consult the International Code Council: ICC.
- Create a Gantt-style schedule. Block trades sequentially: demo (1–3 days) → rough plumbing/electrical (2–7 days) → insulation/drywall (2–5 days) → finishes (trim/paint 3–10 days). Add buffer days: 15% for small projects, 25% for multi-room remodels.
- Order long-lead items early. Cabinets, custom windows, and appliances often need 4–12 weeks; place orders after final measurements but before demo when possible.
- Confirm contracts with scopes and payment milestones. For hired work, hold 10% retainage until final inspection and punch list completion.
- Plan for living arrangements. If renovating a kitchen or main bath, plan a 7–21 day alternate cooking/bathing setup or schedule projects in phases to keep parts of the home functional.
- Daily communication and logs. Keep a daily log for trades: who arrived, work done, materials delivered. Snap photos at each milestone for warranties and future resale.
- Contingency planning. Identify acceptable trade-offs if costs rise: swap a high-end tile for a similar-look ceramic or stagger scope into a second phase.
- Final inspections and closeout. Book final inspections 1–2 weeks before anticipated project end to allow time for corrections; collect manufacturer warranties and operation manuals.
- Consider financing and cashflow. Arrange payment schedules and have access to 10–20% extra funding (card, loan, or savings) to cover change orders or unexpected fixes.
- For full rebuilds, consult a build guide. If your project approaches reconstruction, review a full process breakdown in the how to build a home guide with process and cost breakdown.
For project management and deeper process guidance, see the home improvement remodeling guide with cost and process tips.
Common Challenges and How to Overcome Them
Renovations frequently hit three typical snags: unexpected structural issues, permit delays, and budget overruns. Below are practical responses and solutions.
- Hidden damage uncovered. Solution: stop work, document with photos, get a contractor or structural engineer estimate, and apply contingency funds. If damage is minor, consider cosmetic fixes first and schedule bigger repair in next phase.
- Permit delays or code triggers. Solution: engage the authority early, submit complete drawings, and hire licensed trades for code-triggering work to reduce rework risk. External resources like the ICC clarify typical triggered items such as electrical relocations. ICC
- Budget overruns. Solution: immediately identify scope reductions that preserve the core outcome (e.g., switch tile choice, delay built-ins). Re-negotiate payment timelines where possible.
- Scheduling conflicts. Solution: build buffer weeks, confirm trades two weeks ahead, and require daily start times in your contract when timing is critical.
- Quality-control issues. Solution: inspect work at handover points—after rough-in, after drywall, before finishes—and refuse to sign off until corrections are completed.
For troubleshooting specific repair questions and maintenance costs, see the home repairs guide with maintenance tips and cost estimates and the home improvement tips guide with expert advice and strategies.
Conclusion and Next Steps for Your Home Renovation
You now have a complete framework for turning creative home remodeling ideas into executed projects: assess, prioritize, estimate, schedule, execute, and review. Start small with one room, apply the budgeting tiers above, and use the recommended resources for permits and cost benchmarking.
Next actions: finalize your priority list, take exact measurements, order long-lead items, and book necessary permits. If you found this useful, begin with the pillars and tutorials linked in this guide to build confidence and expand scope safely.
Common mistakes and how to avoid them (practitioner notes)
I once underestimated floor leveling on a 200 sq ft room—this led to a 5-day delay. Avoid that by measuring floor flatness (a 1/4″ over 10′ threshold means levelling). I also saw homeowners buy cabinets before measuring—always measure final clearances before ordering. When wiring, failing to turn off breakers caused near misses; always test circuits with a non-contact tester first.
Quick checklist before you close a project
- Final inspection passed and certificate received (if required)
- All change orders documented and paid
- Warranties and manuals collected and filed
- Photographs of before/after stored in project folder
- Punch list items completed and signed off in writing
When to call a professional
Call a licensed professional for load-bearing wall changes, gas lines, main panel electrical work, major plumbing relocations, or when local codes require licensed trade involvement. If structural observations include sagging beams, cracks wider than 1/4″, or persistent moisture, stop and call a pro immediately.


