


By the end you will have a complete, buildable plan for a modern open concept kitchen—with precise furniture layouts, workflow-tested zoning and a lighting and storage plan you can hand to a contractor. Expect focused planning work: 6–12 hours of measured design and one weekend for rough layout mockups; this guide assumes a DIY-intermediate skill level (basic measuring, sketching and handling cabinetry/design decisions).
This hands-on guide walks you from measurement to final checklist with step-by-step actions, real-world trade-offs, practitioner tips and examples you can apply to any open floor plan kitchen.
Before you start
- Tools: tape measure (25 ft / 7.5 m), laser distance measurer (recommended), graph paper, pencil, masking tape, a level and a camera.
- Software: simple CAD or free plan tool (e.g., SketchUp Free or Floorplanner), spreadsheet for appliance and cabinet dimensions.
- Materials & references: appliance spec sheets (depth/clearances), cabinet box dimensions, a copy of local ventilation codes if planning a hood.
- Timebox: two measurement passes (30–90 minutes each), one 2–4 hour layout session, plus iterative 1–2 hour tweaks.
Introduction to Open Concept Kitchens
An open concept kitchen removes walls between the kitchen and adjacent living spaces to create a continuous social and visual environment. The benefits include improved social interaction, natural light distribution and perceived spaciousness; common features are islands, integrated seating and sightlines to living/dining areas.
According to a 2023 kitchen design industry report, many homeowners prioritize connectivity—open plans remain a top renovation driver for social cooking and entertaining. For design standards and professional layout guidance, consult the National Kitchen & Bath Association for best-practice principles and zoning recommendations: NKBA guidelines.
This introduction prepares you for the detailed, furniture-focused sections that follow. Next, we cover the core design principles you’ll use to structure the kitchen layout.
Key Design Principles for Open Concept Kitchen Layouts
Apply these numbered principles as check steps while you sketch and test layouts. Each item explains how it affects furniture placement and workflow in an open floor plan kitchen.
-
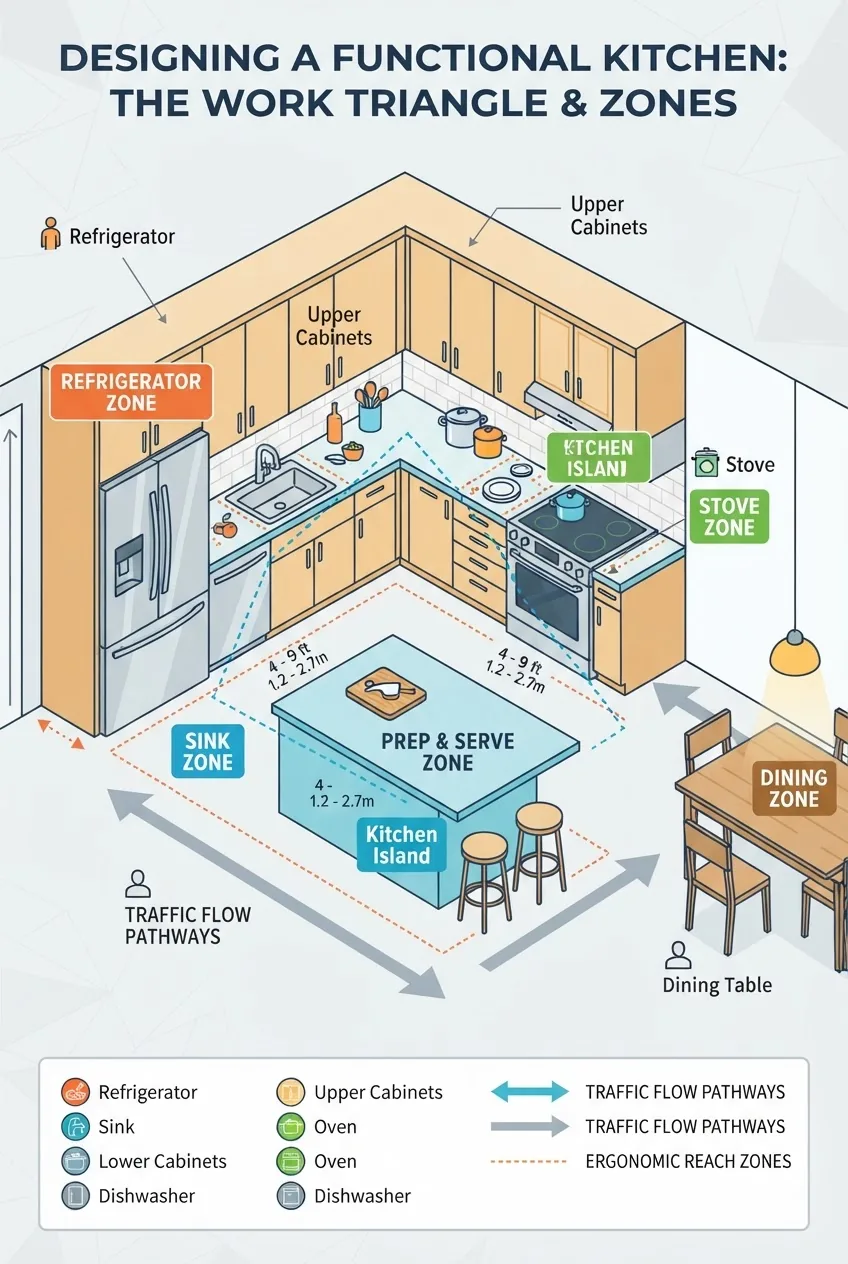
Respect the kitchen work triangle — The classic work triangle links sink, stove and refrigerator to minimize movement. For open floor plan kitchens keep sum of triangle legs between 12 ft (3.7 m) and 26 ft (7.9 m). Maintain at least 42 inches (107 cm) of walkway in single-cook zones and 48 inches (122 cm) in multi-cook zones to keep traffic from colliding with the triangle.
When you place furniture, ensure any island or peninsula doesn’t cut one leg below 36 inches (91 cm) of usable backsplash counter depth—otherwise task flow is disrupted.
-
Define kitchen zoning — Break the kitchen into primary zones: prep, cook, clean, refrigeration, pantry and service (dish storage, server staging). In open plans, create a visible separation between service and social zones using countertops, a partial-height partition, or material change.
For furniture layout, reserve the island primarily for prep and social seating, with at least 36–42 in (91–107 cm) clearances around it for chairs and pass-through traffic.
-
Plan traffic flow and sightlines — Map primary traffic paths (front door to living area, kitchen to backyard) and avoid routing them through prep/cooking zones. Keep through-traffic lanes 36–48 inches (91–122 cm) wide, and use islands as buffers where lanes cross.
A direct sightline from the kitchen to the main living area improves supervision but may expose clutter; plan storage and counter clearing zones accordingly.
-
Decide island vs. peninsula intentionally — Islands are freestanding and excellent for multi-user kitchens; peninsulas attach to cabinetry and can define a boundary with less circulation clearance. Use an island when you have at least 10 ft (3.0 m) depth between the kitchen run and the opposite wall; use a peninsula in narrower footprints to provide seating without needing a full circulation envelope.
When choosing between them, consider seating depth (15–18 in/38–46 cm knee clearance), and overshoot the island by 12–18 in (30–46 cm) for comfortable stools.
Feature Island Peninsula Best for Multi-user cooking, seating, appliances Space definition, limited footprint Minimum clearance 36–48 in (91–122 cm) 30–36 in (76–91 cm) on one side Seating tip 15–18 in (38–46 cm) knee depth Allows bar seating along run -
Prioritize ergonomics and heights — Standard counter height is 36 in (91 cm); consider 34–36 in (86–91 cm) for mixed seating. For primary prep tasks, 36 in works for most; provide a 42 in (107 cm) bar height on islands if you want casual dining. Use multiple work heights for specific tasks (lowered baking surface at 30–32 in / 76–81 cm).
Ergonomic placement of frequently used appliances—dishwasher adjacent to sink, microwave at 15–18 in (38–46 cm) above counter—reduces fatigue and improves workflow.
-
Allocate dedicated storage and decluttering strategies — In open plans, concealment reduces visual clutter. Prioritize a pantry (30–36 in / 76–91 cm width minimum) and drawer stacks for pots and everyday dishes. Use integrated panels for appliances when style cohesion is required.
Reserve at least 24–30 in (61–76 cm) of counter landing space on each side of the cooktop and refrigerator for staging and safety.
-
Use materials and color to create visual continuity — Connect kitchen and living finishes using 1–2 repeating materials or color accents to maintain flow. Use a consistent trim, complementary flooring or a shared palette to avoid visual fragmentation across the open area.
For modern looks, contrast warm wood cabinetry with neutral counters and soft metals to unify kitchen and adjacent spaces.
-
Control acoustics early — Hard surfaces in open plans amplify noise. Integrate acoustic ceiling treatments, soft furnishings in adjacent areas and cabinet door styles that minimize slamming. Specify acoustic-rated ceiling tiles or a rug-based living area to reduce reverberation time by 20–40% in typical layouts.
If noise is a primary concern, locate loud appliances (e.g., dishwashers) away from seating areas or use ultra-quiet models (look for dBA ratings under 45).
-
Plan for ventilation and odor control — In open plans, choose a hood with capture rates appropriate for range type; for gas ranges, a minimum flow of 600 CFM is often recommended for effective capture in open areas. Where recirculating options are used, combine with high-capacity range hoods and timed ventilation strategies.
Refer to local ventilation codes and manufacturer specs for hood sizing; ENERGY STAR and appliance manufacturer guidelines help match capacity to your layout: Energy-efficiency references.
-
Design for multi-functionality — Islands and counters often serve as prep, dining and homework zones. Provide durable surfaces (quartz, solid surface) and task lighting for each function. Include dedicated charging stations and a 2 ft (60 cm) wide “command center” drawer if you need a drop zone for keys and mail.
Multi-functional features save space but require early coordination: determine which function is primary and size counters accordingly.
These principles inform the furniture-focused layout steps that follow. Use them as criteria when comparing alternatives.
Furniture Layout Strategies for Open Concept Kitchens
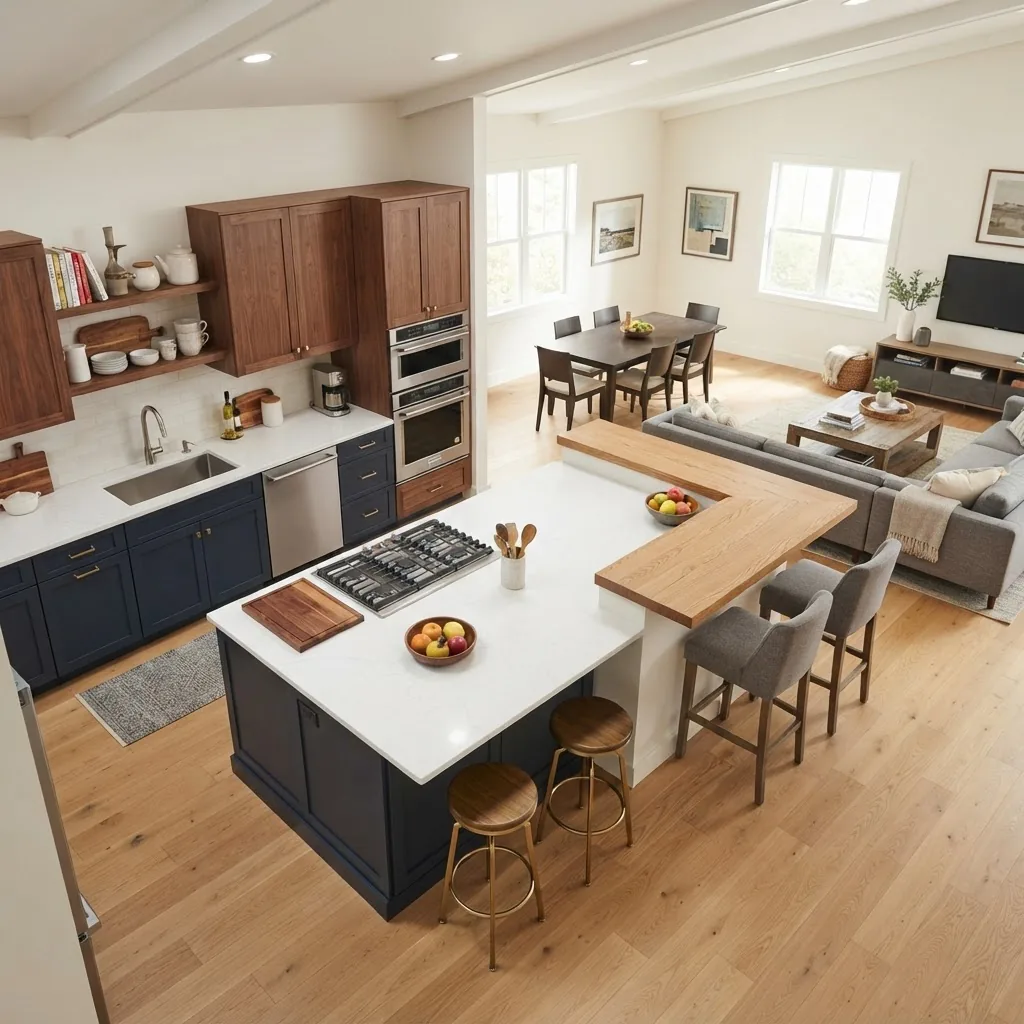
This section is action-first. Follow the steps to convert measured space into furniture placement and seating plans that respect circulation, ergonomics and visual balance.
-
Step 1 — Measure and draw the shell
Measure walls, doorways, window sills and fixed elements. Transfer to graph paper at 1/4″ = 1′-0″ (1:48) or use a digital planner. Record ceiling height and any soffits. Double-check dimensions with a second pass.
For accuracy, follow the advice in accurate room measurements when converting to scaled drawings.
-
Step 2 — Map fixed kitchen work zones
Place the sink, cooktop and refrigerator first. Use the kitchen work triangle distances from the design principles. Draw 36–48 in (91–122 cm) clearance arcs around islands and appliance openings to confirm fit.
Where appliance doors open into living traffic, allow an extra 6–12 in (15–30 cm) buffer so seating or walking paths aren’t obstructed.
-
Step 3 — Choose island/peninsula footprint
Decide footprint based on the guidelines: islands should be minimum 4′ x 2′ (1.2 x 0.6 m) for functional prep; a multi-user island should be at least 6′ x 3′ (1.8 x 0.9 m). Keep 36–48 in (91–122 cm) clearance around all sides.
For peninsulas, allow the run to provide 18–24 in (46–61 cm) overhang for seating with 15–18 in (38–46 cm) knee room. If you plan a sink in the island, ensure plumbing runs are feasible.
-
Step 4 — Select seating and align sightlines
Choose stool heights and count. For casual kitchens, plan 24 inches (61 cm) per seat at bar-height counters; for island seating with table-height chairs, plan 20–22 inches (51–56 cm) per seat. Keep a 12–18 in (30–46 cm) overhang for comfortable knees.
Balance seating with sightlines—place stools so backs don’t block pathways and align them to face the living area if you want interaction. See comfortable seating options for choices used in family-integrated kitchens.
-
Step 5 — Position furniture to create zones
Use the island or a low console to separate kitchen work from living seating. Place sofas and chairs to create a conversation area that faces the kitchen but does not intrude into the 36–48 in (91–122 cm) appliance clearance zones.
When in doubt, use furniture as soft partitions—backless benches, open shelving or a two-sided island cabinet provide visual division without walling off the space. Refer to ideal furniture pieces for selections that scale well in open plans.
-
Step 6 — Test circulation with masking tape
On-site, mark island and furniture footprints with masking tape. Simulate seating, appliance doors and typical routes. Walk the paths carrying groceries and plates to locate pinch points.
Iterate until you have 36–48 in (91–122 cm) in main lanes and 30–36 in (76–91 cm) in secondary lanes. For compact layouts, consider a narrower island (2.5 ft / 76 cm deep) with seating on one side only.
-
Step 7 — Plan storage around activity
Place frequently used items in base drawers near the cooktop and sink; store dinnerware in upper cabinets closest to the dishwasher for quick putaway. Allocate a 30–36 in (76–91 cm) pantry run with adjustable shelves for flexible storage.
Combine concealed storage with open shelving sparingly—open shelves work for curated items but increase visible clutter in an open concept kitchen.
-
Step 8 — Layer lighting and select fixtures
Position task lighting over sink and cooktop, use pendant lighting over the island and ambient fixtures (recessed or track lighting) across the space. For pendants, choose 12–18 in (30–46 cm) spacing between fixtures and hang 30–36 in (76–91 cm) above the island counter for 36 in (91 cm) benches; raise 6–8 in (15–20 cm) for taller counters.
Match fixture style to adjacent living area for visual continuity; see the Lighting section below for step-by-step layering guidance.
-
Step 9 — Finalize dimensions and order templates
Before ordering cabinets, create a cabinet template (full-size paper templates taped to the floor) for a minimum of 2 hours of live testing. Confirm appliance clearances, door swings and 7–10 day lead times for custom panels.
Document final cabinet sizes to 1/8 inch (3 mm) and capture photos for contractor reference. If you need inspiration for tight layouts or sectional placement near kitchens, see sectional sofa layout ideas and efficient furniture layout.
-
Step 10 — Mockup final finishes and test cohesion
Place finish samples (floor, countertop, cabinet door) next to each other in the actual light. If the kitchen shares finishes with the living area, take samples into the living space to test continuity. Use a single accent color or material tie to unify both rooms.
For choices on living room furniture that pair well with kitchens, consult choosing living room furniture and modern furniture sets.
-
Step 11 — Create a staging and cleanup plan
Designate counter landing spots for incoming groceries (minimum 24 in / 61 cm) and a daily cleanup sequence: wipe, load dishwasher, clear counters. In open plans, maintain a 10–15 minute end-of-day tidying routine to keep communal spaces presentable.
Store unsightly items (brooms, recycling) behind cabinet doors or in a mudroom adjacent to the kitchen when possible.
These steps convert measured space into a furniture-first kitchen plan. Next, we examine how to integrate the kitchen with living and dining areas so style and flow feel deliberate.
Integrating Kitchen with Living and Dining Areas
Successful integration balances visual continuity, functional boundaries and shared use. Compare strategies below and choose one that aligns with your household routine.
For cohesive styling, repeat a material or color in small amounts across both spaces—e.g., island base color echoed in a living area console. Use similar metal finishes, consistent trim and a shared rug scale to create harmony. For detailed arrangement tactics for the living area, refer to living room furniture arrangement ideas.
If you need furniture pairing guidance, consult resources on choosing living room furniture and living and dining room combo ideas to coordinate scale and circulation between dining and kitchen zones.
Use placement strategies to control social flow: face seating towards the kitchen for interaction while keeping a clear 36–48 in (91–122 cm) circulation path behind the sofa. If the kitchen contains a TV-facing island or bar, plan audio and glare control to avoid cross-room conflicts; use task lighting above the island and softer ambient lighting in the living area for layered atmosphere.
Where formal living/drawing rooms abut the kitchen, subtle partitions such as a partial-height console, bookcase or a change in floor texture (e.g., tile to wood) can signal different functions without closing the space. For elegant cross-room ideas see elegant interior ideas.
For multifunctional households, plan flexible furniture—lightweight chairs, nesting tables or storage ottomans—that allow the living space to adapt. See guides on functional living spaces for inspiration.
Lighting and Ambiance in Open Concept Kitchens
Layer lighting to serve tasks, mood and architectural definition. Follow these how-to steps to get lighting that performs and flatters.
- Assess natural light patterns — Track sunlight over a day. Position prep areas near windows when possible. Ensure window glare is managed for cooking tasks by orienting major work surfaces perpendicular to direct sun or specifying blinds.
- Install task lighting — Provide 300–500 lux (approx. 28–46 foot-candles) at counters for prep. Under-cabinet LED strips (3000–3500K, CRI >90) avoid shadowing; place strips 2–3 in (5–8 cm) back from the cabinet front to minimize direct glare.
- Place ambient lighting — Recessed lights spaced 3–4 ft (0.9–1.2 m) apart can provide even ambient illumination. Use dimmers to adjust levels for evening relaxation; set kitchen ambient to ~150–200 lux for general activity.
- Choose pendant lighting for islands — Select pendants sized to the island: 1 pendant per 24–30 in (61–76 cm) of island length, or 3 pendants over a 7–8 ft (2.1–2.4 m) island. Hang 30–36 in (76–91 cm) above a 36 in (91 cm) countertop, adding 4–6 in (10–15 cm) for each additional 3 in (7.5 cm) of countertop height.
- Layer accent lighting — Toe-kick LEDs, cabinet interior lighting and above-cabinet uplights add depth. Accent lighting at 100–150 lux highlights displays without affecting task performance.
- Control zones independently — Use multiple circuits and dimmers so kitchen task, island and living area lighting can be adjusted separately. Program scenes for cooking, entertaining and relaxed evenings to match activity without rewiring.
Next, design storage so the open kitchen looks tidy while staying highly functional.
Storage and Organizational Solutions for Open Concept Kitchens
Open plan kitchens need storage that hides clutter without reducing functionality. The tips below reflect trade-offs I’ve seen in client projects.
- Concealed storage first: Full-height pantries and deep base drawers are primary tools—prefer 24–30 in (61–76 cm) deep pantry spaces with adjustable shelves and pull-out trays for accessibility.
- Use appliance garages: If countertop appliance clutter is a concern, plan appliance garages with roll-up doors or lift-up fronts to store toasters and mixers.
- Reserve open shelving for curated items: Limit to 2–4 linear feet (60–120 cm) and keep consistent spacing; use matching dishware for neatness.
- Integrate recycling/compost pullouts: Hide bins in a 12–18 in (30–46 cm) base pullout near prep zones to streamline cleanup.
- Design for daily routines: Add a 12–24 in (30–61 cm) drop zone near entry with a charging drawer and mail sorter to contain everyday mess.
When planning open shelving or glass-front cabinets, remember visible storage required maintenance. If your household prefers low visible clutter, skew towards deep drawers and paneled fronts.
Addressing Challenges in Open Concept Kitchen Design
Below are common issues and practical solutions I use when advising homeowners.
Solution: Choose quieter appliances (dishwashers under 45 dBA), add soft furnishings, use acoustic ceiling panels and consider a glass partition when noise is unavoidable.
Solution: Select a properly sized hood with 600+ CFM for high-output ranges, increase ventilation exchange, and use air purifiers or kitchen-specific exhaust fans on timers.
Solution: Use upper cabinets with opaque doors, a shallow prep counter next to the stove as a barrier, and keep high-traffic staging away from the main sightline.
If your space feels awkward or oversized, additional layout tactics and before/after examples are available in our guide on solutions for awkward open spaces. For inspiration on resolving tricky layout challenges, see handling layout challenges.
For shared space guidance that applies to combined kitchen-living schemes, our shared space design tips expand on flexible solutions.
Modern Appliances and Technology for Open Concept Kitchens
Technology choices affect space planning, energy use and noise. Consider these proven approaches and examples.
Smart appliances now include remote diagnostics, scheduling and energy monitoring. For energy-efficiency metrics and rebates, consult ENERGY STAR resources: ENERGY STAR. Consider dishwashers rated under 45 dBA for open plans to reduce audible impact.
When placing appliances in open concepts, position noisy machines away from primary seating. Locate microwaves at counter or mid-height, and place dishwashers adjacent to sinks to streamline unloading. For ventilation, modern downdraft systems exist but typically require higher airflow to match an overhead hood; consult appliance manufacturers’ install guides for compatibility and clearances: Professional design association references.
Examples: a counter-depth refrigerator reduces visual mass by 2–3 in (5–8 cm) into the aisle; a flush-mounted range hood with 700 CFM suits large island cooktops in an open plan where cross-ventilation is limited.
Case Studies and Real-World Examples of Open Concept Kitchen Layouts
Below are condensed practitioner case summaries showing layout logic and outcomes.
Case A — Urban condo, 850 ft² (79 m²): Converted a closed kitchen to open plan. Solution: 6′ x 3′ island with integrated dining overhang, 36 in (91 cm) clearances, and a 24 in (61 cm) compact pantry. Result: improved social function; added tall storage to conceal clutter.
Case B — Suburban home, 2200 ft² (204 m²): Large open area with fireplace. Solution: dual island layout—prep island and a longer social island with seating; recessed task lighting and 700 CFM hood for a professional range. Result: multitasking family hub with durable finishes and excellent ventilation.
For floor plan examples on similar configurations, see our open concept kitchen floor plans and solutions for multi-level homes in small space solutions.
Conclusion and Final Tips for Designing an Open Concept Kitchen
Key takeaways: honor the kitchen work triangle, design islands and seating with clearances in mind, layer lighting, and prioritize concealed storage to keep the open plan tidy. Use masking-tape mockups to validate furniture placement and always order cabinet templates before final purchases.
Next steps: measure twice, mockup with tape, test sightlines and circulation for 24–48 hours of real-life use, and refine before buying. If you want more living-area furniture guidance, our pillar on living room furniture arrangement ideas offers full layouts that pair with these kitchen strategies.
Common mistakes and how to avoid them
I have seen these failures repeatedly on job sites; here’s how I fix them.
- Underestimating circulation needs: I once installed a 5-foot island in a 10-foot-wide kitchen—it blocked the dishwasher and created a bottleneck. I corrected this by reducing the island depth by 12 in (30 cm) and shifting the sink to a perimeter run, restoring a 42 in (107 cm) path.
- Ignoring appliance noise: A client chose a low-cost dishwasher with a 52 dBA rating; living room conversations were disrupted. We upgraded to a model under 45 dBA and repositioned the living seating to lower noise exposure.
- Overusing open shelving: I allowed clients too much open shelving and they abandoned upkeep. The solution was swapping two upper shelves for doors and increasing drawer storage for everyday items.
Quick checklist
- Measure twice and create a full-size floor mockup.
- Confirm work triangle sum is 12–26 ft (3.7–7.9 m).
- Maintain 36–48 in (91–122 cm) main circulation lanes.
- Provide 24–30 in (61–76 cm) landing space beside range and fridge.
- Choose appliances with acceptable dBA and CFM ratings (dishwasher <45 dBA; hood 600+ CFM where needed).
- Layer lighting: 300–500 lux at counters, pendant spacing 12–18 in (30–46 cm).
- Test finishes in natural and artificial light before ordering.
When to call a professional
Hire an architect or kitchen designer if you plan structural changes, move plumbing or gas lines, or face complex ventilation requirements. Call an electrician for multi-zone lighting controls and a licensed contractor for hood installations above 600 CFM to ensure code compliance.


