


By the end of this hands-on guide you will have a complete, measured plan and step-by-step sequence to arrange seating, rugs, lighting and accessories so your living room functions for daily life and looks intentional. Expect to complete the process in two to six hours for a single room (planning + one reconfiguration session); skill level: confident DIYer to design-curious homeowner.
Introduction to Living Room Layouts
This guide focuses on practical, design-forward approaches to the living room layout—how to plan circulation, set focal points, and arrange furniture so the room works for conversation, media, and welcoming guests. You’ll learn the goals behind layout decisions, how to measure and zone a space, and how to choose furniture placement that balances comfort and style. For a companion resource that condenses these core methods into a single destination, see the pillar resource:
Living Room Layout Ideas Guide for Furniture Arrangement.
Practical layout planning is part ergonomics and part composition: traffic flow must feel natural, while furniture and decor deliver visual balance. This introduction covers the purpose and measurable goals of a living room layout so you begin decisions with clarity.
Key Principles of Effective Living Room Furniture Layout
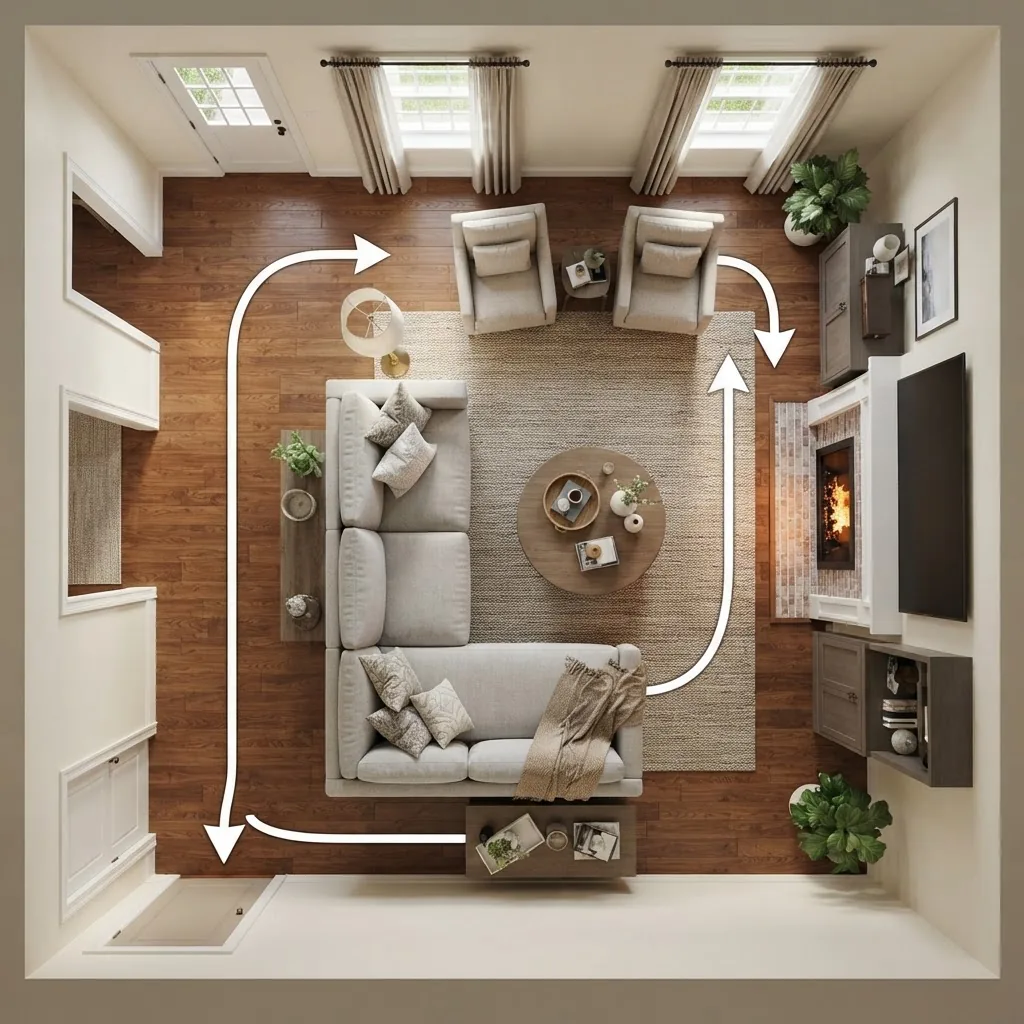
- Define circulation paths. Ensure a minimum of 30–36 inches (76–91 cm) of clear walkway in primary traffic routes and at least 24–26 inches (61–66 cm) between a sofa edge and a coffee table for comfortable movement and cleaning. These numbers follow basic ergonomic circulation guidelines endorsed by professional design practice; see guidance from the American Institute of Architects for spatial planning principles. AIA
- Establish a clear focal point. A focal point anchors the layout: fireplace, TV, large window, or a statement piece of art. Arrange primary seating to face the focal point while allowing secondary views — for example, sofa facing the TV with a pair of chairs angled 30–45 degrees for conversational balance.
- Prioritize functional zoning. Split larger spaces into zones (conversation, media, reading, play) using rugs, lighting, or furniture backs as soft dividers. Keep zones 3–6 feet (0.9–1.8 m) apart to avoid crowding while preserving visual cohesion.
- Balance scale and proportion. Match furniture scale to room size: in rooms under 12′ x 12′ use sofas 72–84″ long; in rooms 14′ x 16’+ consider sectional depths and sofa sizes above 90″. Use the “2/3 rule”—the coffee table footprint should be about two-thirds the length of the sofa for balanced proportion.
- Choose symmetry vs asymmetry intentionally. Symmetry provides formality and calm (two matching sofas or identical chairs flanking a focal point). Asymmetry gives energy and layered interest (one long sofa paired with mixed side chairs and a console). Use symmetry for formal sitting rooms and asymmetry for lived-in family rooms.
- Allow modular and flexible solutions. Use modular sofas, ottomans, and light occasional chairs to enable reconfiguration. Modular furniture should leave 12–18″ (30–46 cm) between modules for easy repositioning and at least 18″ from door swings.
- Layer lighting for tasks and atmosphere. Plan ambient (overhead), task (reading lamps), and accent (wall or picture lights). Place task lighting within 12–18″ of seating positions for reading. For technical standards and recommended illuminance levels, consult the Illuminating Engineering Society. IES
- Use rugs to define and anchor areas. A rug should either sit entirely under the primary seating group or at least the front legs of the main furniture—allow 8–18″ (20–46 cm) of bare floor between rug edge and walls to create scale.
- Plan for circulation near entries and doors. Keep at least a 30–36″ clear approach from entry points to main seating. Don’t place low coffee tables or ottomans inside primary walkways.
- Consider sightlines and acoustics. Arrange tall furniture away from windows and doors to preserve light and avoid blocking sightlines; use soft textiles and area rugs to reduce echo and improve conversation clarity.
- Account for multi-function use. If the room doubles as a workspace or dining area, establish consistent visual cues (matching accent color or rug) to keep the space cohesive—define the secondary zone so it doesn’t encroach on primary seating.
- Follow ergonomic seating distances. For TV viewing, place the sofa at a distance equal to 1.5–2.5 times the diagonal screen size (for HD/4K content). For conversation, seating should be 4–12 feet (1.2–3.7 m) apart depending on group size and room acoustics.
- Respect door and window operations. Measure door swings (usually 30–36″ widths) and window sill heights; position furniture to avoid blocking access or preventing natural light.
- Prioritize flexibility over perfection. Test one layout for 24–72 hours before committing; you’ll notice traffic blips or lighting shortcomings that a static plan won’t reveal.
- Document your final plan. Create a simple floor plan to scale (1/4″ = 1′ or 1:50 metric) to reference for purchases and reconfiguration. For basic digital planning, use a room-planning app to move furniture virtually and test sightlines.
Transition: With the principles above in mind, next we apply them to common and stylish configurations so you can pick the layouts that match your function and room shape.
Popular Living Room Layout Ideas and Configurations
This section provides practical, how-to steps and example configurations for common living room setups: conversation-focused, TV/media, sectional-based, and multi-zone living rooms. Follow the numbered steps below for each configuration and adapt measurements to your room.
-
Conversation-Focused Layout — Create a central social cluster
- Measure a 10–14′ square area (3–4.3 m) that will be your primary conversation zone.
- Place the main sofa facing the center of the zone, leaving 12–18″ (30–46 cm) behind for side tables if placed against a wall.
- Set two chairs opposite or at 90° to the sofa; angle them 10–20° toward the center for natural eye-lines.
- Choose a coffee table two-thirds the length of the sofa and position it 14–18″ (36–46 cm) from seating edges.
- Anchor the group with an area rug that either sits entirely under all front legs or at least under the front legs of all pieces; allow 8–18″ to the walls.
Example: Sofa 84″ (213 cm) + two 28″ chairs + 50″ coffee table; rug 9′ x 12′ to ground the group in a medium living room.
-
TV/Media-First Layout — Optimize sightlines and acoustics
- Measure screen diagonal and multiply by 1.5–2.5 to set the ideal viewing distance (e.g., 65″ TV → ~8–13′ viewing distance).
- Place the sofa perpendicular to the main light source to reduce glare; use blackout curtains or adjustable blinds when necessary.
- Position storage credenzas or low media cabinets under the TV to keep cables and devices concealed; leave 1–2″ clearance for ventilation behind electronics.
- Use flanking bookcases or wall sconces to create symmetry around the screen if you prefer a formal setup; otherwise offset with plantings or decorative panels for an asymmetrical layout.
Example configuration for a 16′ x 12′ room: TV wall + sofa centered at 10′ + two small swivel chairs behind for flexible viewing.
-
Sectional-Centered Layout — Use the sectional as a zone-defining spine
- Select a sectional depth that keeps the chaise or longer side at least 30″ from main walkways.
- Float a sectional if possible—leave 6–12″ (15–30 cm) behind the back to allow wall access; anchor with a large rug that includes at least the front legs of the sectional.
- Create balance by adding a pair of accent chairs across from the sectional or adjacent poufs for informal seating.
- Include side or console tables along the sectional to keep drinks and remotes within 18–24″ reach.
Example: L-shaped sectional 110″ x 85″ in an open-plan living area, anchored by an 8′ x 10′ rug, with a low-profile media cabinet across.
See sectional sofa living room layouts for compact sectional strategies.
-
Open-Plan Living — Zoning for multi-use spaces
- Define zones with rugs, lighting, and furniture backs; allow 36–48″ transitions between major zones for ease of movement.
- Place seating to create a “conversation island” that faces into the room rather than directly toward the kitchen or dining areas.
- Use transparent or low partitions (console tables, bookcases with open backs) to maintain sightlines while offering subtle separation.
Example: In a combined 20′ x 16′ open area, use a 10′ x 8′ rug for the living zone, a 6′ console behind the sofa to separate the walkway, and pendant lighting to focus the dining area.
For designs that integrate kitchen layouts, see open concept living room floor plans and open concept kitchen design.
-
Multi-Functional Layouts — Work, play and relax in one room
- Create a primary seating cluster for relaxation and a secondary workstation zone with a desk behind the sofa or in a corner; ensure the desk area is no less than 30″ deep and 42–48″ wide for a laptop and task lamp.
- Use storage furniture—bench with concealed storage or a credenza—to hide office materials when not in use.
- Maintain a consistent aesthetic (matching wood tones or textiles) so the zones read as a single, cohesive space.
Example: A 13′ x 12′ living room that includes a 48″ wide desk behind a sofa with a low-shelf divider and a task lamp for dedicated evening work.
For shared layouts, see shared living room and bedroom space ideas.
-
Small Living Room Configurations — Maximize seating and flow
- Choose sofas 72–78″ and pair with slender-profile chairs; allow 24–30″ walkways on main routes.
- Use nesting tables and stackable stools to increase seating without permanent footprint; visible legs on furniture help maintain a sense of space.
- Mount the TV on the wall or use narrow consoles (12–16″ depth) to save floor area.
Example: In a 10′ x 11′ room use a 72″ sofa + two armless accent chairs + 6′ rug; see compact seating strategies in our small living room furniture layouts and small living room seating tips.
-
Formal Drawing Room — Achieve elegant symmetry
- Place two identical sofas or matched seating facing each other; leave 3–5′ (0.9–1.5 m) between them for circulation and an oversized coffee table.
- Use identical side tables and mirrored lighting to reinforce symmetry; keep rugs proportionally large so all feet rest on the rug.
For luxury touches and classical layouts, see elegant drawing room interior ideas.
-
Second Living Room or Den — Create a flexible retreat
- Design the second living room for a single dominant use (reading, TV, play), and keep furniture light and movable—sofas under 80″ and chairs on casters if possible.
- Include at least one storage unit with a pull-out surface for serving or working.
Reference: second living room design ideas.
-
Built-In Furniture Integration — Make architecture work for you
- When planning built-ins, leave 18–24″ of circulation in front of shelving and 36″ for main walkways; integrate seating ledges or window benches with 16–18″ seat height.
- Coordinate built-in depth: 12–15″ for open shelving and 18–22″ for media cabinets with ventilation consideration.
Built-ins are permanent decisions—mock up with cardboard templates or an app before committing.
For more furniture setup options, explore living room arrangement ideas and layout examples.
Transition: After exploring configurations, next tailor these ideas to the actual dimensions and shape of your room.
Tailoring Layouts to Your Living Room Floor Plan and Size
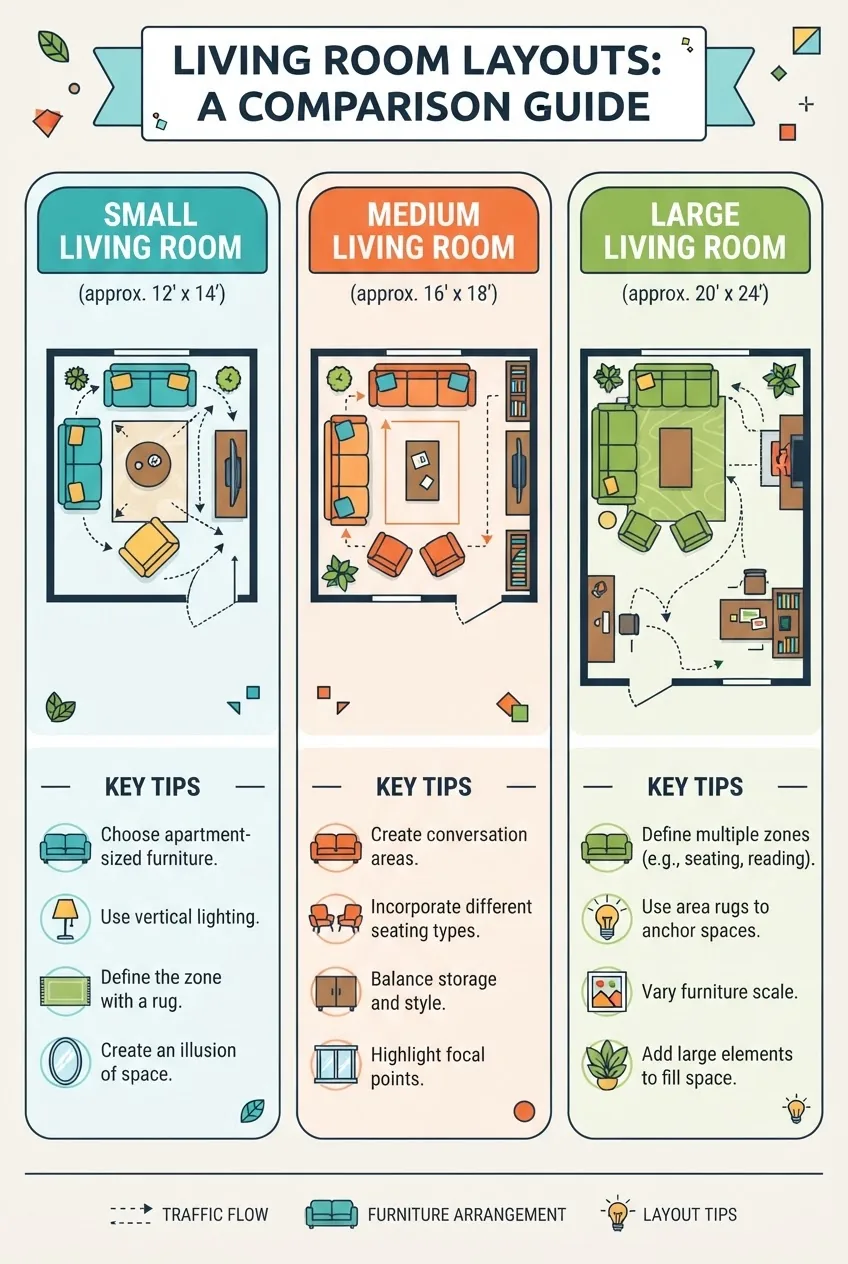
Room-specific adaptations are essential. Below are comparative, actionable tips by room size and shape; each section includes exact measurements and when to consult specialized plans.
| Room Category | Dimensions (typical) | Layout Focus |
|---|---|---|
| Small | Up to 12′ x 12′ (3.7 x 3.7 m) | Compact seating, wall-mounted TV, multi-use furniture |
| Medium | 12′ x 12′ to 16′ x 16′ (3.7–4.9 m) | Conversation clusters, clear traffic paths, defined zones |
| Large / Open-plan | 16′ x 16′ and up (4.9 m+) | Zoning, sectional arrangements, multiple focal points |
Small Living Rooms: exact tactics
- Use a 72–78″ sofa and low-profile chairs with 24–30″ walkways.
- Rug sizing: 5′ x 8′ or 6′ x 9’—front legs on the rug to visually expand the area.
- Prefer vertical storage and floating shelves 12–14″ deep to free floor space.
- See small living room furniture layouts and sectional sofa living room layouts for compact examples.
Medium Living Rooms: balance and flexibility
- Allow 36″ primary circulation and create two complementary zones if necessary (e.g., media + reading corner).
- Rug sizing: 8′ x 10′ or 9′ x 12’—ideally all seating front legs on the rug.
- Place console tables behind sofas to separate pathways from activity zones; keep them 12–16″ deep.
- For room planning techniques, check effective room planning design.
Large & Open-Concept Rooms: zoning and proportion
- Define zones with 10–12′ rugs and leave 36–48″ for main circulation between zones.
- Use sectional sofas to create anchor zones; pair with occasional chairs to form conversation islands.
- Consider sightline furniture placement so focal points read from multiple angles.
- Apportion space with reference to flexible open floor plans and small design floor plan solutions for multilevel homes.
Measurement and planning notes:
- Measure ceiling height—8′ ceilings favor lower-profile furniture; 9′ or higher can support taller bookcases and larger-scale art.
- For precise measuring techniques, consult our accurate room measurements guide.
- Also cross-reference efficient room arrangements ideas to adapt space-saving principles.
Transition: Once size-appropriate layouts are chosen, select and place furniture to optimize comfort and proportion.
Furniture Selection and Placement Strategies for Optimal Comfort and Style
Choosing the right pieces and placing them correctly turns plan into lived comfort. Below are precise placement guidelines, scale tips, and selection strategies.
- Match furniture scale to room volume. In rooms under 12′ wide, select sofas under 84″ wide and ottomans no larger than 36″ square to maintain 30″ circulation.
- Seat depth and comfort benchmarks. Sofa seat depth of 20–24″ supports upright seating; 24–28″ depths are lounge-friendly. Seat heights of 16–18″ are standard for most adults; add 1–2″ for taller users.
- Place sofas strategically. Sofa placement in living room planning should balance access and view: leave 12–18″ behind if against a wall, or float with 18–24″ behind to allow a console table. For TV viewing, set distance at 1.5–2.5x the diagonal screen size.
- Review furniture pieces for living rooms to choose complementary items.
- Layer seating types. Mix a primary sofa with a love seat, pair of swivel chairs, or a bench. For family rooms, include at least two flexible seats (stools/ottomans) that can be moved into the conversation area when needed—store under a console to save space.
- Use proportion rules for tables. Coffee table height should match sofa seat height ± 2 inches; side tables can be 1–2 inches higher than armrests for easy reach.
- To update your look, compare layouts with modern living room furniture sets.
- Consider modular vs. fixed furniture. Modular systems offer reconfiguration; give each module 12–18″ clearance if you expect frequent movement. Fixed frames like built-ins or heavy cabinets require mock-ups: tape outlines on the floor and measure a 36″ navigation zone around them.
- When selecting pieces, refer to our choosing living room furniture guide.
- Trade-offs and ergonomics. Trade-offs commonly involve storage vs. seating or scale vs. flow. For family households, prioritize durable upholstery and flexible seating over a strict symmetry that hinders movement.
- For seating choices optimized for families, read comfortable seating for family rooms.
- Anchor with storage. Use low storage units (18–24″ height) to separate zones without obstructing sightlines and to keep surfaces tidy—especially important in multi-use rooms.
Transition: Now that furniture and placement are chosen, finish the layout with rugs, lighting and accessories that reinforce your plan.
Enhancing Your Living Room Layout with Accessories and Details
Accessories finalize a layout: they define zones, set mood, and solve small functional issues. Follow the how-to steps and examples below.
- Place area rugs to anchor seating groups. Center the rug under the main seating cluster; for small rooms use a rug that allows front legs on; for larger rooms a full-coverage rug under all furniture gives cohesion. Leave 8–18″ of bare floor to the wall to frame the rug visually.
- Layer lighting with intent. Start with ambient lighting—a central fixture or recessed lights on dimmers. Add task lamps next to reading chairs with 40–60 watt equivalent (2700–3000K) bulbs. Add accent lighting for art or architectural features using 12–30 lux for displays. For professional lighting standards, consider guidance from the Illuminating Engineering Society. IES
- Place your coffee table and side tables correctly. Coffee table: 14–18″ from seating front legs; side tables: within 18″ of seating arms. Keep top surface under 26″ in height for standard sofas for comfortable reach.
- Arrange decor with rhythm and restraint. Group objects in odds (3–5) and vary heights; maintain at least a 2–3″ visual gap between object groups so each read clearly from multiple sightlines.
- Manage traffic with furniture setbacks. In main walkways drop furniture 12–18″ from the route; avoid placing low tables directly in a path. Use rugs or different flooring patterns to subtly indicate circulation lanes.
- Address acoustics through soft surfaces. Use curtains that drop to the floor, +25–35% additional acoustic absorption with heavy textiles and rugs if the room has loud echoing—measured reduction is often notable after adding 30–40% soft surface coverage of exposed floor/wall area (According to a 2023 interior design survey on residential acoustics, designers reported measurable echo reduction after such additions).
- Use mirrors and reflective surfaces wisely. Place mirrors to double natural light—opposite windows is ideal—but avoid reflective glare on screens. Keep mirror placement at eye level: centerline at 57–60″ from the floor is a common guide.
- Add living elements. Place at least one medium plant (3–4′ tall) in a corner to soften angles and improve perceived air quality; group smaller plants on side tables for scale layering.
- Personalize but maintain clarity. Limit tabletop decor to 1–2 practical items per surface (lamp + coaster or vase) to keep surfaces functional for daily use.
- Test accessory placement for a weekend. Live with the arrangement for 48–72 hours and observe whether surfaces become clutter hot-spots or walkways get obstructed, then iterate.
For luxury finishing touches and decorative strategies, see elegant drawing room interior ideas.
Transition: Even with careful planning, some layouts encounter predictable challenges—below are the most common problems and practical fixes.
Common Challenges and Solutions in Living Room Layouts
Problem-solution pairs for frequent issues—each answer uses specific, measurable fixes you can apply immediately.
-
Problem: Awkward room shape or narrow dimensions
Solution: Create multiple small zones instead of forcing one dominant arrangement. Float furniture away from angled walls by at least 12–18″ and use rugs to visually square a seating area. For extensive awkward solutions, consult our awkward living room layout ideas and see a fireplace case study below.
Case study: In a 20′-irregular-plan living room with a corner fireplace, we shifted the main sofa 36″ off the long wall, introduced a 9′ x 12′ rug to centralize seating and re-centered the TV above a low credenza—this resolved sightline conflicts and improved traffic flow. See the detailed process in our fireplace living room layout makeover.
-
Problem: Limited room for furniture
Solution: Prioritize multi-function pieces (storage ottomans, console tables that double as desks) and reduce sofa depth by 2–4″ in tight rooms. Consider wall-mounted lighting to free table surfaces and select furniture with visible legs to maintain an airy feel. See compact solutions in small living room furniture layouts.
-
Problem: Balancing aesthetics and daily function
Solution: Designate “active” surfaces (coffee table, console) for daily use; protect them with trays and storage baskets. Use durable fabrics (performance textiles) on frequently used furniture for longevity—trade slight softness for stain resistance in family rooms.
-
Problem: Multi-use rooms with competing needs
Solution: Use visual separators (rug + lighting) and store work items out of sight in closed storage. When possible, plan the desk to face away from the main seating to reduce visual overlap; maintain at least a 36″ pathway between work and seating zones for clarity.
For shared space strategies, read shared living room and bedroom space ideas.
-
Problem: Fireplace obstructs layout
Solution: Treat the fireplace as a primary focal point—if the TV is also required, either mount below the mantel (check heat clearance) or create a dual focal approach with seating oriented to allow both fireplace and TV viewing. For a documented renovation, see fireplace living room layout makeover.
-
Problem: Poor lighting and glare
Solution: Add layered lighting and install dimmers. Move screens perpendicular to windows and add reflective glazing or sheer curtains to diffuse strong midday sun. For technical illuminance recommendations, consult lighting industry standards at IES.
-
Problem: Inconsistent style or scale
Solution: Create a unifying palette (two neutrals + one accent) and ensure dominant furniture items share at least one material or finish. Use the 2/3 rule for coffee table-to-sofa size to restore visual proportion.
-
Problem: Unclear traffic flow
Solution: Re-align furniture so primary routes have 30–36″ clearance. If necessary, swap a bulky low table for nesting tables to free the route.
More ideas for unusual flows are in our awkward living room layout ideas.
-
Problem: Living + dining combo conflicts
Solution: Use rugs and different pendant heights to define the dining area; keep at least 42–48″ between the dining table edge and sofa back to allow chair movement. See more in living and dining room combo layout tips.
-
Problem: Need for flexibility over time
Solution: Choose modular pieces and lightweight accent chairs; keep three or four multipurpose items stored in a closet (folding table, poufs) for occasional reconfiguration.
Transition: After solving layout problems, maintain and adjust your arrangement seasonally and as your household needs change.
Tips for Maintaining and Adjusting Your Living Room Layout
- Rotate accessories seasonally: move heavier textiles (wool rugs) in fall/winter and lighter linens in spring/summer to change thermal feel in 30–60 minute swaps.
- Keep two alternate layouts on paper or in an app; test each for 48–72 hours before permanent changes.
- Invest in two modular elements (a reversible ottoman and a two-piece sectional) to adapt seating quickly—reconfiguring takes 20–40 minutes for an average 3-piece setup.
- Mark key furniture footprints with floor tape during planning to avoid overbuying; adjust tape positions in 2″ increments to fine-tune scale.
- Periodically reassess lighting—swap bulbs to warmer 2700K in winter or cooler 3000K for bright task areas based on seasonal needs.
Transition: Below are procedural, hands-on steps to execute a living room arrangement project in one controlled session.
Hands-On Step-by-Step Execution
Before you start: gather these prerequisites and tools so your layout session runs efficiently.
- Measuring tape (25′ / 7.5 m), laser distance measurer (optional)
- Graph paper or a room-planning app, pencil, masking tape
- Phone or camera to photograph existing state, notepad
- Furniture sliders (for moving heavy items), level, and screwdriver for minor disassembly
- Rugs, sample fabric swatches, notepad for measurements and notes
-
Measure and document the room (action-first).
Steps: Measure length, width, ceiling height, door swings, window locations, and fixed elements (fireplace, built-ins). Record measurements to the nearest inch or centimeter and photograph each wall. Draw a simple to-scale plan on graph paper (1/4″ = 1′ or 1:50). Time: 20–40 minutes for a medium room.
-
Create circulation overlays (action-first).
Steps: On your sketch, draw 36″ wide bands for primary circulation and 30″ for secondary. Mark furniture setbacks (12–18″ from main routes). This step prevents selecting items that block flow. Time: 10–20 minutes.
-
Choose focal points and zoning (action-first).
Steps: Decide the primary focal point (fireplace/TV/window). Place the main seating cluster facing this focal point and allocate 3–6′ depth for each zone. Time: 15–25 minutes.
-
Select and size key furniture (action-first).
Steps: Using your plan, select sofa dimensions so that it leaves the required walkways. Mark the coffee table at 2/3 sofa length and ensure 14–18″ between seating and table. Time: 20–30 minutes including online check of measurements.
For item selection cross-check with furniture pieces for living rooms.
-
Mock-up using tape and temporary placements (action-first).
Steps: Use masking tape on the floor to mark furniture footprints and rug outlines. Move lightweight chairs and small tables into position to test sightlines for 24–48 hours. This prevents heavy lifting later. Time: 30–90 minutes depending on room size.
-
Arrange lighting and test layers (action-first).
Steps: Position overhead dimmer or central lamp, place task lamps within 12–18″ of reading positions, and set accent lights for art. Test at multiple times of day and record any glare issues. If TV glare occurs, reposition seating or move lamp by 6–12″ increments. Time: 20–40 minutes; testing may take longer across different daylight conditions.
-
Finalize accessory placement and storage (action-first).
Steps: Anchor seating with a rug (8–18″ from walls), place side tables 18″ from armrests, and keep one accessible storage piece (bench or console) for remotes and clutter. Time: 30–60 minutes.
-
Live-test and iterate (action-first).
Steps: Use the layout for 48–72 hours. Note traffic pinch points, underused seating, or lighting gaps. Make 1–2 small adjustments (move table by 6–12″, rotate a chair) and re-test for another 24–48 hours. Time: iterative—expect 2–5 days for final tweaks.
-
Document the final plan and measurements (action-first).
Steps: Create a final to-scale drawing and label furniture with sizes, paint colors, and fixture details. Photograph the final arrangement for future reference. Keep the drawing with receipts for warranties and future purchases. Time: 20–40 minutes.
-
Optional: Use a digital room-planning tool (action-first).
Steps: Import your room dimensions into a planning app (e.g., RoomSketcher, SketchUp) and replicate your plan to check sightlines and distances in 3D. I used RoomSketcher in a client project to confirm a sectional scale that appeared too large on paper; the app saved a return trip. Time: 30–90 minutes to model and test.
-
Case study: a compact plan with trade-offs (action-first).
Scenario: A 12′ x 13′ living room needed seating for four, media viewing, and a small workspace. Trade-offs made: chose a 78″ sofa (saved 8″ over a larger sofa), added two armless chairs that tuck under a side console, and placed a 42″ desk behind the sofa with closed storage to conceal work items. Outcome: Clear traffic lanes (36″) and a living + work area that remained visually unified. This reflects a real client scenario where durability and flexibility trumped strict symmetry.
Common mistakes and how to avoid them
I’ve often seen homeowners pick a beautiful oversized sofa without measuring doorways—once we couldn’t even get it into the room. I now always measure doorway clearances before purchase. Another frequent mistake is centering everything on the TV; this can make windows and fireplaces feel ignored. I fixed this by creating dual focal zones with angled seating so both TV and fireplace are usable. Finally, people stack too many small tables instead of fewer, larger surfaces—this fragments the space. My solution: favor one well-proportioned coffee table plus two functional side tables.
Checklist: Verify your living room layout
- Primary circulation routes are 30–36″ wide.
- Seating distance to coffee table is 14–18″.
- Rug size: at least front legs of main furniture on rug, or full group coverage.
- Lighting: ambient + task + accent present and dimmable where needed.
- Focal point(s) clearly visible from main seating.
- Storage accessible without breaking circulation flow.
- Tested layout for 48–72 hours and iterated at least once.
When to call a professional
- Structural changes (moving walls, relocating windows) — consult an architect or licensed contractor.
- Complex electrical or lighting rewiring — hire a licensed electrician and reference AIA spatial planning if integrating built-in media walls. AIA resources
- Acoustical remediation for large open rooms or home theaters — engage an acoustic consultant if echo persists after soft-surface additions.
- Full-scale custom built-ins or millwork—use a professional cabinetmaker and provide them a final scaled plan.
Transition: Below are frequently asked questions that answer specific, practical concerns readers often have right before beginning a layout project.
Conclusion and Next Steps for Living Room Arrangement Planning
Summary: You now have a step-by-step process to measure, zone, choose furniture, mock-up and finalize a living room layout that balances traffic flow, focal points, scale and comfort. Start by measuring and creating tape footprints, test one layout for 48–72 hours, then iterate. For detailed measurement techniques and small-room specifics use the linked guides above; they extend the step-by-step methods here into focused solutions. If you’re ready to proceed, gather your tools, mock-up the major pieces with tape today, and plan to live-test the arrangement this weekend—then refine it with the checklist.
Next step CTA: If you want a printable to-scale worksheet or a quick remote review of your floor plan, consider contacting a certified interior designer or use a room-planning app to model your layout before buying new pieces.


