


By the end of this hands-on guide you will have a measured, furniture-ready plan and styling checklist to design a comfortable, private, and stylish dual-purpose room; this project typically takes 2–8 hours of planning and one weekend to implement for basic changes. Skill level: beginner to intermediate DIY with basic measuring and assembly tools.
Before you start
- Tools: tape measure (metric and imperial), laser distance measurer (optional), pencil, graph paper or a room planner app (RoomSketcher, MagicPlan, or IKEA Home Planner)
- Materials: painter’s tape for temporary zoning, 2–3 swatches for textiles, a notebook for measurements and notes
- Apps & files: photos of the room from three angles, floor-to-ceiling height, window and door positions, and electrical outlet map
- Time block: 2–3 hours for measuring + 2–4 hours to prototype layouts in-app; order lead-times for multifunctional furniture range from 1–6 weeks
Understanding the Challenges of Designing a Shared Living Room and Bedroom
Designing a combined living and sleeping space introduces specific constraints and opportunities unique to shared space design. The main challenges are limited square footage, conflicting activity needs (entertaining vs. sleeping), and privacy concerns. A small studio apartment often needs to function as lounge, workspace, and restful bedroom without feeling cluttered or visually chaotic.
- Measure precisely. Start with a full room survey: measure length and width, window and door swings, heater/radiator locations, and ceiling height. Record outlet positions and light switches. Use the bedroom dimensions guide to confirm standard clearances for beds and circulation.
- Identify primary functions. Rank activities by frequency: sleeping (nightly), watching TV (daily), working (occasional/primary). Prioritization dictates what must be permanent (bed) vs. temporary (fold-away desk).
- Accept trade-offs. Dual-use rooms require compromises: the ideal sofa may not be the best sleep surface; a luxury bed frame may reduce storage. Decide which trade-offs you can live with for comfort or aesthetics.
- Understand ergonomics. Ergonomics matters for furniture height, desk depth, and TV sightlines. For seating and bed heights, aim for 16–20 inches seat height and 18–25 inches mattress platform from the floor for transfers and comfort; these thresholds align with common ergonomics guidance from research organizations.
- Work from zones, not monuments. Instead of centering the room on a single large item, plan zones for sleeping, lounging, and storage. Zoning reduces the “bed dominates the room” problem common in hybrid layouts.
Transition: once the constraints and priorities are clear, you can apply targeted zoning techniques and select multi-functional furniture to create a cohesive hybrid room.
Effective Zoning Strategies to Define Living and Sleeping Areas
Zoning is the process of visually and functionally separating activities in a single room. Think of zoning as creating “rooms within a room” that guide movement and behavior; this helps each area feel purposeful without permanent walls. Below are practical, step-by-step zoning strategies.
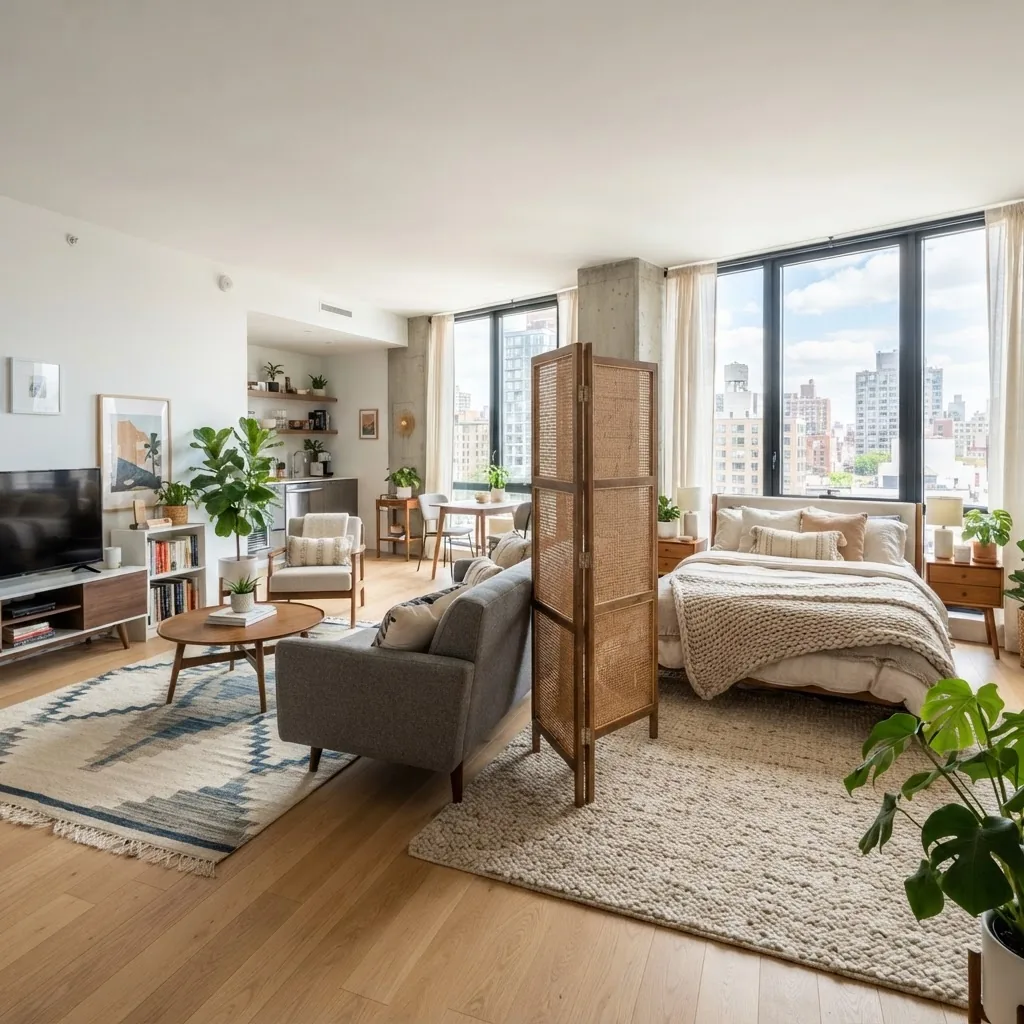
- Define zones with rugs. Place a 5’x8′ or 6’x9′ rug under the sleep area and a separate rug (4’x6’–8’x10′) under the lounge. Keep at least 18–24 inches of bare floor between rug edges to signal separation. Use low-pile rugs in circulation paths to reduce trip risk.
- Use shelving as a divider. Install an open shelving unit that is anchored to the ceiling or wall and around 60–72 inches tall to separate spaces while preserving sightlines and light flow. Choose a depth of 12–16 inches to allow storage without overwhelming the walkway. Open shelves allow airflow and light while providing storage and display.
- Install a folding or sliding partition. For nightly privacy, fit a folding screen or sliding panel on a ceiling-mounted rail. Panels that are 70–80 inches tall block sight and reduce light spill; acoustic-backed panels will also dampen sound. Avoid floor-to-ceiling heavy partitions unless structural reinforcement is possible.
- Hang curtains for flexible privacy. Ceiling-mounted curtains (use track and gates) can enclose the bed at night and be drawn back during the day. Use blackout lining with a room-darkening factor (RDF) of at least 85% for true sleep darkness. Opt for 8–12 oz/yd2 fabrics for drape and durability.
- Anchor the sleep zone with lighting. Use a bedside task lamp (300–600 lumens, 2700–3000K) and separate ambient lighting for the living zone (300–400 lux at eye level). A dimmer on shared circuits provides immediate day-night transitions that reinforce zone use.
- Place the bed strategically. Position the bed so its headboard is against a wall away from the main door when possible. Leave a minimum of 24 inches of circulation space on at least one side; 30 inches is ideal if space allows. Where side clearance is tight, use wall-mounted lights instead of floor lamps.
- Create a visual spine with paint or wallpaper. Paint a single wall behind the bed in a calming hue at 10–15% darker value than the rest of the room, or apply vertical wallpaper to the shelving divider to give the sleeping area its own visual identity without closing it off.
- Arrange furniture to support movement. Keep a primary lane of at least 28–36 inches from the entry through to the bed and living area for comfortable traffic flow. If the main lane must pass between zones, offset the bed to preserve a clear path.
- Incorporate a micro-workstation. If you need a desk, choose a fold-down 28–30 inch deep wall-mounted desk or a compact desk (30–36 inches wide) placed within the living zone so the sleep area remains restful.
- Test and tweak. Temporarily mark zones with painter’s tape on the floor and live with the arrangement for at least 48 hours. Move the tape if circulation feels tight or the bed intrudes on social space.
Transition: with zones established, choose the right furniture pieces that perform double duty—supporting both living and sleeping functions without sacrificing comfort.
Choosing Multi-Functional and Space-Saving Furniture
Selecting the right furniture turns zones into usable spaces. Multi-functional furniture provides storage, transforms for sleep, or disappears when not needed. Below are practical furniture choices and trade-offs by use-case, plus brand examples and comparisons.
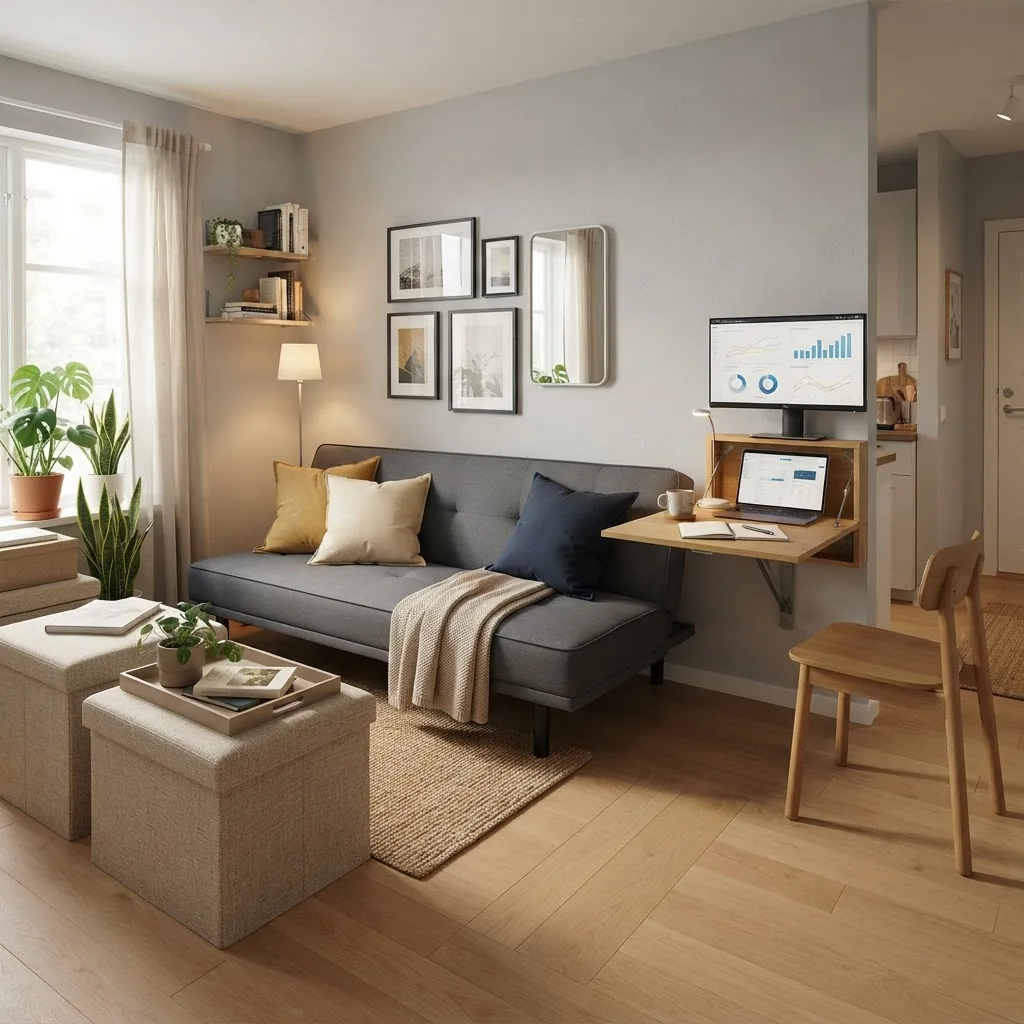
- Choose a quality sofa bed for daily or occasional sleeping. Compare memory-foam sofa beds (better sleep, thicker mattress) vs. inner-spring or slatted-frame designs (lighter, cheaper). For nightly use, choose a mattress thickness of 4–6 inches minimum for slatted sofa beds or 6–8 inches for memory-foam models. Recommended models: IKEA LYCKSELE (budget-friendly), FRIHETEN (storage + pull-out), and Resource Furniture’s transforming sofas for premium, space-saving engineering.
- Select a storage bed or ottoman bed if the bed is permanent. Platform beds with 8–12 inches of under-bed drawer space can replace a dresser. Brands: West Elm storage bed lines and IKEA BRIMNES series offer integrated drawers; choose timber or laminate finishes that resist warping in variable humidity.
- Pick a fold-down desk or wall desk for a compact workspace. Look for units with a 24–30 inch depth when open and internal cable routing. Mount the desk 28–30 inches from floor with an under-desk knee clearance of 24 inches for ergonomic seating. For design references, see compact models by MICKE (IKEA) and wall-mounted steel brackets paired with custom plywood tops.
- Use storage ottomans and benches as seating and concealed storage. Aim for 16–20 inches seat height for standard seating ergonomics and 14–16 cubic feet of internal volume for meaningful storage. Ottoman tops with reinforced hinges and gas-strut assists avoid slam hazards.
- Invest in convertible tables for dining and work. Choose a drop-leaf or butterfly table that extends from 30 inches to 60–72 inches for occasional hosting. Look for locking mechanisms rated for at least 50 kg to ensure stability when loaded.
- Integrate built-in or modular wall units. Modular wall systems which combine open shelving, cabinets, and a concealed Murphy bed offer big wins in small rooms. Resource Furniture and Clei produce certified wall-beds with integrated seating; Murphy beds require 30–40 inches clearance when extended depending on mattress depth.
- Compare materials and weight limits. For multi-purpose use, avoid particleboard on load-bearing pieces; use plywood or solid wood faces with engineered cores for durability. Check weight ratings: shelving should hold 20–40 lbs per linear foot; floating shelves for heavy storage need anchor points and toggles.
- Complement with comfortable seating. For suggestions on seating choices, see comfortable seating options and evaluate seat depth (18–22 inches) for lounging vs. upright tasks.
- Look to layout and arrangement guides. For arrangement patterns that complement multifunctional furniture, review living room layout ideas and living room furniture setup ideas.
- Balance seating density with circulation. In small rooms, allow at least 28–30 inches from coffee table edge to seat to permit comfortable passage. Consider armless chairs or stools that tuck under tables to save space; check small living room furniture layout for tight-space techniques.
- Match furniture scale to ceiling height. In rooms under 8 feet, avoid tall, heavy headboards or shelving; choose low-profile pieces that maintain visual openness. For higher ceilings, vertical storage can increase usable volume without crowding floor space—see ideal living room furniture pieces.
- Decide by lifestyle use-case. If you entertain often, prioritize convertible seating and an expandable table. If you work at home, prioritize a comfortable ergonomic chair (seat height 16–20 inches, lumbar support) and a stable desk surface with cable management. For seating recommendations in compact rooms, consult small living room seating tips.
- Quality vs. budget: plan replacement cycles. Multifunctional mechanisms (folding frames, gas pistons) wear. Expect mid-range convertible furniture to need servicing or replacement within 5–8 years if used nightly; higher-end mechanisms can last 10–15 years with maintenance. Budget for maintenance and replacement accordingly.
- Shop tested lines when possible. Brands with tested mechanisms (Resource Furniture, Clei, IKEA’s convertible lines) provide spec sheets you can review for clearance, weight, and mattress dimensions. For general selection criteria, consider guidance on how to choose living room furniture and match to your plan.
- Consider modular sectional layouts. If you plan a sectional, evaluate small living room sectional layouts for configurations that can be reoriented as needs change.
Transition: after choosing furniture, tune lighting and color to support both wakeful and restful activities without visual conflict.
Lighting and Color Schemes for Dual-Purpose Rooms
Lighting and color choices govern mood, perceived space, and sleep quality. Layered lighting and deliberate color zoning make a single room perform like two. Below are hands-on recommendations, followed by do’s and don’ts.
- Layer your lighting. Plan three layers: ambient (overhead, 300–500 lux for living tasks), task (desk or bedside lamps, 300–600 lumens), and accent (LED strips, 100–200 lumens). Use independent controls or zones so the sleep area can be dimmed separately. Install dimmers with a minimum TRIAC dimmer rating compatible with LED fixtures.
- Optimize natural light. If possible, put the living zone near the primary window to receive daylight and place the bed where you can control daylight with blackout curtains. Tilt blinds and sheer curtains can diffuse glare while preserving brightness during the day.
- Use color to define mood. Apply calming colors for sleep zones (muted blues, greys, warm neutrals at LRV 20–40) and slightly livelier hues for social zones (soft greens, warm taupes). For small rooms, keep base walls in a light value (LRV 60–80) to maximize perceived space while anchoring zones with darker or textured elements.
- Implement color zoning subtly. Instead of painting full walls different colors, use textiles—throw pillows, rugs, and a headboard panel—to create color separation. Paint one accent wall behind the bed no more than 10–15% darker than the room to avoid heavy visual weight.
- Choose temperature wisely. Warm white (2700–3000K) is preferred for sleep areas; 3000–3500K works well in living zones. Avoid bright cool-white (4000K+) near sleep areas as it can disrupt melatonin production.
- Control blue light near bedtime. Install bulbs with lower blue light output or smart bulbs you can program to shift from 3000K to 2200K over an hour before sleep to aid circadian rhythm. According to a 2024 industry report, smart lighting adoption in small-home conversions increased by an estimated 28% as homeowners sought better night-time control, showing the value of programmable lighting.
- Use accent lighting for separation. A wall sconce or directional floor lamp aimed at a bookcase will draw attention to the living zone while not illuminating the bed directly—helpful for a partner who sleeps earlier.
- Do’s and don’ts
- Do use layered lighting with dimming controls.
- Do choose warm color temperatures near sleeping areas.
- Don’t put a bright TV opposite the bed without an antiglare setup or blinds for contrast control.
- Don’t use more than two competing accent colors in a small hybrid room—keep a cohesive palette.
Transition: lighting and color handle mood and perception; storage and layout handle function. Next, maximize storage without crowding the room.
Maximizing Storage Solutions in Shared Spaces
Storage is critical in hybrid rooms. Use vertical planes, hidden compartments, and multi-use furniture to reclaim floor area. Below are step-by-step how-to strategies to add meaningful capacity.
- Audit possessions. Spend 60–90 minutes sorting items into four boxes: keep, seasonal, donate, discard. Target reducing clothing volume by 20–30% before designing storage to avoid oversizing solutions.
- Use under-bed storage effectively. Opt for drawers or rolling bins sized to your bed frame: measure the clearance under the bed; if under-bed clearance is 8–10 inches, choose low-profile containers; if 12+ inches, drawers or lift-up hydraulics are practical. Label boxes and use vacuum storage bags for seasonal textiles to reduce volume by up to 60%.
- Install wall-mounted shelves to free floor space. Place shelving starting 12–18 inches above furniture tops to avoid dust and visual clutter. For books and decor, 10–12 inch deep shelves are sufficient; for storage baskets and bins, choose 14–16 inch depth.
- Build vertical storage. Use floor-to-ceiling cabinets on a non-window wall to capture wasted vertical volume. For narrow rooms, 12–16 inch deep cabinets provide storage without encroaching on circulation. Include adjustable shelves every 12–16 inches to accommodate different items.
- Fit furniture with hidden compartments. Choose beds with built-in drawers, sofas with storage chaise sections, and ottomans with internal bins. Expect to gain 10–15 cubic feet of storage from a typical storage bed and 3–6 cubic feet from storage ottomans.
- Leverage multi-purpose decor. Use decorative baskets, stackable trays, and labeled containers for flexible organization. Standard basket dimensions (12″ x 15″ x 9″) fit most open shelving niches.
- Optimize closet interiors. Install a double-rail system (top rail 66–72 inches from floor; lower rail 36–42 inches) and add shelf dividers. Use slimline hangers (0.4 inches thick) to save 10–20% hanger space.
- Conceal cords and electronics. Use cable raceways behind wall units and a centralized power strip mounted off the floor to keep walkways clear and reduce trip hazards. Label cables and use Velcro strips to bundle excess length.
- Step-by-step install example (wall shelving).
- Measure and mark stud positions with a stud-finder; mark where shelves will sit at 48 inches above floor for a media shelf.
- Secure brackets into studs using 2.5 inch wood screws; use toggles for drywall-only anchors rated at least 100 lbs.
- Place shelf boards (3/4″ plywood recommended) cut to length; secure with 1 inch screws and brad nails for extra stability.
- Use stackable, modular storage for flexibility. Buy modules in 15–24 inch widths so you can reconfigure as needs shift—this is critical in rental units where permanence is limited.
Transition: storage plus good layout helps with privacy and acoustic control, which we cover next.
Maintaining Privacy and Noise Reduction in Combined Rooms
Privacy and quiet are non-negotiable for restorative sleep. Combining light-blocking and acoustic strategies ensures the living area’s activity doesn’t spoil rest. Below are practical techniques and product suggestions.
- Install sound-absorbing textiles. Use a 6–8 lb/yd2 rug pad and 1/2–3/4 inch thick area rugs to damp footsteps. Add upholstered furniture and heavy curtains (8–12 oz/yd2) which absorb mid- to high-frequency sounds.
- Apply acoustic panels where needed. Mount 1–2 inch thick melamine or mineral wool panels on the wall behind the headboard and across the living area for a balanced sound profile. Panels covering 10–20% of wall area can reduce reverberation by 10–20% depending on room shape.
- Use sound-blocking curtains and seals. For windows and sliding doors, fit blackout curtains with a dense lining and add door sweeps to gaps under doors to reduce noise transfer and light leakage.
- Consider white-noise machines. Evaluate a white-noise machine or an app with a 60–70 dB range to mask intermittent noise. Place the device 3–6 feet from the bed for best coverage without loudness that disrupts sleep.
- Choose privacy screens appropriately. Folding privacy screens (60–72 inches high) are portable and permit quick reconfiguration; choose screens with a dense core or fabric layer to improve acoustic attenuation vs. thin woven screens.
- Layout adjustments to minimize noise. Place bookshelves or wardrobes as a buffer against noisy walls (street-facing) and avoid placing loud appliances (speakers, VR equipment) near the bed area. If you need to watch TV late, mount speakers closer to the living zone and direct sound away from sleeping zones.
- Product suggestions. Acoustic panels: brands such as ATS Acoustics and Auralex have tested panels; sound-absorbing curtains: Velvet-lined blackout curtains rated for 20–30 dB reduction; white-noise machines: models providing pink and brown noise options are preferable for masking low-frequency disturbances.
- Understand limitations. For significant soundproofing (neighbors, shared walls), full wall decoupling or adding mass (double drywall with damping compound) is required—this is structural work and may need professional consultation. For code and safety on structural changes, consult open floor plan house plans or a licensed contractor.
Transition: acoustic and privacy treatments also inform your decor choices—now harmonize both aesthetics and function.
Styling Tips to Harmonize Living Room and Bedroom Aesthetics
Styling a dual-purpose room means creating visual cohesion so the space reads as one thoughtfully-designed area rather than two competing rooms. Below are rules, examples, and stylistic frameworks.
- Create a cohesive palette. Limit your primary palette to three colors: a background neutral, an accent color, and a contrasting texture. Use textiles (throws, cushions, curtains) in the accent color to link zones. For upscale inspiration, explore elegant interior drawing room ideas.
- Keep decor multifunctional. Decorative storage boxes, attractive baskets, and stackable trays perform styling and storage duties simultaneously—choose consistent materials (rattan, woven seagrass, or matte painted metal) for cohesion.
- Use plants to unify zones. Place medium-height plants (2–4 feet) near the divider to blend areas and improve acoustics. Choose low-maintenance varieties like snake plant or pothos for low-light situations.
- Choose textiles for layered comfort. Layer a lightweight throw (50% cotton/50% acrylic) and a warmer wool blanket for sleep transitions. Pillow sizes: 20″x20″ for lounge cushions, 16″x24″ or Euro shams for bed back support.
- Select art and focal points wisely. One larger focal piece (36″x48″) over the sofa can anchor the living zone; a smaller cluster (three 11″x14″ frames) above the bed keeps the sleeping area intimate.
- Modern furniture sets for style guidance. To see contemporary sets that balance form and function, refer to modern living room furniture sets.
- Balance minimalism and warmth. Minimalist furniture reduces visual clutter but can feel cold. Add two warm-textured elements (rugs, woven basket, wooden side table) to keep the space inviting.
Transition: styling completes the environment. Next, see practical layout examples and two real-world case studies that demonstrate how these techniques combine.
Practical Layout Examples and Case Studies for Shared Spaces
This section shows annotated layouts and two real-world case studies to model your own plan. Each floor plan example includes measurements and furniture lists; these are reproducible templates you can adapt to your dimensions.
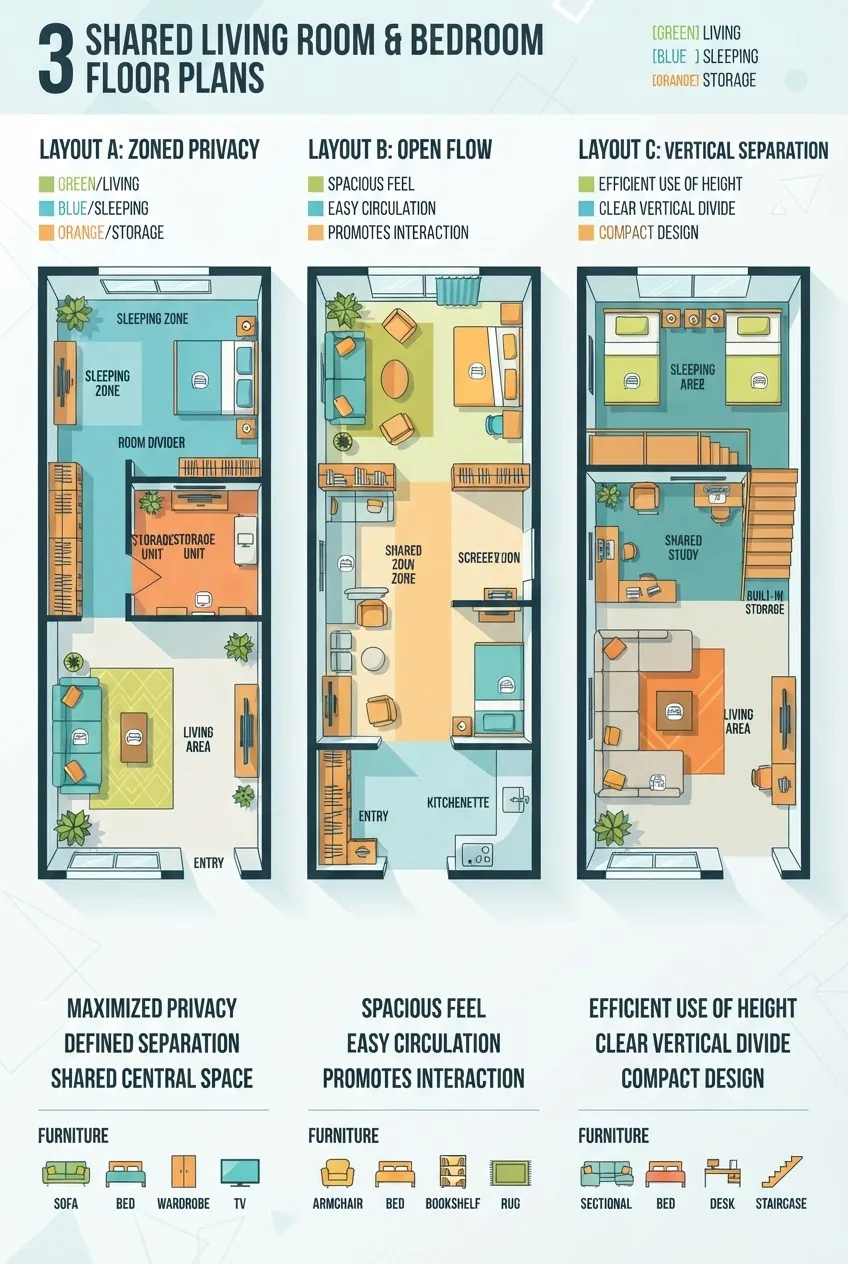
- Studio layout A — 320 sq ft (approx. 29.7 m²) modular plan.
Room footprint: 16′ x 20′. Bed: 54″ x 75″ full platform with 10″ under-drawer clearance on the far wall. Living zone: 72″ sofa with pull-out, 18″ coffee table. Storage: floor-to-ceiling shelving (12″ deep) forms a partial open partition at 60″ height. Circulation: 36″ primary lane from door to window.
Item Dimensions Notes Full platform bed 54″x75″ Lift-up drawers, 8″ clearance Sofa bed 72″ W Pull-out mattress 4.5″ thick for guest use Open shelving divider 60″H x 12″D Anchored to wall; dual-access storage - Case study 1 — Urban studio conversion (Owner: L.M.).
L.M. converted a 300 sq ft inner-city unit into a day-night studio by installing a ceiling-mounted curtain with a headboard-backed twin platform bed and a 60″ convertible sofa facing the window. Results: increased perceived space, a 30% reduction in clutter, and improved guest hosting flexibility. Measurements and plan were sketched in MagicPlan and adjusted after a 48-hour live test.
- Case study 2 — Shared room for one occupant + home office (Owner: S.R.).
S.R. needed a workspace and restful area in 340 sq ft. They placed a Murphy bed (full-sized) within a custom unit that concealed an office desk when stowed. The desk was set at 29″ height with a 20″ knee clearance; the owner used a Herman Miller-style ergonomic chair with adjustable seat heights (16–20″) and added sound-absorbing panels behind the desk to separate audio from the bedroom side. The plan was drawn using RoomSketcher and dimension-checked against the bedroom dimensions guide.
- Layout variant catalog.
Three quick floor plan types to test (use the infographic above):
- Open-plan linear: bed at one end, living at the other, divider shelving between.
- Central partition: bed behind a partial wall or large cabinet, living in front.
- Convertible core: Murphy bed or wall bed that reveals a sofa or workspace when closed.
- Tools and techniques for accurate planning.
Measure twice: use a tape measure and confirm with a laser distance measurer. Sketch at 1/4″ = 1′ scale on graph paper or use a digital planner. For DIY sketching methods, see draw bedroom layout techniques and consider space planning techniques.
- Additional references for tricky shapes. If your room has an awkward footprint, consult suggestions on awkward living room layout ideas and view transformations in before and after living room layout.
- Expand to open-plan solutions. For hybrid layouts that adjoin kitchens, explore open concept kitchen and living room floor plans and open floor plan house plans for flexible solutions and cross-zone considerations.
- When a second living area is feasible. If you have extra rooms, consider functional second living room ideas to relocate entertainment functions away from rest spaces.
- Small house and two-storey considerations. Small two-storey homes can tuck bedrooms upstairs and living areas below—see small design solutions for two-storey houses for options that reduce hybrid conflicts.
Real-world note on standards and safety: consult established designers and standards bodies for best practices. For professional best practices, see the American Society of Interior Designers guidelines via living room layout furniture arrangement ideas and external resources like the American Society of Interior Designers for professional standards, ergonomics research publications for seating and posture guidance, and housing and safety standards for structural and safety considerations.
Common mistakes and how to avoid them (from practice)
I once specified a low-profile sofa bed for nightly use without checking mattress depth; the client complained of stiffness because the pull-out mattress was under 4″. Always check mattress thickness for nightly use (6″+ recommended). Another time I placed an open shelf divider too close to the circulation path—people clipped their shoulders on protruding decor. I now keep 18–24″ clear from open shelving edges to the main lane.
Checklist before you finish
- All measurements verified (two methods) and layout sketched to scale.
- Zones defined with rugs, shelving, or curtains and tested for 48 hours.
- Selected furniture rated for intended use (pull-out mattresses, weight limits confirmed).
- Lighting layered with dimming and separate controls for sleep and living zones.
- Storage capacity measured (cubic feet) for seasonal and everyday items.
- Privacy and noise mitigation measures installed or planned.
- Safety and code checks referenced via professional guidelines or the HUD site if making structural changes.
When to call a professional
- If you plan structural alterations (removing load-bearing walls, adding built-in cabinetry beyond cosmetic anchors)
- When advanced soundproofing is required (wall decoupling, mass-loaded vinyl) — consult a contractor or acoustic engineer
- If electrical modifications are needed for new lighting circuits or outlets — hire a licensed electrician
- For complex custom wall-bed installations requiring structural reinforcement — use certified installers


