


What you will achieve: By the end of this hands-on home repairs guide you’ll be able to diagnose and complete the most common household repairs, set a seasonal maintenance routine, and create a realistic repair budget. Plan on 6–12 hours of focused work for a set of typical fixes (few minor jobs and a full preventive checklist); skill level required: beginner-to-intermediate DIY.
Before you start
- Permit check: know local permit needs for electrical, plumbing, or structural changes
- Safety gear: gloves, safety glasses, respirator for dust, and a non-contact voltage tester
- Basic tools: hammer, adjustable wrench, screwdriver set, pliers, utility knife, tape measure
- Materials: replacement washers, slip-joint pliers, patching compound, electrical outlet replacements, plumber’s tape
- Reference: have a notepad for measurements and photos to document before/after
Introduction to Home Repairs and Maintenance
Good home repairs and maintenance protect your largest investment and keep daily life predictable and safe. This section frames the repair basics—why regular household upkeep matters and how to prioritize common fixes for safety and cost-savings. Think of your plumbing as the home’s circulatory system: small clogs or leaking valves become bigger failures if ignored.
A practical maintenance habit reduces emergency costs, improves energy efficiency, and keeps systems within warranty and code. For broader project inspiration and skill-building beyond repairs, see the resource below.
DIY Home Improvement Projects Guide with Tips and Ideas
Transition: next we’ll identify the most common repairs you’ll encounter, laid out so you can spot symptoms quickly and choose whether to DIY or call a pro.
Common Types of Home Repairs Explained
Below are the everyday household repairs you’ll likely face, described so you can diagnose problems and understand urgency.
- Plumbing repairs (leaks, faucets) — Typical issues include dripping faucets, running toilets, and minor leaks under sinks. A dripping kitchen faucet usually needs a new cartridge or O-ring; slow drains often indicate trapped hair or grease buildup.
- Electrical repairs (outlets, switches) — Common signs: warm outlets, flickering lights, or outlets that don’t hold plugs. Replace a damaged receptacle or switch (always turn power off at the breaker and verify with a non-contact tester).
- HVAC maintenance — Regular tasks include filter changes, condensate drain clearing, and thermostat calibration. Seasonal tune-ups keep systems efficient and extend lifespan.
- Roof and gutter repairs — Small roof patching, flashing repair, and regular gutter cleaning stop leaks and foundation damage. Replace missing or cracked shingles and reseal flashing around chimneys or vents.
- Wall and drywall patching — Patching nail pops, small holes, and cracks is straightforward with compound and sanding. Larger damaged sections may need new drywall cut-in.
- Appliance troubleshooting — Many issues are diagnostics: is the appliance getting power? Is a fuse blown? Refer to the appliance manual and test circuits before replacing components.
- Hand tool upkeep and use — Regular tool maintenance—keep blades sharp, screwdrivers aligned, and wrench jaws clean—prevents damage during repairs.
- Preventive maintenance checklist items — Seasonal checks like gutter clearing, HVAC filter replacement, and caulking gaps around windows avoid costly repairs later.
- Cost estimate awareness — Repairs range widely: a faucet cartridge is inexpensive and often DIY, while roof repair or rewiring can quickly become costly and require pros.
- Safety precautions and when to call professionals — Anything involving service panels, gas lines, major structural elements, or suspected mold should trigger a professional evaluation for safety and code compliance.
- Seasonal-specific repairs — Winterize exposed pipes, inspect roofing before storm season, and test sump pumps before rainy months.
- DIY repair kits — Faucet repair kits, outlet replacement kits, and drywall patch kits streamline small jobs for novices.
- Energy efficiency fixes related to repairs — Sealing air gaps, insulating ducts, and replacing drafty windows reduce energy waste and lower bills.
- Special situations: older or kit-built homes — Older homes often hide outdated wiring or plumbing; modular/kit-built homes can have manufacturer-specific parts—refer to a house kits guide or an old home renovation guide.
- Cosmetic vs. essential repairs — Differentiate cosmetic home interior remodeling guide projects from essential fixes that defend structure and safety.
Transition: now that you can recognize the most common home repairs, let’s gather the tools and materials you’ll use on the majority of projects.
Essential Tools and Materials for DIY Home Repairs
A compact, well-maintained tool kit covers nearly every small household repair. Organize tools by function and keep safety gear accessible.
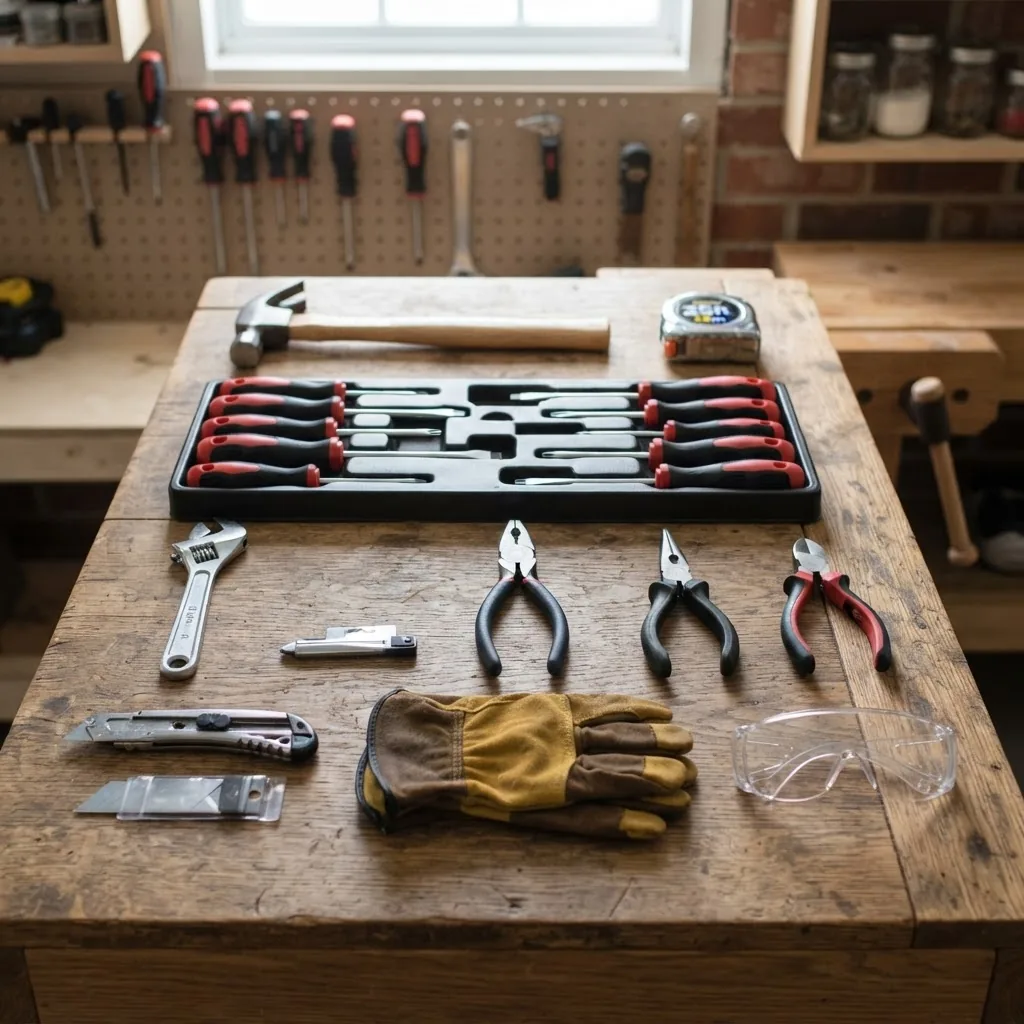
- Hand tools
- Claw hammer (16 oz)
- Adjustable wrench (6–12″) and set of open-end wrenches (8–19mm)
- Screwdriver set: Phillips #1–#3, slotted 1/8″–1/4″
- Pliers: slip-joint and needle-nose
- Tape measure (25 ft) and utility knife with spare blades
- Electrical tools
- Non-contact voltage tester and receptacle tester
- Insulated screwdriver set and wire strippers
- Plumbing tools
- Slip-joint pliers (10″), basin wrench for tight faucets
- Plumber’s tape (PTFE/Teflon), pipe dope, replacement O-rings and cartridges
- Repair kits and materials
- Drywall patch kits, joint compound, and 120–220 grit sandpaper
- Faucet repair kits (universal cartridges can vary—keep make/model)
- Outlet/switch replacement kits with covers
- Safety gear
- Safety glasses, work gloves, N95 or better dust mask, ear protection
- Fire extinguisher rated ABC within easy reach
- Materials & consumables
- Assortment of screws, anchors, drywall screws, caulk (silicone and acrylic)
- Flashlight or headlamp with fresh batteries
- Tool maintenance
- Keep metal tools oiled, sharpen blades quarterly, and store screwdrivers dry to prevent corrosion
- Basic carpentry skills — For quick carpentry tasks, see the simple carpentry projects guide.
Transition: with tools in hand, the next section walks through step-by-step repair methods for the most common household issues. Each sub-procedure lists concrete steps you can follow.
Step-by-Step DIY Repair Methods for Common Household Issues
This part is the hands-on core. Each repair below includes 4–6 explicit steps—action-first and practical. For extra project ideas and skill-building beyond repairs, review the linked resource.
DIY Home Improvement Projects Guide with Tips and Ideas
Transition: follow these repair methods precisely, and check the “Common mistakes” section afterward for real-world pitfalls I’ve seen.
Fix a dripping kitchen faucet (cartridge or O-ring)
- Turn off the water supply. Close the sink shutoffs under the sink or shut the house supply if needed; open the faucet to bleed remaining water. (Time: 2 minutes)
- Identify the faucet type. Remove handle with screwdriver; photograph the assembly to pick the correct cartridge or O-ring. Many single-handle faucets use a cartridge; two-handle faucets use seat and spring assemblies. (Time: 5–10 minutes)
- Replace O-rings or cartridge. Pull the cartridge or stem out; replace worn rubber O-rings and the cartridge if corroded. Apply a light coat of plumber’s grease on O-rings. (Parts: ~$5–$35; Time: 10–20 minutes)
- Reassemble and test. Re-install handle, open water supply, and run the faucet for 2–3 minutes to verify the leak is fixed and no new drips appear.
- Check for hidden leaks. Inspect under-sink fittings and cabinet floor 24 hours after repair for slow seepage.
Unclog a slow drain (bathroom or kitchen)
- Remove visible debris. Use gloved hands or a drain snake to remove hair or gunk near the surface. (Time: 5–10 minutes)
- Use a plunger correctly. For sink drains, seal overflow with a wet cloth; plunge 8–12 quick strokes, then check flow. (Time: 5 minutes)
- Snake the drain. Feed a hand auger 10–25 feet into the drain until resistance, then rotate and pull back to remove blockage. (Tool cost: $15–$60; Time: 10–20 minutes)
- Flush with hot water. Run 2–3 liters of hot water to clear residual grease. Avoid chemical cleaners on older pipes; they can damage seals.
Patch a small drywall hole (up to 4 inches)
- Cut a clean opening. Square the hole with a utility knife to make a 4″ or smaller square. (Time: 5 minutes)
- Insert backing support. Insert a 3–4″ wood furring strip behind the drywall; screw through the drywall into the strip to create a firm backing. (Time: 10 minutes)
- Apply drywall patch and compound. Fasten a drywall patch or cut a drywall piece to size, screw it to the backing, and apply joint compound in two layers, drying 2–4 hours between coats. (Materials: ~$10–$25; Time: 1–6 hours including drying)
- Sand and paint. Sand with 120–220 grit until smooth, prime, then paint to match. Dry time: 24 hours for paint to fully set.
Replace a non-working electrical outlet
- Turn off power at the breaker. Label the breaker and test the outlet with a non-contact voltage tester to confirm power is off. (Time: 2–3 minutes)
- Remove the cover and outlet. Unscrew the receptacle and gently pull forward to access wires. Note wiring position or take a photo. (Time: 5 minutes)
- Transfer wires to new outlet. Connect black (hot) to brass screw, white (neutral) to silver screw, and green/bare to ground. Tighten screws to 20–25 in-lbs. (Ensure firm connections.)
- Reattach and test. Fit into box, screw in, replace cover, turn breaker on, and test with receptacle tester for proper wiring and grounding.
Repair a running toilet
- Diagnose the cause. Remove the tank lid; observe the fill cycle and check for worn flapper, misadjusted float, or fill valve issues. (Time: 3–5 minutes)
- Replace the flapper if leaking. Turn off water to toilet, drain tank, unclip old flapper and attach replacement (universal flappers fit most). (Part: $6–$15; Time: 10 minutes)
- Adjust the float or replace fill valve. If tank overfills, lower float height or replace the fill valve assembly (~$15–$40). Adjust to stop water level 1/2″ below overflow tube.
- Test for leak. Add a few drops of food coloring to tank; after 10 minutes, check bowl—no color should appear if sealed.
Patch a small roof leak (shingle replacement)
- Inspect safely. Use a stable ladder and have a helper; never climb a wet roof. Inspect shingles for cracking, missing fasteners, or damaged flashing. (Safety: use fall arrest for steep roofs.)
- Remove damaged shingle. Pry the shingles above the damaged one, remove nails, slide out the damaged shingle, and replace with a matching shingle. Nail 6″ above shingles and seal underlay with roof sealant. (Materials: $5–$20; Time: 20–30 minutes)
- Seal flashing and test. Apply a bead of roof sealant around seams and nail heads. After a rain or controlled hose test, inspect the attic for leaks.
- Document and monitor. Note repair date and check again after the next heavy rain to confirm success.
Basic appliance troubleshooting (washer, dryer, fridge)
- Confirm power and supply. Check the breaker, outlet, and for appliances on gas ensure the valve is open. (Time: 5 minutes)
- Run diagnostics if available. Many modern appliances have a diagnostic code sequence in the manual—record any error codes.
- Check common failures. For washers: clogged pump filters; dryers: clean lint trap and vent; refrigerators: ensure condenser coil is clean and door seals intact.
- Decide repair vs. replace. If part cost exceeds 50% of appliance value or warranty expired, consider replacement. (See cost section for typical price ranges.)
Minor HVAC tasks (filter change & condensate check)
- Turn off the system. Switch thermostat to OFF and flip the unit’s breaker. (Time: 1–2 minutes)
- Replace filters monthly or per manufacturer. Use MERV 8–13 as recommended for your system; note date of replacement on filter frame. (Filter cost: $10–$30; Time: 5 minutes)
- Clear condensate drain. Use a wet/dry vacuum on the condensate line or flush with a 1:1 mix of water and white vinegar to remove algae. (Time: 10–15 minutes)
- Schedule annual professional tune-up. A certified HVAC tech should inspect refrigerant levels and safety controls yearly.
Repair exterior wood rot (small deck board)
- Assess the rot. Probe with a screwdriver to determine the depth; if rot exceeds 25% of board thickness, replace the board. (Time: 5 minutes)
- Remove and replace board. Unscrew or pry the damaged board, cut a replacement to length from pressure-treated lumber, pre-drill, and fasten with exterior screws. (Board cost: $8–$25; Time: 20–40 minutes)
- Seal and finish. Apply a wood preservative to end cuts and a finish coat for UV protection within 48 hours.
Transition: with the hands-on methods complete, adopt a preventive routine to keep these repairs from recurring.
Preventive Home Maintenance Tips to Avoid Costly Repairs
Routine inspections and seasonal tasks are your best defense. Below is a prioritized checklist that saves money and prevents emergencies.
For small cosmetic upgrades after repairs, consult the DIY home decor ideas guide for inspiration.
- Monthly
- Change HVAC filters (every 1 month for high-use or every 3 months otherwise).
- Test smoke and CO detectors; replace batteries annually or when chirping.
- Quarterly
- Inspect plumbing under sinks for dampness and tighten loose fittings.
- Clean range hood filters and inspect dryer vent for lint buildup.
- Biannually (spring & fall)
- Clean gutters and downspouts—remove debris and check for proper downspout drainage to avoid foundation water damage.
- Check roof for loose or missing shingles and clear debris from valleys and flashing.
- Service HVAC before cooling/heating seasons; change thermostat batteries and verify program schedules.
- Annually
- Inspect the home envelope: caulk windows/doors and check for air leakage—seal gaps with 3/8″ backer rod and exterior-grade caulk.
- Pressure-test the sump pump and inspect foundation for hairline cracks; measure cracks monthly for movement.
- Energy efficiency tips tied to maintenance
- Seal ducts and insulate to at least R-8 in accessible areas to reduce HVAC runtime.
- Replace incandescent bulbs with LEDs and add smart thermostats to save 8–12% on energy load according to modern efficiency frameworks.
- DIY aids — Make small maintenance tools: see the handmade crafting ideas guide and the things to make at home guide for simple maintenance helpers.
Transition: preventive work reduces frequency of repairs — but you still need to plan and budget. The next section breaks down typical repair costs so you can plan accordingly.
Home Repair Cost Estimates and Budget Planning
Costs fluctuate by region, part availability, and labor rates. According to a 2024 industry report from Angi, average repair costs have modestly risen due to labor and material pressures.
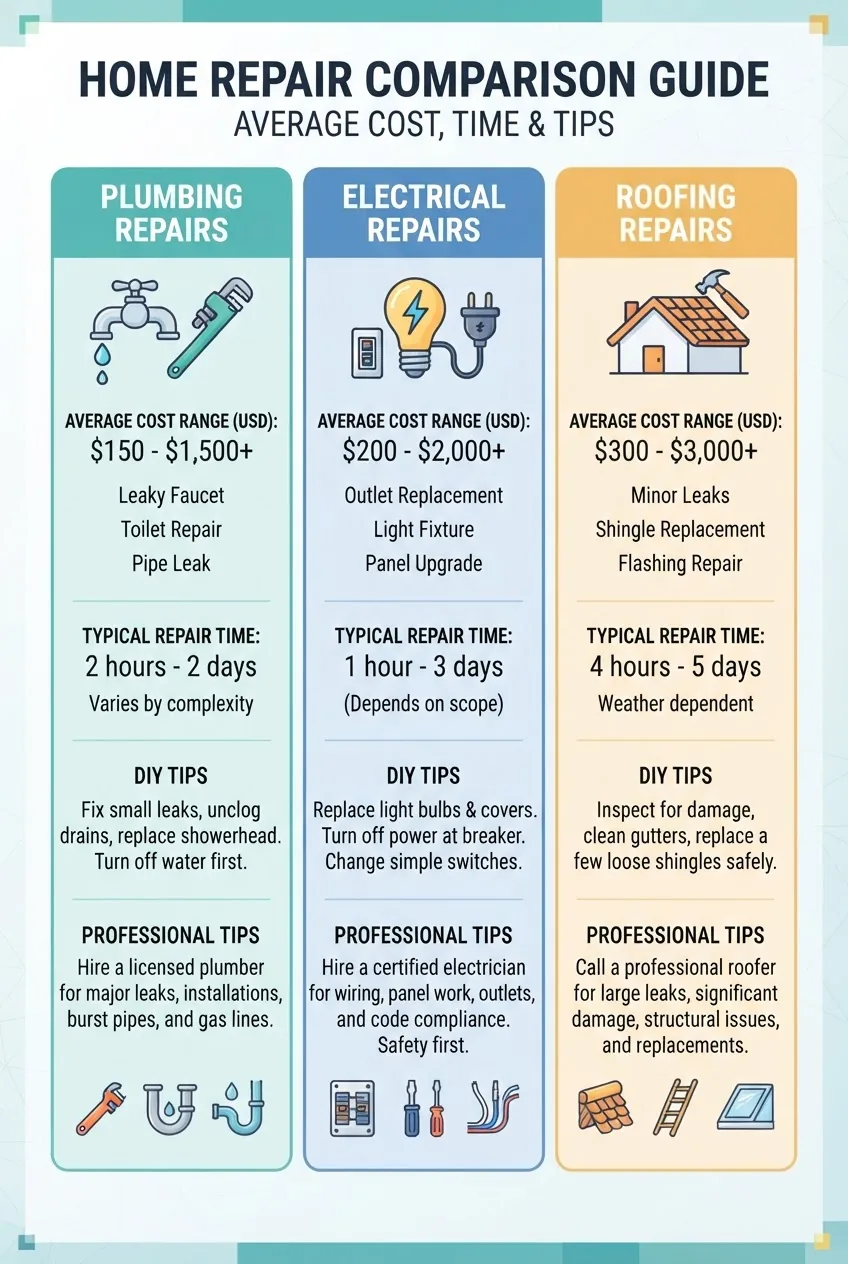
| Repair Type | DIY Cost Range (parts) | Professional Cost Range (labor + parts) | Typical Time |
|---|---|---|---|
| Faucet cartridge/O-ring | $5–$40 | $120–$250 | 30–60 minutes |
| Electrical outlet replacement | $3–$15 | $120–$220 | 15–45 minutes |
| Toilet flapper / fill valve | $6–$40 | $150–$350 | 15–60 minutes |
| Drywall patch (small) | $10–$40 | $150–$400 | 1–6 hours (incl. drying) |
| Roof shingle repair | $5–$40 | $200–$1,000+ | 30 minutes–few hours |
| HVAC service (annual) | N/A | $80–$200 | 60–90 minutes |
Budget planning tips
- Set aside 1–3% of home value annually for maintenance and small repairs (common homeowner rule-of-thumb).
- Create a repair contingency: $1,000–$3,000 emergency fund for unexpected structural or systems failures.
- Compare part cost to professional minimums: if a part costs >50% of a contractor’s minimum trip charge, consider DIY if safe and legal.
- Get 2–3 quotes for larger jobs; document quotes and warranties.
- For budget renovation guidance, see the affordable home improvements guide and the DIY home renovation guide.
Mini case study: budgeting a bathroom leak vs hiring a pro — I once tracked a slow leak under a bathroom vanity. DIY parts cost $25 (replacement P-trap gasket and plumber’s tape) and took 45 minutes; a plumber’s minimum call plus parts quoted $180. With observed signs of widespread water damage I opted for a pro; otherwise the DIY route saved money and time. Always assess hidden damage potential.
Transition: the next section helps you decide when to DIY and when to call a professional.
When to Seek Professional Help vs. DIY Repairs
Balancing complexity, safety, permits, and warranty concerns guides the DIY vs pro decision. Use the comparisons and safety caveats below.
| Scenario | DIY Pros | Pro Pros / Safety Caveats |
|---|---|---|
| Changing a faucet washer or cartridge | Low cost, quick turnaround, easy parts | If leak is in supply lines or hidden under cabinet—possible wall damage—call a plumber |
| Replacing an outlet or switch | Simple, inexpensive, limited risk when power is off | Complex wiring, multi-wire circuits, or panel work requires a licensed electrician and may need permits |
| Roof structural repair | Small shingle replacement doable | Structural or extensive roof work requires a roofing contractor; fall risk and structural code compliance matter |
| Gas line or major HVAC repair | N/A | Always call licensed pros for gas or refrigerant work; codes and licensing apply |
Safety caveats: consult government building code guidance for permits and licensing. For U.S. code and permit basics, see https://www.hud.gov. For trade standards and tool recommendations, consult the National Association of Home Builders at https://www.nahb.org. For current repair cost statistics, reference the Angi 2024 data at https://www.angi.com.
Pros & cons summary:
- DIY advantages: lower out-of-pocket costs for minor repairs, immediate scheduling, skill development.
- DIY disadvantages: potential for improper repair, voided warranties, missing permits, and personal injury if safety protocols ignored.
- Professional advantages: licensed tradespeople, warranties, insurance coverage, permit handling.
- Professional disadvantages: higher cost and scheduling delay.
Transition: before you start your next repair, review the common mistakes below so you don’t lose time or money.
Common mistakes and how to avoid them
I’ve seen homeowners tighten a leaky pipe only to crack the fitting—the fix cost more than the original repair. Don’t over-torque fittings; use a backup wrench and hand-tighten, then 1/8–1/4 turn with the wrench. Another common error: replacing an outlet without cutting power at the breaker; I once nearly shocked myself because the breaker wasn’t labeled—always test with a non-contact voltage tester. I’ve also sanded drywall before the compound fully dried, creating a dust cloud and uneven surface—allow full drying time (2–4 hours per thin coat) and use a damp sponge to smooth edges before final sanding.
Compact checklist to verify your repair work
- No leaks or drips visible after 24 hours under replaced plumbing parts
- Electrical outlets show correct wiring and grounding on a tester
- Drywall blends smoothly with surrounding finish and paint matches
- Roof repairs sealed and attic shows no signs of moisture after a rain
- Appliances cycle correctly and do not show error codes
- Your maintenance log shows date and parts used for each repair
When to call in a professional instead
Call a licensed pro if any of the following apply: suspected structural damage, gas leaks, electrical panel work, sewer backups, mold covering more than 10 sq ft, or when a job requires a permit. For larger remodeling or structural projects, consider the best home improvements for effective renovations and consult a home improvement remodeling guide or the how to build a home guide for structural projects.
Experience note: check for licensing and insurance before hiring—request proof of liability insurance and a local business license. Follow local code guidance; a permit may be mandatory for electrical or major plumbing work (check municipal building department rules).
Final transition: below is a short recap and a clear next step to keep your home in good repair.
Conclusion
This home repairs guide arms you with the practical steps, tools, preventive checklist, and realistic cost estimates to manage everyday household repairs confidently. Start with the “Before you start” checklist, follow the step-by-step repairs, and keep the preventive schedule—save receipts and photos for warranties. If you’re planning larger renovations, budgeting resources such as the home renovation ideas guide or the home renovation ideas on a budget guide will help you scale up wisely.
Ready to get started? Tackle one small repair this weekend, document it, and add the task to your maintenance calendar. If you’d like a printable version of the checklist or a prioritized task list based on your climate and home age, bookmark this page and consult a local pro for permit guidance.


