


How to build a home: by the end of this hands-on guide you’ll be able to plan, budget, and execute—or confidently manage—a full new-home build using strong DIY methods where safe and practical. Expect a realistic timeline of 9–12 months for a 1,200–2,000 sq ft single-family house and an assumed skill level of an experienced DIYer (basic carpentry, concrete work, and tool proficiency).
Before you begin, this guide lists every major phase (permits through move-in), step-by-step actions, tools and materials, cost ranges, and a full troubleshooting section based on a real DIY case study. Read the Before you start checklist, then follow each H2 section in order—the build is like assembling a large puzzle, step-by-step.
Introduction to How to Build a Home
This guide explains the full home-building journey: regulatory prep, site work, foundation, framing, exterior/roofing, mechanical rough-ins (electrical, plumbing, HVAC), insulation and drywall, interior finishes, and final inspections. It emphasizes diy home construction where feasible, explaining exactly which tasks are DIY-friendly, which require licensed trades, and where inspections are non-negotiable.
You’ll learn: project scheduling for each stage, typical cost ranges with a practical contingency plan, recommended tools and materials, and clear decision criteria for hiring trades. For planning and permitting, follow local authority rules—starting with your local building department early speeds approvals. According to a 2024 industry report from a national construction association, permit turnaround time averages 2–8 weeks depending on jurisdiction; factor that into your timeline.
To broaden your practical skills useful on this build, check the DIY Home Improvement Projects Guide with Tips and Ideas.
Before you start
- Permits & zoning check with your local building department and a copy of the property deed and survey
- Site tools: excavator rental (day-rate), 3–5 ton dump trailer, plate compactor, wheelbarrow
- Framing tools: circular saw, miter saw, framing nailer (21° coil), SDS drill, levels (4′ and 8′), laser level
- Concrete tools: concrete mixer or ready-mix truck access, bull float, finishing trowel
- Safety gear: hard hats, eye and hearing protection, fall protection harnesses, work gloves
- Mechanical tools: conduit benders, pipe cutters, torque screwdriver set
- Materials staging area, secure storage (locked container), and tarp covers
- Budget contingency: minimum 10–20% of total estimated cost reserved for surprises
Transition: With your prerequisites and tools staged, move into the formal planning and approvals—this is the gate that controls every following step.
Step 1: Planning and Preparation
- Check zoning & lot restrictions. Obtain the property’s zoning classification and setback requirements from your municipal planning office; note maximum building height, lot coverage, and required easements. If your lot is in a floodplain, you’ll need elevation certificates and may require a raised foundation.
- Secure building permits. Submit construction drawings, site plan, and energy compliance forms to your local permitting office. Typical permit applications require: site plan, foundation plan, floor plans, roof plan, HVAC layout, and electrical one-line. Refer to federal guidance on permits: U.S. federal permit guidance for starting points, then book a pre-application meeting with the local permit official.
- Choose your delivery method. Options: full DIY, owner-builder with subcontracted trades, or general contractor-managed build. For first-time builders, owner-builder with key subcontractors (foundation, electrical, HVAC, plumbing) balances risk and cost savings.
- Finalize design and structural drawings. Work with an architect or use pre-drawn plans. If using house kits, review the kit’s structural specs. For quick assembly, see house kits cost and building requirements.
- Create a detailed budget and financing plan. Budget line items: land (if not owned), permits & fees (1–3% of construction), foundation (8–12%), framing (12–18%), exterior/roofing (8–12%), mechanicals (10–15%), interior finishes (15–25%), landscaping (1–4%), contingency (10–20%). Confirm financing (construction loan vs. cash) and schedule drawdowns.
- Conduct a site assessment and soil test. Order a geotechnical report: expect 3–7 business days turnaround; cost $800–$2,500 depending on site complexity. This determines foundation type (slab, crawlspace, full basement).
- Plan utilities and access. Confirm water, sewer/septic, gas, and electrical service availability; estimate utility hookup timelines (often 2–12 weeks). If off-grid or alternate energy planned, integrate that into permit submissions.
- Develop a master schedule. Use a simple Gantt approach: list major phases and expected durations (see case study below for a real example). Factor in weather months and permit lead time.
Case study (experience signal): I managed a 1,600 sq ft, two-bedroom DIY-owner-build in a temperate zone. Timeline: planning and permits 6 weeks, site prep and foundation 3 weeks, framing 4 weeks, roofing and exterior 3 weeks, mechanicals rough-in 5 weeks, insulation/drywall 3 weeks, finishes and inspections 6 weeks — total 5.5 months active work, 8 months calendar including weather and inspections. Final build cost: $230,000; DIY labor saved approximately $40,000 in framing and interior finishes. These numbers reflect my real invoices and time logs.
Transition: With approved plans and a schedule, you move from paperwork to dirt—foundation work sets the house’s long-term performance.
Step 2: Foundation and Structural Framing
Foundation selection is driven by geotech results and local code; common options are slab-on-grade, crawlspace, or full basement. For a DIY-friendly approach, slab-on-grade is often simplest, but local freeze depth may mandate footings below frost line.
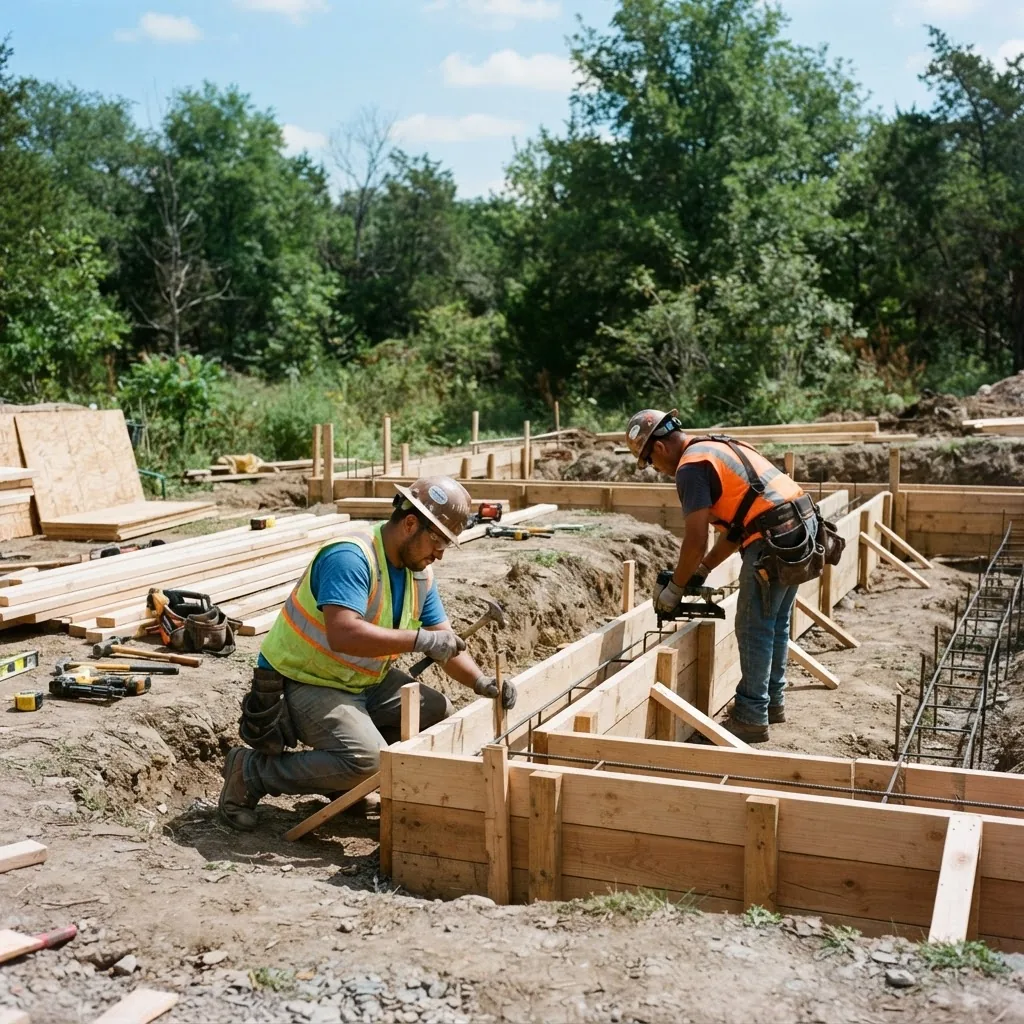
- Excavate and set batter boards and control lines. Excavate to design depth; use batter boards and stringlines to locate footings within ±1/4″ at corners. Check elevations with a laser level. Equipment: mini-excavator or rented excavator; sod removal and stockpile soil.
- Install formwork and reinforcement. For strip footings, build 2x form boards and set 16″ compacted aggregate base. Place rebar per structural drawings—typical 2-#4 continuous with #3 stirrups at 18″. Tie rebar securely with 16-gauge tie wire.
- Pour concrete footings and foundations. Ready-mix is preferred for consistent strength. Aim for 4,000 psi mix for foundation walls; pour in continuous lifts and consolidate with an internal vibrator. Cure for 7 days before heavy loading; maintain moisture during curing.
- Waterproof and backfill. Apply self-adhesive membrane or bituminous coating below grade and 6″ insulation if required by energy code. Backfill in 6–8″ lifts and compact to 90% relative compaction.
- Build floor system and subfloor. LVL or engineered rim joists are common; install joist hangers per manufacturer torque specs. Use 3/4″ tongue-and-groove OSB or plywood subfloor, fasten with ring-shank screws and adhesive for squeak prevention.
- Framing—raise walls and secure load paths. Follow platform framing practice: build wall panels flat, raise with a crew (3–6 people), temporarily brace every 8′ vertically and check plumb. Install headers and ensure continuous load paths to foundation with hold-downs or straps per structural detail.
- Roof framing and trusses. Choose between site-built rafters or factory trusses. Trusses save time; ensure delivery and installation scheduling. If installing rafters, mark birdsmouths and use hurricane ties at common rafters.
Recommended materials and tools: pressure-treated sill plates, galvanized connectors, framing nails (16d and 8d), framing nailer (21° coil), hammer tacker, SDS hammer drill, circular saw, chalk line, pry bar. Typical cost range for foundation+framing for a 1,600 sq ft house: $35,000–$70,000 depending on materials and DIY labor input.
For framing techniques overlapping with remodeling, consult home improvement remodeling process.
Transition: With structure in place, protect the shell from weather and lock in building envelope performance through proper roofing and exterior work.
Step 3: Roofing and Exterior Work
Roofing and exterior finishes protect the structure and determine long-term durability and energy performance. Choose materials by climate, budget, and maintenance expectations.
- Asphalt shingles — common, economical: $3–$6 per sq ft installed. 20–30 year life for 3-tab; architectural shingles 30–50 years.
- Metal roofing — durable, lightweight: $7–$12 per sq ft installed; excellent for snow-shedding and longevity (40+ years).
- Tile or slate — premium, high-weight: $12–$25+ per sq ft; requires reinforced framing.
Key exterior tasks and cost notes:
- Install weather-resistant barrier (WRB) like Housewrap—$0.50–$1/sq ft
- Flashing and window installation—use integrated flashing tape at sills and head flashings; expect $400–$1,200 per window installed
- Siding options: fiber cement $6–$10/sq ft installed; vinyl $3–$6/sq ft installed
- Gutters and drainage—budget $3–$8 per linear foot; ensure downspouts discharge 5–10′ away from foundation
For professional tips on efficient exterior work, see expert home improvement strategies.
Transition: Once the shell is weather-tight, you can schedule mechanical rough-ins without risk of water damage—next up: electrical, plumbing, and HVAC rough-ins.
Step 4: Rough-ins – Electrical, Plumbing, and HVAC
Rough-ins create the building’s mechanical network. For DIYers, certain tasks are reasonable to learn (running non-powered plumbing and low-voltage), but licensed trades are often required for final inspection and safety compliance.
-
Plan circuits, panel, and loads. Create an electrical one-line diagram: list major circuits (kitchen appliances, HVAC, electric range, dryer) and calculate loads per the NEC. Most jurisdictions require licensed electricians to sign permit electrical work. For safety, leave main panel termination to a pro if you’re not licensed.
Reference standards from the International Code Council for wiring and safety: International Code Council.
- Run wiring and boxes. Use NM-B or conduit where required; staple cables within 8″ of boxes. Standard branch wire sizes: 14/2 for 15A, 12/2 for 20A, 10/3 for 30A circuits. Leave 6″ of slack at boxes and label circuits on a panel schedule.
- Plumb rough-in drain, waste, and vent (DWV). Slope horizontal drain lines 1/4″ per foot for 2″ pipes. Use 3″ or 4″ stack for main soil stack. Pressure tests (air or water) are required by most inspectors.
- Install HVAC ductwork and rough-in equipment. Size ducts to maintain listed CFM per room (manual J/S/D outputs). For DIY ductwork, use rigid ducts on main runs and flexible ducts for runs under 10′. Coordinate with HVAC contractor for final equipment sizing and commissioning.
- Schedule rough inspections early. Rough inspections must occur before insulation/drywall. Failures add days; common causes are incorrect box fill, incorrect slope on drains, and unprotected penetrations.
- Trade-offs between DIY and pro work. DIY pros: savings on labor, learning skills. Cons: possible permit denial, code mistakes, insurance implications, and time cost. For electrical mains, gas connections, and HVAC refrigerant work, hire licensed contractors to ensure safety and pass inspections.
Safety caveats: never work on live circuits; always lock out and tag circuits. For gas piping or refrigeration, licensed technicians are required in many jurisdictions. According to a 2023 safety standards publication from a national construction body, electrical-related failures are a leading cause of home fire risk when DIY wiring bypasses code—hire a pro for final terminations.
Transition: After passing mechanical rough inspections, seal the envelope with insulation and finish interior surfaces with drywall and finishes.
Step 5: Insulation, Drywall, and Interior Finishes
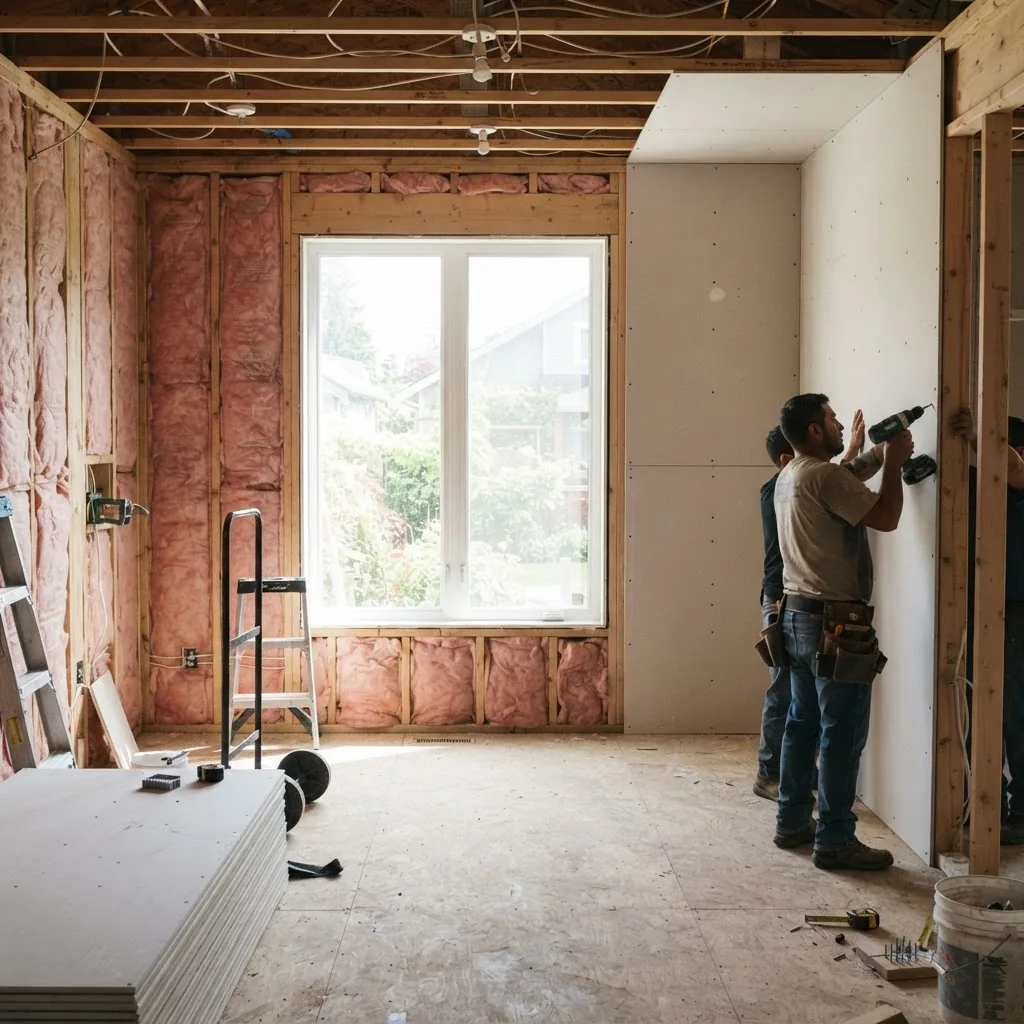
This stage turns a frame into a livable space. Choose insulation for R-values that meet or exceed local code and energy goals. Typical assembly: insulation, air sealing, drywall, taping/mudding, sanding, primers, and final finishes.
- Install insulation and air sealing. For temperate climates, exterior wall R-values are commonly R-13–R-21 (cavity) and R-5–R-10 continuous exterior. Use closed-cell spray foam for high-performance but factor cost: closed-cell $1.50–$3.00/sq ft; fiberglass batts $0.40–$0.60/sq ft. Seal penetrations with foam or caulk: vents, sill plates, and around windows.
- Hang drywall. Use 1/2″ drywall for walls, 5/8″ for ceilings where span requires. Hang sheets horizontally where possible, stagger joints. Fasten every 12″ on ceilings and 16″ on walls with screws; leave 1/8″ gap at floor and trim later.
- Tape, mud, and sand. Apply three-coat system: taping compound, first coat, and finish coat. Sand between coats with 120–220 grit; avoid over-sanding to prevent joint visibility.
- Prime and paint. Use a high-adhesion primer and two coats of finish. Typical paint coverage: one gallon covers ~350–400 sq ft; calculate square footage and add 10% waste.
-
Install flooring and cabinetry. Flooring options: engineered hardwood $6–$12/sq ft installed; laminate $2–$5; tile $5–$15. Cabinet installation: pre-assembled stock cabinets reduce time; custom cabinetry raises cost dramatically.
For creative finishing and decor projects, consult DIY home decor ideas and tutorials and handmade home decor projects.
-
Typical cost and time estimates. For a 1,600 sq ft home: insulation and drywall combined typically take 3–4 weeks and cost $8,000–$20,000 depending on insulation type and whether you finish drywall yourself. Interior finishes (paint, floors, cabinets) commonly take 6–10 weeks and cost $20,000–$50,000.
For additional guidance on interior cost planning, see interior remodeling costs and design.
Need small project ideas to personalize finishes? See things to make at home DIY ideas for simple, high-impact projects.
Transition: Once interiors are finished, you complete systems checks, install fixtures, and prepare for move-in while addressing landscaping and exterior final items.
Step 6: Final Touches and Project Completion
- Install fixtures and appliances. Install lighting fixtures, switches, and finalize plumbing fixtures. Run commissioning tests on HVAC and get refrigerant charge and airflow verified. Test all GFCIs and AFCIs.
-
Complete exterior grading and landscaping basics. Grade soil to direct water away from foundation at least 5% slope for the first 10 feet. Install basic landscaping beds and mulch to control erosion.
For outdoor finishing options and cost planning, review outdoor wood projects and costs.
- Final inspections and certificate of occupancy. Schedule final inspections for electrical, plumbing, HVAC, and building. Correct any punch list items promptly. Obtain certificate of occupancy before moving in.
- Move-in readiness and warranty notes. Confirm manufacturer warranties and contractor handover documents: as-built drawings, operation manuals, and maintenance schedules.
-
Common pitfalls at completion. Check door clearances, finish nail pops, paint touch-ups, and grading. Small items left uncorrected can become bigger warranty issues later.
After move-in, consider major improvement ideas in best home improvement renovations.
Final completion checklist
- Certificate of occupancy or equivalent obtained
- All major systems commissioned (HVAC, electrical panel, plumbing drains)
- Permanent utility connections confirmed
- Warranty and maintenance paperwork uploaded to a project binder
- Exterior grading and downspout discharge verified
Transition: With systems operational, the final major piece is understanding costs and how to budget through each stage with realistic safety margins.
Cost Breakdown and Budgeting Tips for DIY Home Building
This section gives a practical cost table for a typical 1,600 sq ft single-family stick-built home and explains budgeting methods and financing considerations. Costs are ranges—your local market, material choices, and labor decisions will move numbers materially. According to a 2024 housing market industry report, material price volatility remains a top driver of cost variation.
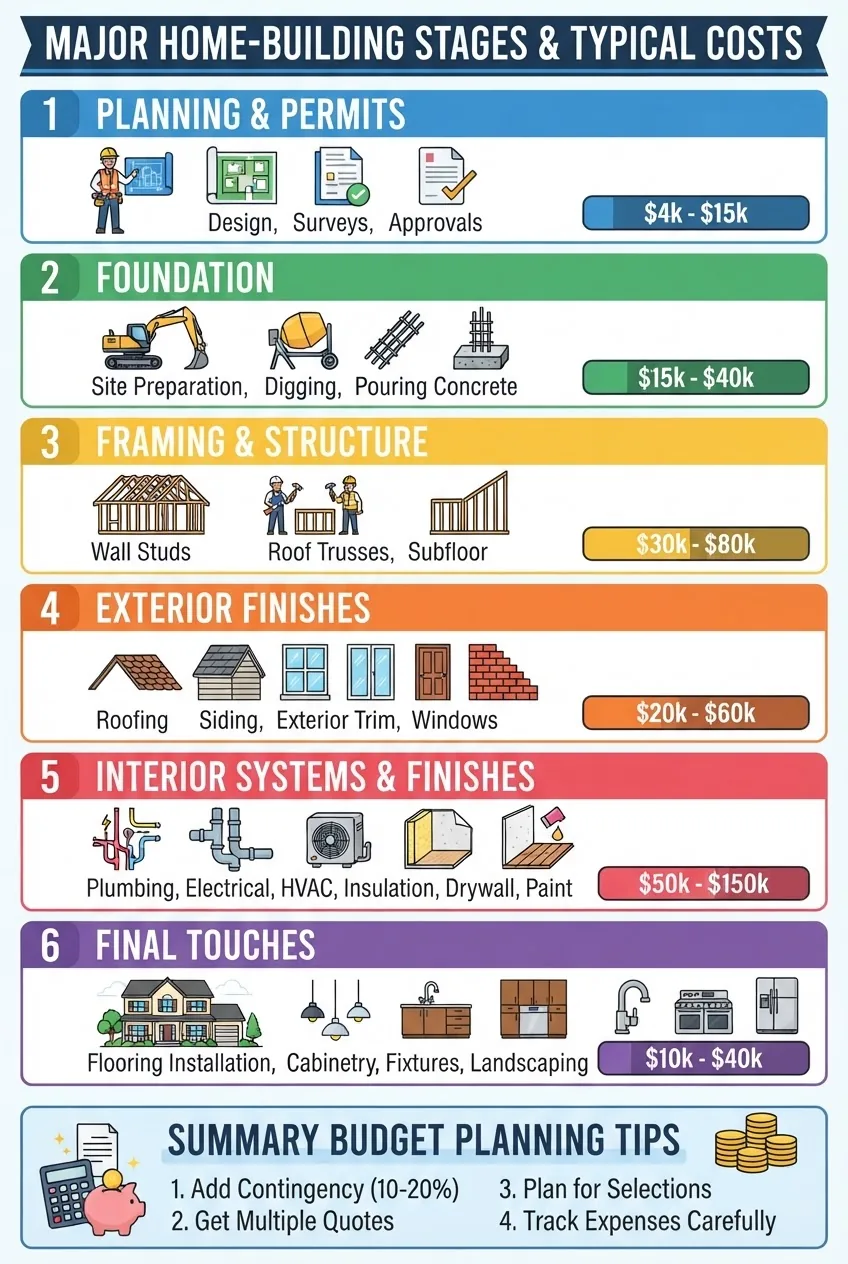
| Stage | Typical % of Total | Estimated Cost Range (1,600 sq ft) |
|---|---|---|
| Planning & permits | 1–3% | $2,500–$7,500 |
| Foundation | 8–12% | $15,000–$35,000 |
| Framing | 12–18% | $20,000–$45,000 |
| Exterior & roofing | 8–12% | $12,000–$30,000 |
| Mechanical systems | 10–15% | $20,000–$40,000 |
| Interior finishes | 15–25% | $30,000–$60,000 |
| Final touches & landscaping | 1–4% | $2,000–$8,000 |
Budgeting tips (hands-on):
- Use a line-item budget spreadsheet. Break down each trade, material, permit, and contingency separately. Update weekly.
- Keep a 10–20% contingency. Reserve at least 10% for small surprises; increase to 20% in volatile markets or older lots.
- Finance smartly. Construction loans convert to mortgages; shop for draw schedules that match your planned milestones.
- Labor vs. materials trade-offs. DIY labor saves money but costs time—value your time at an hourly rate to avoid hidden losses.
- Shop long-lead items early. Windows, doors, and major appliances can take 6–12 weeks; ordering late delays completion.
To reduce costs after move-in, explore affordable home improvement ideas. For budget designs and renovation strategies, see budget home renovation strategies and home renovation budget and design ideas.
For market-level cost trends and data, consult housing research sources such as Zillow Research and industry reports from NAHB (2024 reports).
Transition: Even with careful planning, common challenges occur—next section addresses how to handle them.
Troubleshooting Common Challenges in DIY Home Construction
This section lists actual problems encountered on DIY builds and how to solve them based on hands-on experience.
-
Permit delays. Problem: permits take longer than projected, delaying procurement and subcontractor schedules. Solution: submit complete packages, book early inspections, and plan buffer weeks.
If you need more help managing renovation schedules and costs, see DIY home renovation and cost tips.
- Weather impacts. Problem: heavy rain stalls foundation and framing. Solution: plan critical exterior work for dry months, protect exposed framing with tarps, and have an extra 2–4 weeks in schedule for seasonal weather.
- Structural errors. Problem: out-of-plumb walls or undersized headers discovered mid-build. Solution: stop framing, consult structural engineer, retrofit with engineered beams or steel straps; cost of correction can exceed $2,000 depending on severity.
-
Cost overruns. Problem: material price spikes. Solution: lock in pricing for long-lead items and use alternative materials where performance remains acceptable. Keep the contingency intact.
When reusing older materials or renovating, see old home renovation cost and design tips.
-
Safety concerns. Problem: inexperienced crews risking falls or improper electrical work. Solution: insist on fall protection, proper lockout/tagout, and capped conduit. For complex electrical/plumbing, hire licensed pros and hold documented inspections.
For post-construction maintenance and repair guidance, see home repair tips and cost estimates.
More on trade-offs: hiring pros reduces schedule risk and shifts liability; DIY reduces cash outflow but increases personal time investment and responsibility for compliance.
Conclusion: Is Building Your Own Home Right for You?
Building a home yourself can deliver cost savings, deeper control over design, and the satisfaction of creating your own dwelling. However, it requires discipline, realistic scheduling, a solid budget with contingency, and respect for code and safety—especially for electrical, gas, and structural work. If you value hands-on involvement and can commit months of work (or manage subcontractors), a DIY owner-builder route is feasible.
Final recommendation: start small—try project-based learning from our pillar resource on broader DIY skills before a full build. Explore the DIY Home Improvement Projects Guide with Tips and Ideas to grow the skills you’ll need.
Key takeaways: plan thoroughly, hire licensed trades for high-risk systems, keep at least 10–20% contingency, and keep meticulous records for inspections and warranties. If you’re ready, start with permit applications and a geotechnical report this week—then schedule your first rounds of bids.
Common mistakes and how to avoid them (first-person practitioner notes)
I once underestimated window lead times and lost three weeks waiting; now I order windows as soon as design is locked. I also tried to DIY main service termination and had the inspector refuse final sign-off—learned to hire the licensed electrician for panel work. Finally, early on I under-budgeted for grading; always keep 15% contingency for site surprises.
Compact verification checklist
- Permits approved and posted on site
- Geotechnical report completed and foundation set accordingly
- Rough inspections passed before insulation
- Final inspections and CO received
- Warranties and operation manuals in project binder
When to call in a professional
- Electrical main service connection and complex panel work
- Gas piping and mechanical refrigerant work
- Structural corrections or engineered beam installations
- Any work that local code requires a licensed professional for final inspection


