


By the end of this hands-on guide you’ll have a prioritized, actionable plan to improve your home, the ability to complete common home improvement tips and DIY home repairs, and a checklist to maintain results. Realistic timeframes: planning 1–2 weeks; small projects 1–4 weeks; moderate renovations 1–6 months. Skill level: beginner to intermediate DIY with clear thresholds for when to hire pros.
Introduction to Home Improvement Tips

This guide focuses on strategic, high-impact advice to help you get results efficiently. Whether your goal is better comfort, increased home value, or simply smoother day-to-day maintenance, a few core principles return the most value: clear home improvement planning, sensible budget management strategies, and realistic timelines.
If you want project-level walkthroughs after reading this strategic guide, consult the comprehensive projects directory for detailed instructions and tutorials.
DIY Home Improvement Projects Guide with Tips and Ideas
You’ll also find targeted sections on material selection tips, essential tools for DIY projects, safety procedures, and how to weigh hiring contractors vs DIY. If your intent is purely DIY project-level guidance, see the projects directory below for step-by-step builds.
This Introduction covers planning basics and the benefits of strategic work: improved comfort, fewer emergency repairs, and measurable increases to resale value. We’ll define terms you need: a retrofit is an upgrade applied to an existing system (for example improving insulation in an existing wall); a load-bearing wall supports structural weight and must not be removed without engineering review.
Before you start: quick prerequisites and expectations are listed below.
Before you start
- Permits knowledge: verify local permit rules (city/county) for electrical, plumbing, structural changes.
- Basic safety gear: eye protection, respirator (N95 for dust), gloves, knee pads.
- Essential tools: cordless drill (18V), adjustable wrench, stud finder, tape measure, level (48″), multi-bit screwdriver set, utility knife, reciprocating saw for demo.
- Materials planning: a simple bill of materials with 10–20% overage for waste on cuts and mistakes.
- Time blocks: reserve 2–4 hour blocks for daily tasks to maintain momentum.
Proceed to the strategic planning section for the five-step approach to choose the right projects and order them for maximum impact.
Strategic Planning and Prioritization for Home Improvement
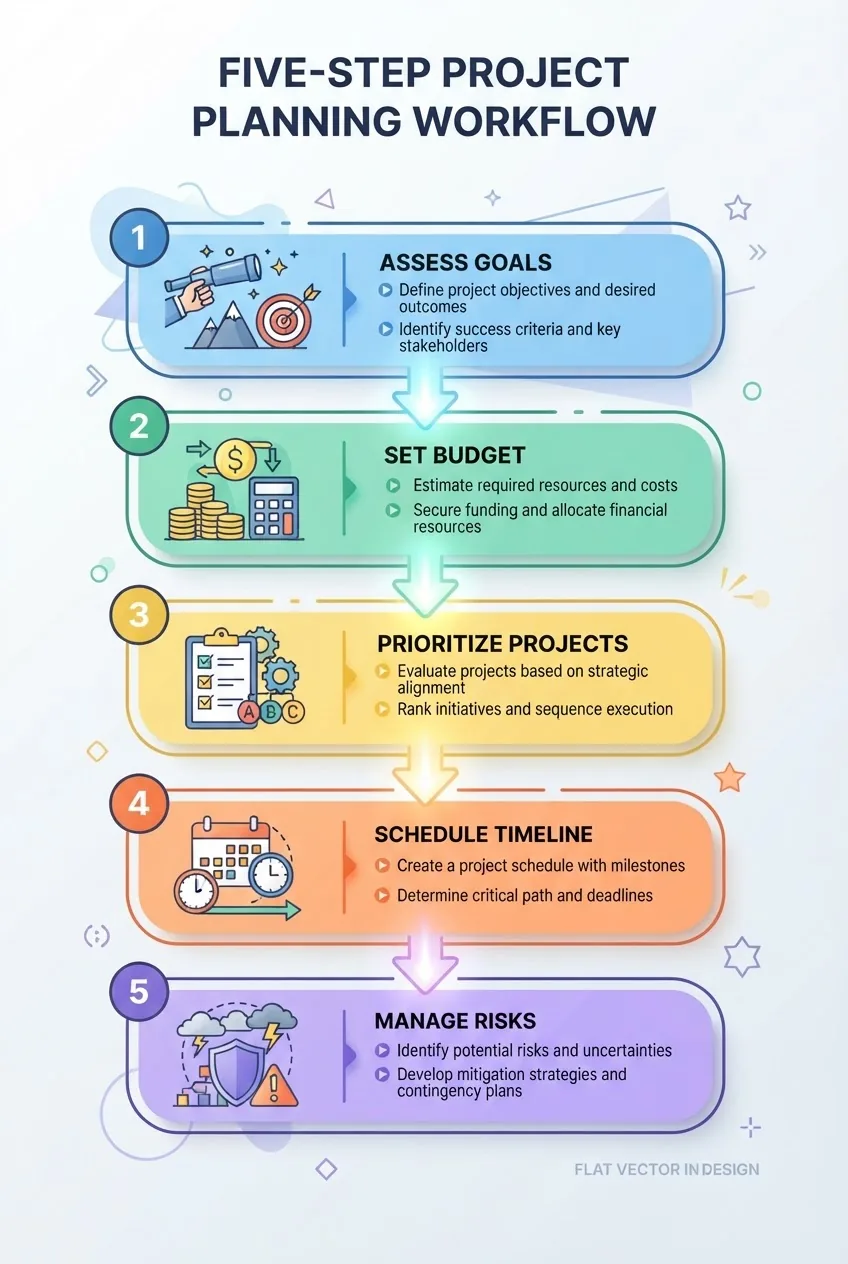
- Assess goals and condition: Walk every room and list issues and opportunities in three columns: Safety, Function, and Value. Use a simple SWOT analysis: Strengths (good systems), Weaknesses (leaky roof), Opportunities (unfinished basement), Threats (outdated wiring). This clarifies priorities—safety items (e.g., smoke detectors, electrical faults) always outrank cosmetic upgrades.
- Set realistic budget boundaries: Create three tiers: Essential (10–25% of available budget), Improvement (35–60%), Stretch (remaining). For budgeting specifics see curated affordable home improvement options that map low-cost choices to high-impact outcomes. Always reserve 10–15% contingency for surprises.
- Prioritize by impact-per-dollar: Rank potential projects using a simple score: Safety (3x weight), Value (2x), Comfort (1x). Combine with estimated time. For design and budget pairing explore budget-friendly renovation ideas.
- Build a phased timeline: Schedule in phases: Phase 1 – urgent fixes (0–3 months), Phase 2 – high ROI upgrades (3–9 months), Phase 3 – aesthetic or long-term investments (9–24 months). Use calendar blocks and set milestone reviews every 2–4 weeks to re-assess scope and costs.
- Manage risks and scope changes: Identify likely risks (permit delays, material shortages, hidden damage). Assign mitigations: for permit delays, apply early; for materials, buy long-lead items first. Consider prefabricated alternatives like house kits and building options for major additions to compress schedule and reduce on-site uncertainty.
- Decide build vs buy vs hire: For whole-home additions, research the home building step-by-step process and compare permits, inspection rounds, and contractor coordination time. Use a decision matrix: Skill required, Safety risk, Code complexity, Time to complete, Cost delta. If more than two high-risk categories apply, hire a licensed pro.
affordable home improvement options
budget-friendly renovation ideas
house kits and building options
Practical tip: treat planning like a recipe—measure, set timers, and batch similar tasks. Keep an implementation board (physical or digital) with tasks, owners, deadlines, and contingency notes. That discipline prevents scope creep and budget overruns.
Transition: With priorities set, move into essential practices that keep projects safe, efficient, and durable.
Essential Home Improvement Tips and Best Practices
This section provides hands-on, tool-level steps and selection rules you can apply on projects from painting to partial kitchen refreshes. Where a longer procedure is required, a step is expanded into an
with quantities and timings.
- Inspect and fix safety issues first: Confirm smoke/CO detectors, check GFCI outlets in kitchens/bathrooms, and repair exposed wiring immediately. Use a circuit tester and label panels. If wiring is more than 25 years old or shows cloth insulation, hire an electrician.
- Choose quality over flashy finishes: For high-traffic zones like entryways, select wear-rated materials—porcelain tile (PEI 4–5) for durability or laminate with AC rating 3+ for budget installs. Match material life to project priority.
- Select tools correctly: For general DIY, buy an 18V cordless drill with a clutch (min 40 Nm torque), a circular saw with a blade diameter of 7-1/4″ for crosscuts, and a random-orbit sander (120–220 grit range). Rent heavy equipment—tile saws, jointers—if used under 10 times per year.
- Prep thoroughly before painting: Scrape loose paint, sand glossy areas with 120–150 grit, prime with stain-blocking primer on bare wood or repairs, and use 2 coats of quality paint (e.g., 300–400 sq ft per gallon coverage). Allow 4 hours dry between coats at 21°C and 50% humidity.
- Measure twice, cut once—and mark for mistakes: For carpentry: measure, mark, clamp, then cut. When assembling cabinets, pre-drill pocket holes with a jig and use #8 1-1/4″ pocket screws for face frames. Allow 1–2mm for wood movement.
- Understand trade-offs: DIY vs professional: Low-skill, low-code tasks like painting, replacing hardware, or installing shelving are ideal for DIY. High-risk items—structural changes, main electrical, gas line work—require licensed contractors. For deciding, score tasks on a 1–10 risk scale: 7+ hire a pro.
- Manage dust and containment: For demo, set up a negative-pressure fan if removing drywall more than 10 sq ft, seal doorways with thick plastic sheeting and zipper doors, and use HEPA vacuums. Protect HVAC: close vents and replace filters after work.
- Use correct materials for moisture-prone areas: Install cement backer board under tile in showers, use mold-resistant drywall (green board) in damp zones, and seal seams with appropriate tape and thinset rated for wet areas.
- Plan for inspections and warranties: Keep receipts and photos by date for every major change. Many materials have 1–10 year warranties—register product warranties where required and maintain an inspection checklist to meet warranty conditions.
- Small structural work—follow engineered specs: When altering a wall, confirm if it’s load-bearing. If so, get engineered plans and specify beam sizes. A common rule: a single-story removal over spans >6′ generally needs engineered support. When in doubt, consult a structural engineer.
- Insulate and seal before finishing: Update insulation where walls are accessible. For attics, aim for R-38–R-60 depending on climate. For walls, use closed-cell spray foam for air sealing when budget permits; otherwise install fiberglass with sealed edges and add a continuous air barrier.
- Handle flooring transitions carefully: Use transition strips where different materials meet and maintain recommended expansion gaps: laminate/engineered wood usually 8–12mm at edges; tile grout joints per manufacturer specs.
- Finishing touches matter: Install door hardware at 36″ from floor for consistency, use consistent paint sheen for trim (semi-gloss) vs walls (eggshell), and seal exterior penetrations with backer rod and a quality exterior-grade sealant to prevent water intrusion.
- Document your work and label systems: Photograph before and after, label shutoffs and circuit breakers, and store manuals and receipts in a digital folder. This matters for future maintenance and resale.
- Start small and scale skills: Practice carpentry with a simple floating shelf project: use 1×6 pine, two 16″ long cleats screwed into studs with 3″ screws; keep shelves 16–20″ deep. If comfortable, progress to cabinet face frames or door hanging.
Expanded procedure: Replacing a bathroom faucet (time: 60–90 minutes)
- Turn off water and drain lines: Close sink shutoffs, open faucet to relieve pressure.
- Remove old faucet: Use a basin wrench, disconnect supply lines, and clean deck surface.
- Install new faucet: Apply plumber’s putty or supplied gasket, seat faucet, tighten mounting nuts to hand+quarter turn (do not over-torque), reconnect flexible supply lines with 3/8″ compression fittings tightened finger-tight plus 1/4 turn.
- Test for leaks: Turn on supply slowly, inspect for drips at fittings for 5 minutes, re-tighten if necessary.
For aesthetic improvements and smaller decorative projects, explore curated best home improvement practices and DIY home decor ideas to combine durability with style.
best home improvement practices
If you want creative DIY accents, try low-cost handmade crafting ideas, simple woodworking from the simple carpentry projects list, or outdoor builds like a bench from the outdoor wood project ideas guide.
Transition: Next, focus on upgrades that lower running costs and increase sustainability.
Energy Efficiency and Sustainable Improvements

Energy upgrades often provide the fastest lifecycle savings and the clearest ROI when prioritized correctly. Consider:
- Insulation and air sealing: Add attic insulation to reach recommended R-values (R-38 to R-60 depending on climate). Seal gaps around window frames and top plates with low-expansion foam or caulk to reduce infiltration by 10–30%.
- Heating and cooling efficiency: Install a programmable or smart thermostat; according to a 2024 industry report, smart thermostats can reduce heating and cooling energy use by around 8–12% (industry report).
- Window upgrades: Replace single-pane windows with double-pane low-E glazing in temperate climates; for colder zones seek U-factor ≤ 0.30. When replacement costs are high, retrofit with interior storm windows to achieve much of the benefit at lower cost.
- Lighting and appliances: Replace incandescent bulbs with LED lamps (lumens per watt 80–120). For appliances, look for ENERGY STAR-rated units—check the EPA database for model ratings.
- Renewable energy options: Evaluate roof solar photovoltaics using a site assessment: optimal orientation, shading, and roof condition. According to a 2024 government energy report, rooftop solar can offset 20–60% of household electricity usage depending on system size and local insolation (government energy report).
- Water-saving measures: Install low-flow fixtures (1.8 gpm showers, 1.28 gpf toilets) and consider a heat recovery ventilator (HRV) or drainwater heat recovery for efficiency in colder climates.
- Sustainable materials: Use reclaimed wood, FSC-certified lumber, low-VOC paints, and bamboo or cork flooring where appropriate. For insulation, consider mineral wool for fire resistance and moisture tolerance; closed-cell spray foam offers air sealing but has higher embodied carbon.
For standards and recommended practices see official guidance from energy authorities and certification bodies.
Trade-offs: closed-cell spray foam gives best air-seal and R-value per inch but costs more and is harder to remove. Mineral wool is breathable and fire-resistant but denser and requires careful air sealing. Choose based on climate, occupancy, and resale expectations.
Transition: After upgrades, a disciplined maintenance routine keeps efficiency gains intact—covered in the next section.
Maintenance and Upkeep: Extending the Life of Your Renovations
- Perform seasonal inspections: Spring: check roof flashings, gutters, and exterior caulking. Fall: service heating systems and test smoke/CO detectors. Allocate 1–2 hours per season for a basic inspection.
- Routine mechanical maintenance: HVAC filters: replace every 90 days (or every 60 days with pets/allergies). Service furnace/AC annually by a licensed technician for safety and efficiency.
- Protect finishes: Re-seal exterior wood decks every 2–3 years; pressure-wash and re-stain with a high-UV formula. Interior high-traffic paint may need touch-ups every 3–5 years depending on wear.
- Plumbing checks: Inspect under-sink cabinetry for dampness quarterly. Replace supply lines older than 15 years. Test shutoff valves annually to ensure operability.
- Warranty and documentation: Keep a file (digital + physical) of installations, service dates, and receipts. Note manufacturer warranty durations (1, 5, 10 years) and schedule maintenance tasks that affect warranty compliance.
- Seasonal HVAC prep: Before winter, bleed hydronic systems and check combustion appliance vents. Before summer, clear condensate lines and ensure outdoor condensers are free of debris.
- Exterior envelope maintenance: Inspect caulking around windows/doors yearly and replace if cracked. Monitor foundation perimeter for soil grading and proper drainage—maintain a 6-inch slope away from foundation for at least 5 feet.
home repair and maintenance tips
Transition: Even with planning and maintenance, projects often hit unexpected snags—read on for common challenges and case-study responses.
Overcoming Common Challenges in Home Renovations
Many renovation projects face predictable hurdles: project delays, budget overruns, contractor communication gaps, permit friction, and material shortages. Below are pragmatic responses illustrated with anonymized, representative case studies.
Case study A — Unexpected structural issue during kitchen remodel: A homeowner removed a non-structural partition and discovered water-damaged posts and signs of earlier termite activity. Response: stop work, document findings with photos, and hire a structural engineer to assess; the engineer specified sistering joists and replacing a 6′ section of sill plate. The project paused 10 days, adding 6% to the original budget but prevented future collapse. Lesson: budget contingency for hidden defects (10–15%).
Case study B — Permit delay and scheduling cascade: A bathroom addition required a plumbing and electrical permit; the local authority had a 3-week backlog. The contractor scheduled other non-permit work first—painting and cabinet measurements—so critical path tasks could wait without labor idling. Lesson: order long-lead items (cabinets, windows) and submit permits early to avoid downtime.
Case study C — Material shortage on tile and fallback plan: During a mid-sized renovation, the specified tile was discontinued. The team sourced a visually similar alternative, reserved transitional trim pieces, and revised the layout to minimize mismatched runs. A transparent change order kept the client informed. Lesson: identify acceptable substitutes in advance and maintain at least 5% flexibility in material choices.
Case study D — Miscommunication with contractor: A homeowner assumed unfinished electrical work included new outlet locations; a marked-up plan had not been signed. The fix: institute a daily photo log and a one-page scope sign-off for each phase. Lesson: use simple, dated sign-offs to reduce disputes and claim creep.
For DIYers tackling tricky problems on their own, we explain common repair work and mitigation measures in a dedicated sibling article on DIY renovation challenges and solutions.
DIY renovation challenges and solutions
If your project grows into a larger remodel, consult specialist resources on remodeling cost and process insights and consider targeted help for older properties using old home renovation insights.
remodeling cost and process insights
Transition: below are final expert strategies you should adopt before and during any project.
Expert Advice and Final Strategies for Successful Home Improvements
Adopt a consultative mindset: think like an adviser rather than a doer. Use these principles when evaluating scope and contractors.
Use a structured evaluation: Before any major decision, run a quick professional SWOT: list structural strengths, identify weaknesses (old systems), opportunities (usable attic), and threats (flood risk). This method clarifies trade-offs and helps when negotiating with contractors.
Get at least three bids and vet credentials: For licensed trades, check references and licenses. Use certified associations to validate contractors—review work portfolios and ask for proof of insurance. For standards and contractor certification guidance see the industry body below.
National Association of the Remodeling Industry (NARI)
Schedule a final inspection and punch list: Reserve 5–7% of the contract value to address punch-list items. Walk through with the contractor at practical completion and verify that code-required inspections have been signed off.
Continuous improvement: After completion, schedule 3-, 6-, and 12-month reviews to check systems, sealants, and finishes. Use findings to refine future project planning.
Document decisions and share lessons: Keep a short “project report” with budget vs actual, key issues, and vendor notes—this becomes your institutional memory for future work.
Common mistakes and how to avoid them (practitioner perspective)
I once saw a homeowner attempt to remove a wall without confirming it was non-load-bearing; the result was a cracked ceiling and emergency pro call. Avoidance: always confirm structural status in writing from an engineer. I’ve also watched people underestimate demo waste—order +15% materials and have a 30–60 gallon job-site trash plan ready.
Final checklist before you sign off
- Permits filed and inspections scheduled/complete.
- Contractor insurance and licenses verified.
- Materials on site for critical path items; long-lead items purchased.
- Contingency fund of 10–15% set aside.
- Punch-list reserved funds (5–7% of contract).
- Warranty registration and maintenance schedule documented.
When to call in a professional
Call a licensed pro when work involves structural modifications, primary electrical panels, gas-line work, or changes that trigger local building permits. If a task scores 7+ on the risk matrix (safety, code complexity, exposure), hire a pro. When in doubt, consult a certified tradesperson to avoid costly rework.
interior remodeling design strategies
Final transition into the wrap-up: summarizing key takeaways and next steps.
Conclusion: Start with a focused plan—assess goals, set budget tiers, prioritize high-impact tasks, then execute with safety, correct materials, and realistic timelines. Use the checklists, maintain your improvements, and call professionals when risk or code complexity requires it. Take one project at a time: your home will improve steadily and predictably.
Ready to start? Choose one high-impact, low-risk project from your Phase 1 list and schedule a weekend to complete it—then re-evaluate progress and update your plan.


