


Living room arrangement ideas you can implement this weekend: by the end you’ll have a measured plan, a sketched layout, and a staged furniture setup ready for refinement. Expect 3–6 hours for a typical living room and this guide assumes basic DIY competence (measuring, simple moving, sketching).
Introduction to Living Room Arrangement Ideas
This hands-on guide focuses on practical, repeatable methods for living room setup and space planning so your furniture looks intentional and functions well. You’ll learn how to zone a room, prioritize focal points, optimize traffic flow, and balance scale and proportion while keeping comfort and style in view. The process below emphasizes doing — measure, sketch, arrange, test — rather than endlessly browsing photos.
For a complementary overview of layout planning principles, see the Living Room Layout Ideas Guide for Furniture Arrangement. It expands on zoning systems and visual hierarchy that we apply step-by-step here.
Before you move on, confirm the outcome you want: relaxed conversation area, TV-focused family room, or mixed-use living space. That decision will drive focal point choice, seating count, and clearance requirements discussed below.
Transition: First, internalize the core principles that shape every successful arrangement.
Key Principles for Effective Living Room Furniture Arrangement
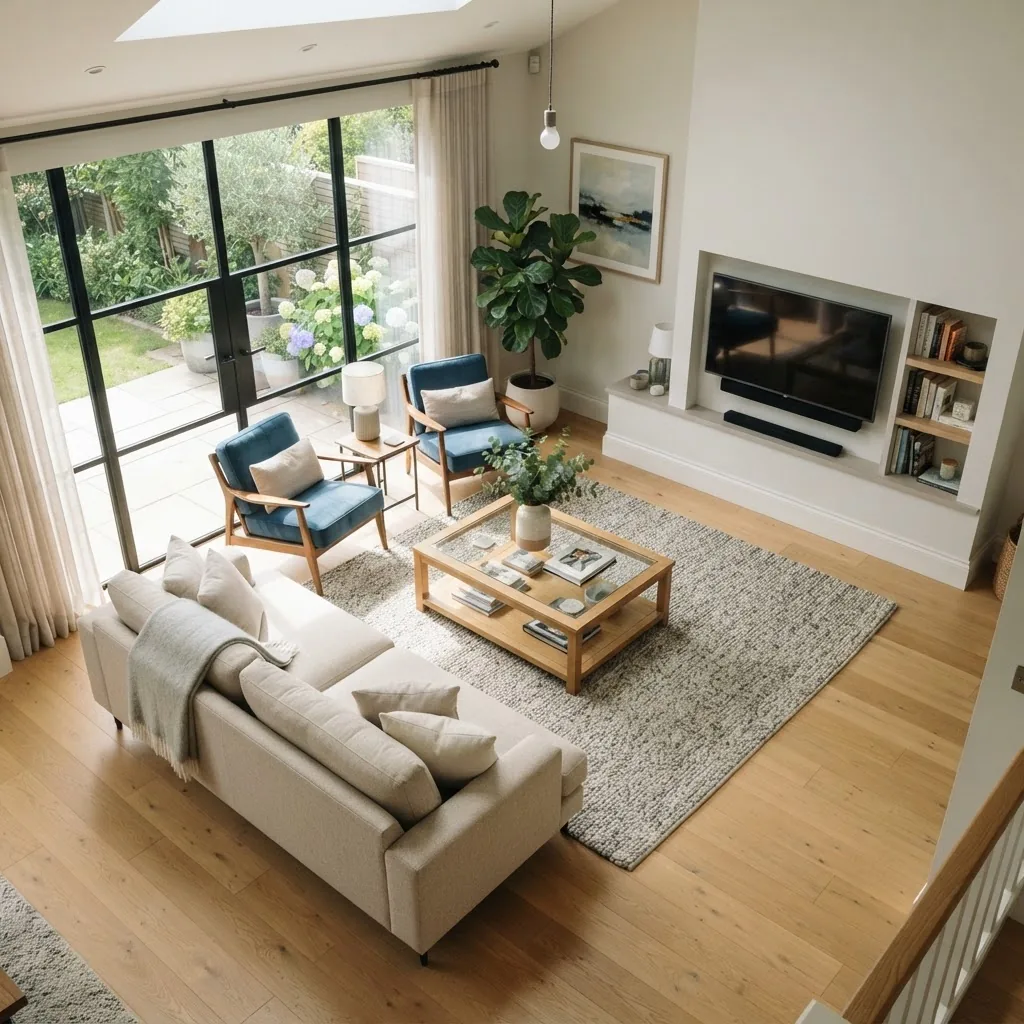
- Prioritize traffic flow — Think of “traffic flow” as the natural path people take through the room. Maintain a 24–36 inch (60–90 cm) main circulation lane; secondary paths can be 18–24 inches (45–60 cm). These clearances prevent furniture from feeling like an obstacle course and support everyday use.
- Identify and respect the focal point — A focal point (fireplace, TV, window, or a large artwork) anchors seating. Arrange primary seating to face the focal point within a 10–45 degree visual range so viewing and conversation are comfortable. When two focal points exist, choose a primary one for anchored seating and use secondary furniture to bridge the two.
- Balance scale and proportion — Match furniture size to room size: in smaller rooms, choose pieces with lower profiles or open legs; in larger rooms, group pieces to avoid lost space. Rule of thumb: leave at least 18 inches (45 cm) between a sofa back and a wall if possible, and ensure coffee tables are 12–18 inches (30–45 cm) from seating.
- Create defined conversation areas — Group seating within a 8–12 foot (2.5–3.5 m) diameter for conversation to avoid shouting. Use rugs, lighting, and tables to create visual zones even in open spaces.
- Maintain visual balance — Distribute visual weight by pairing larger items with clusters of smaller ones (e.g., a large sofa opposite two armchairs and a tall lamp). Symmetry creates formality; asymmetry adds relaxed interest. Choose intentionally based on the style you want.
- Respect clearance and spacing standards — Use standard clearance guides for doors (32–36 inches / 81–91 cm), circulation spaces (see item 1), and walkways around tables (minimum 30 inches / 76 cm to allow seat movement).
- Consider multi-functional furniture — In multi-use rooms select pieces that double up: ottomans that store throws, nesting tables, or sofas with slim profiles that still seat three adults. This supports both utility and style without crowding.
- Layer lighting for function and mood — Plan ambient (overhead), task (reading lamps), and accent (art or wall wash) lighting. Aim for at least three light sources within the main seating zone to control mood and visibility.
- Place accessories with intent — Anchor items to furniture groups: a lamp beside an armchair, a tray on the coffee table to organize remotes, or low-profile stacks of books to support art. Accessories define use and improve comfort.
- Test and iterate — After initial placement, live with the layout for 48–72 hours, noting pinch points and sightlines. Small changes like shifting a rug 6–12 inches or angling a chair 10–15 degrees can dramatically improve flow and balance. According to a 2024 industry report on interior design workflows, iterative testing reduces rework by 35% (source type: industry report).
Below is a compact comparison table of common spacing standards you’ll reference when arranging pieces.
| Relationship | Recommended Distance | Why it matters |
|---|---|---|
| Sofa to coffee table | 12–18 in. (30–45 cm) | Allows comfortable reach and movement. |
| Seating conversation radius | 8–12 ft. (2.5–3.5 m) | Supports conversation without raising voice. |
| Main circulation path | 24–36 in. (60–90 cm) | Keeps walkways comfortable and accessible. |
| Door clearance | 32–36 in. (81–91 cm) | Ensures doors open freely and furniture doesn’t block access. |
Transition: With principles in mind, we’ll move into a detailed, hands-on planning and execution sequence you can follow step-by-step.
Step-by-Step Guide to Planning Your Living Room Setup
This section is the practical core. Follow these ordered steps. Each step begins with an action-first phrase so you can scan and act. Before starting, prepare the items in the “Before you start” list below.
Before you start
- Tape measure (25 ft / 7.5 m) and laser measure (optional)
- Graph paper or printout grid at 1/4″ = 1′ scale (or use room planner software)
- Painter’s tape for on-floor mockups
- Camera or phone for photos, notebook, pencil, and eraser
- Furniture moving helpers or sliders (protect flooring and backs)
- Access to planning tools: we recommend professional tools below
- Measure the room first: Measure length, width, ceiling height, window and door locations, and permanent fixtures. Record these to the nearest 1/4 inch (6 mm). Photograph each wall. If you need precise techniques for dimensioning, see accurate room measurements.
- Note sightlines and focal points: Identify the primary focal point (fireplace, TV, or a view) and any strong secondary axes like a large window. Sketch sightlines from typical seating positions. If multiple focal points conflict, decide which is primary and which will be treated as accent.
- Establish zones: Mark zones for conversation, media, circulation, and a potential reading nook. Use painter’s tape on the floor to approximate each zone: conversation (8–12 ft radius), media (place seating 1.5–2.5 times TV diagonal for viewing), and walkway. Zoning helps even in open-plan spaces where living blends with dining.
- Create a scale sketch or digital plan: Draw to scale on graph paper (1/4″ = 1′) or import measurements into software. For professional-level space planning fundamentals, consult space planning for interior design. If you prefer digital tools, professional software like SketchUp or RoomSketcher can speed iterations (source type: tool websites).
- Block out furniture footprints: Use scaled cutouts on your sketch or drag-and-drop shapes in software. Place large items first (sofa, sectional) then add secondary seating, coffee tables, and storage. Maintain the spacing standards from the Key Principles table.
- Plan for clearance and function: Ensure 24–36 in. circulation paths and enough room for opening doors and cabinets. For an ergonomic seating layout, allow 30–36 in. behind a seated person for comfortable standing and passage. For seating aimed at the TV, measure the viewing distance using the 1.5–2.5x rule of the diagonal screen size.
- Layer lighting and power planning: Place floor lamps near reading chairs, table lamps on side tables, and consider overhead dimmable ambient lighting. Confirm outlet locations; plan cord runs behind furniture for safety and aesthetics.
- Mock up on the floor: Use painter’s tape or moving blankets to outline furniture footprints. Live in the mockup for a few hours (or a full evening) to test flow, sightlines, and seating comfort. This low-effort test avoids heavy lifting mistakes.
- Staging and accessory placement: Add rugs sized to anchor groups (e.g., all front legs on rug for seating clusters in medium rooms; for small rooms front legs only). Place coffee tables 12–18 in. from seating; side tables 2–3 ft (60–90 cm) from the seat center. Use lamps and plants to soften corners.
- Photograph and annotate: Take “before” and “after” photos from consistent angles. Note what works and what creates friction. According to a 2024 industry report on design decision-making, documenting interventions improves final satisfaction rates by over 20% (source type: industry report).
- Iterate over 48–72 hours: Live with the layout. Expect to move a chair 6–12 inches, angle an armchair 10–15 degrees toward conversation, or shift a rug 6 inches to correct scale. Small, timed experiments help you judge comfort vs. style trade-offs.
- Finalize anchoring pieces: Once satisfied, tighten the layout: anchor the seating with a properly sized rug, secure loose items, and add storage solutions where needed. Label the plan for future reference.
- Optional: consult standards and ergonomics: For clearance and furniture ergonomics cite industry standards. The BIFMA site and professional associations provide spacing/ergonomic guides relevant to living room furniture (source type: industry standards websites).
- Reflect on trade-offs: If comfort reduces formality (e.g., deep sofas require larger rugs), document the trade-off and consider multi-functional furniture to preserve both style and use.
- Document and save your plan: Keep the final sketch and photos in a folder for future moves or renovations. Consider uploading the plan to cloud storage and tagging with dates and notes for easy retrieval.
Common mistakes and how to avoid them (practitioner notes)
I once recommended a symmetrical layout in a rectangular living room and learned that symmetry felt stiff for a young family: the balanced look blocked an intuitive flow to the kitchen. We solved it by shifting the sofa off-center 18 inches and adding a casual ottoman to create a secondary path. My takeaways: always test with tape, and don’t lock yourself into formality when everyday movement matters.
Transition: Now that you have a repeatable process, apply these approaches to specific room shapes and use cases to get concrete, visual examples.
Popular Living Room Furniture Arrangement Ideas by Room Type
Different room shapes require different priorities — a square room favors balance, a long rectangle demands flow, open-plan rooms need zoning. Below are practitioner-tested arrangements and short example descriptions you can adapt.
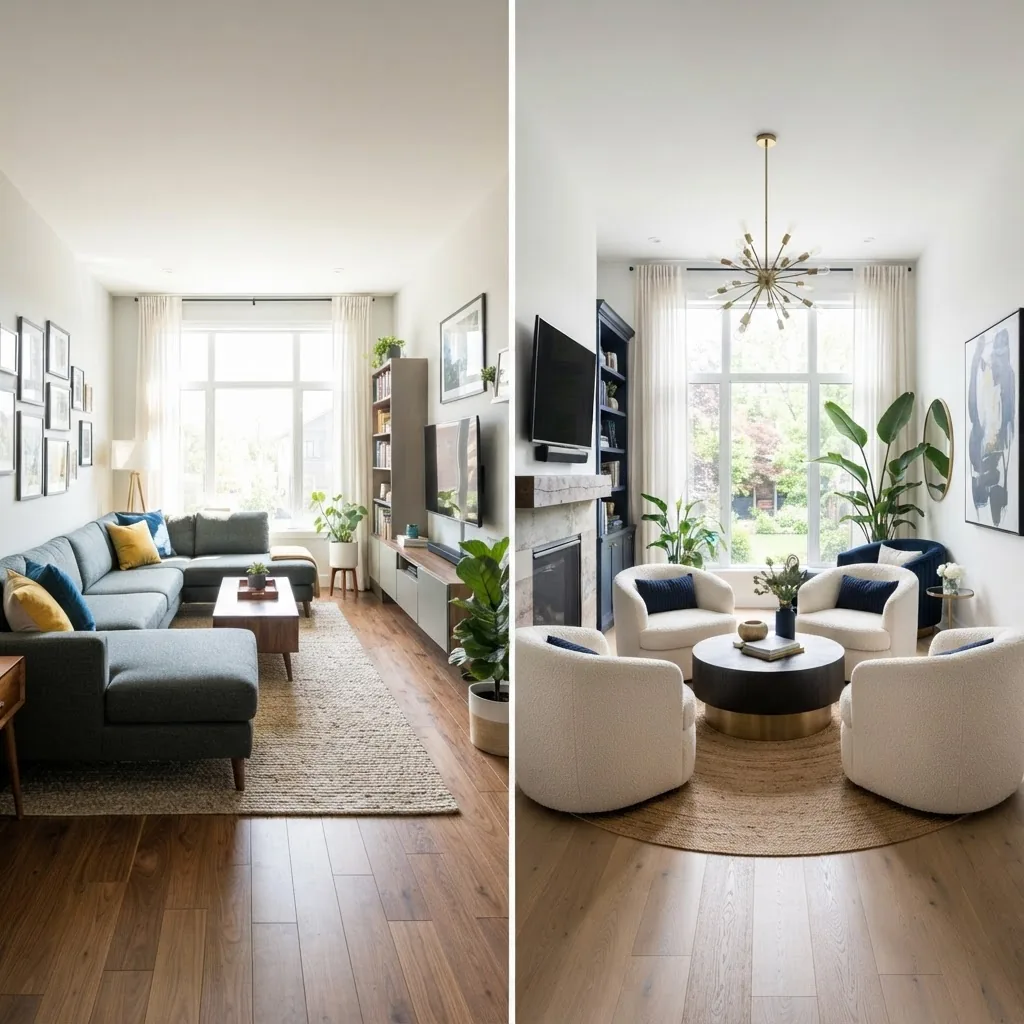
Rectangular Rooms
Approach: emphasize traffic flow along the long axis while creating a strong conversation area. Place the sofa parallel to the long wall, opposite a media unit or fireplace. Use a rug to define the seating area and keep main circulation lanes 30–36 inches. Example: In a 14′ x 20′ room, a 3-seat sofa centered on the long wall, a pair of armchairs opposite angled at 10–15°, and a 48″ x 24″ coffee table maintain balance and comfortable sightlines.
Square Rooms
Approach: promote symmetry or circular arrangements. Center a round rug and coffee table, then place seating around it to create an egalitarian conversation group. Example: In a 14′ x 14′ room, a 42–54″ round coffee table with four seating elements (sofa + two chairs + bench) keeps distance within the 8–12 ft conversation radius.
Open Concept Living Areas
Approach: Zone visually using rugs, floor lamps, and furniture backs as subtle dividers. Define the living area with a rug that holds at least the front legs of sofas and chairs. For integration with kitchens, align the sofa back with the kitchen island to maintain a clear pathway. For planning open layouts, consider advice on open concept kitchen design, open concept kitchen living room floor plans, and broader open floor plan house plans.
Small Living Rooms
Approach: maximize perceived space through scaled furniture and vertical storage. Use a slim sofa (72–84″ length), a narrow console behind the sofa, or a small sectional with a chaise to add seating without bulky pieces. For further seating-specific strategies see seating for small living rooms, small living room furniture layout, and small living room sectional layout ideas.
Multi-use and Shared Spaces
Approach: use translucent screens, rugs, and furniture orientation to create clear functions. If your living area doubles as a guest room or bedroom, consider strategies in living room and bedroom shared space ideas.
Home with Dining or Kitchen Adjacency
Approach: keep circulation between zones intact. Use a low console or bench as a visual divider instead of a full-height wall. For concrete combo-space approaches see living room and dining room combo ideas and consult small-house resources like small design solutions.
Second Living Rooms and Specialty Spaces
Approach: designate the second living room’s prime function (quiet retreat, TV den, or hobby room) and build the layout around it. See second living room ideas for inspiration.
If your room is unusually large or oddly shaped, specialized solutions exist in our awkward living room layout ideas resource.
Transition: Next, learn how to handle furniture around specific focal points like fireplaces and windows so the setup looks intentional and performs well.
Tips for Arranging Furniture Around Common Focal Points
A focal point organizes attention. Below are focused ideas per focal type with quick, actionable tips.
- Fireplace
- Place main seating 8–12 feet from the hearth for conversation and heat distribution.
- When a TV shares a fireplace wall, mount the TV 12–18 inches above the mantel for sightlines or consider a swivel arm on a sidewall TV; avoid placing seating directly at fireplace-center if heat is intense.
- For a case study on fireplace-centered layouts see awkward living room layout with fireplace.
- TV and Media Wall
- Use the 1.5–2.5x diagonal rule for viewing distance. For a 55″ TV, sit 6.5 to 11.5 feet away.
- Arrange seating in a shallow arc to maintain viewing angles and encourage interaction.
- Keep pathways clear behind seating to allow unobstructed passage.
- Large Window or Scenic View
- Create a window-facing seating nook with lower-backed furniture so sightlines are maintained; position seats 2–3 feet from the glass to avoid glare and condensation issues.
- Use neutral, light-reflecting textiles to enhance daylight without adding glare to screens.
- Artwork or Gallery Wall
- Place seating so the artwork is visible at seated eye level (approx. 42 inches from floor to artwork center) or use accent lighting to focus attention.
- Anchor the art with a low credenza or console to balance vertical weight.
- Multi-focal combinations
- When two focal points compete, set the seating to favor the primary function: entertainment or conversation. Use swivel chairs and movable lighting to adapt the room for both uses.
Transition: Beyond layout itself, accessories and lighting finalize comfort and style; apply these rules to upgrade functionality without clutter.
Maximizing Comfort and Style with Accessories and Lighting in Your Living Room Setup
Accessories and lighting are the last 20% that deliver 80% of perceived design quality. Use them to tune comfort, emphasize focal points, and control scale.
Rugs and scale: Choose a rug that fits the seating cluster. For medium rooms, place all front legs of seating on the rug; for small rooms, front legs only. Rug sizes often used: 5′ x 8′ for small sets, 8′ x 10′ for standard sofas plus chairs, and 9′ x 12′ for larger ensembles.
Throw pillows and textiles: Use 2–4 pillows per sofa (vary sizes 16–24 inches). Mix one large lumbar pillow (12″ x 24″) with square pillows for support and visual depth. Layer throws folded on the arm or back for immediate seating comfort.
Curtains and window treatments: Hang curtains 4–6 inches above the window frame and extend 6–12 inches beyond the sides to make windows read larger. Keep bottom hems 1/2 inch above the floor for casual rooms or touching the floor for formal setups.
Accent furniture and storage: Use narrow consoles (10–14 inches deep) behind sofas or against walls to keep surfaces for lighting or display without crowding circulation. Consider media furniture with integrated cable management to keep the setup tidy.
Lighting types and placement:
- Ambient lighting — ceiling fixtures or recessed lights spaced every 6–8 feet for even coverage; use dimmers for flexibility.
- Task lighting — floor lamps with 1,000–1,500 lumens near reading chairs; place lamp bases 24–36 inches from the seat center.
- Accent lighting — wall washes or picture lights with narrow beam angles (15–30°) to highlight art or architectural features.
For family-oriented seating strategies consult comfortable seating for family rooms. For upscale accessory inspiration see elegant luxury living room ideas and modern living room furniture sets.
Transition: Even with careful planning, common mistakes occur—here’s how to identify and fix them before they become permanent.
Avoiding Common Mistakes in Living Room Furniture Arrangement
- Overcrowding the room — Solution: subtract 20% of furniture footprint from your plan to leave breathing room. If a layout feels cramped, remove one item and test circulation for 24 hours.
- Poor traffic flow — Solution: maintain a 24–36 inch main path. If people cut through seating, reposition side tables or angle chairs to open a clear lane.
- Ignoring scale — Solution: measure pieces before buying; use painter’s tape to mock-up oversized furniture. For sofas, select a depth under 38 inches for small spaces and 40–44 inches for deeper lounging styles.
- Blocking focal points — Solution: ensure no tall storage or high-back furniture directly blocks the view to the focal point. If unavoidable, use low-profile alternatives or floating furniture.
- Insufficient seating — Solution: aim for at least seating for the household size plus one guest; add movable seating like poufs or folding chairs stored under a console for flexibility.
- Neglecting lighting — Solution: add at least three sources of light in the main seating area and fit dimmers to control brightness for multiple activities.
- Forgetting function — Solution: define the room’s primary function before arranging: e.g., if watching TV most evenings, prioritize viewing angles over perfect symmetry.
- Using undersized rugs — Solution: choose rugs that at minimum take the front legs of big furniture—undersized rugs visually shrink the room.
- Not testing arrangements — Solution: always test with tape and live in the layout for 48–72 hours; document issues before committing.
- Over-accessorizing — Solution: apply the 3-2-1 rule: three large anchors (sofa, rug, major light), two medium accents (chairs, console), and one standout piece (art or sculptural lamp).
Transition: Ready to finalize? The conclusion below summarizes next steps and provides a quick checklist you can use on-site.
Conclusion and Next Steps for Your Living Room Setup Project
You now have a repeatable playbook: measure, zone, sketch, mock up, iterate, and finalize. Key takeaways: protect traffic flow (24–36 in.), anchor seating around a focal point, scale furniture to the room, and layer lighting across ambient, task, and accent sources.
Compact checklist
- Room measured and sketched to scale
- Primary focal point chosen and seating oriented
- Circulation lanes at minimum 24–36 in.
- Seating within 8–12 ft. conversation radius
- Rug anchors seating appropriately
- Three layers of lighting present in main zone
- Mockup tested for 48–72 hours and photos taken
- Plan saved and labeled for future reference
When to call a professional
- If you must reconfigure plumbing, electrical, or structural elements.
- If circulation conflicts persist after two iterations or if you require built-in solutions.
- When you need to reconcile multiple high-priority focal points in large, unusual rooms — consider a certified interior designer or architect for complex zoning.
Final CTA: Start with measuring this weekend, mock up the plan with painter’s tape, and test for 48 hours. When you’re ready for inspiration or technical drawing tips, consult the practical resources linked throughout this guide to refine your layout.


